Configuring Bacs Manual
The Bacs for FinDock payment extension includes two Bacs Direct Debit options: Bacs Manual and SmartDebit. This article covers the Bacs Manual option which is a self-managed Bacs setup.
FinDock generates Bacs Standard 18 files and processes incoming Bacs reports. These files and reports are manually transferred to and from the Bacs service.
Prerequisites
- FinDock is installed and configured.
- The org is connected to ProcessingHub.
- Your organization is a registered Bacs service user.
- You have a Service User Number (SUN).
- You have Bacstel-IP software or a service for file transfers.
Install and activate Bacs extension
Follow the standard procedure for installing and activating the Bacs for FinDock extension, called BACS.
Add permissions for Bacs extension
Check and assign the required permissions for FinDock and Bacs features. Ensure all package-specific permission sets are correctly assigned.
Adjust FinDock Core mandate settings
In the Bacs Direct Debit scheme, it is strongly recommended to maintain a one-to-one relationship between a payer (Contact or Account) and DDI (Mandate). This helps keep payments and associated reports clear, particularly for reconciliation and indemnity.
Therefore, we recommend that you disable the Reuse existing mandate option for FinDock under the Core mandate settings, but make sure the Autocreate mandate for Direct Debits option is enabled. This setting ensures a new Mandate record is automatically created when needed.
The Mandate Reference setting is not used for Bacs Manual.
Update Payment Schedule layout
The BACS package adds the BACS Processing Date field to the Payment Schedule object. This is an essential input field for collecting Bacs Direct Debit payments. Make sure you add the field to the page layout you are using for the Payment Schedule object.
Add target for Bacs Direct Debit
A target in FinDock defines the bank account that is credited in the Bacs DD collection process. In Bacs terminology, the target is typically the account at the sponsoring PSP. This is the bank that also handles the organization’s application to use the Bacs service and issues the Service User Number.
It is strongly recommended to maintain a one-to-one relationship between the SUN and target. More than one target per SUN could complicate customizations and workflows.
The target configuration includes several essential elements that must be defined correctly to ensure adherence to the Bacs DD rules. The organization’s registered name and SUN on the target, for example, must match the values used in the initial DDI sign-up with the payer.
Bacs Manual target settings
| Setting | Description |
|---|---|
| Name | The name should be transparent and easily recognizable. It is not shown externally but used in Salesforce to distinguish different targets. |
| Target | The payment extension to be used with this target. Select PaymentHub BACS. |
| Type | The Bacs implementation for this target. This affects which settings are needed and how the target is used. Select MANUAL for Bacs Manual. |
| Bank Account Addition | The sort code for your bank branch where direct debits are credited. |
| Bank account number | Your bank account number at your sponsoring PSP where direct debits are credited. |
| Collection file lead time (days) | The collection file is the Standard 18 file that includes DDIs. Your sponsoring bank or Bacs service bureau may have a lead time between your manual file submission to them and when they submit the file to the Bacs service network. You can use this field to record the expected lead time in days. FinDock does not currently use this value when generating collection files, but it can be used for customizing workflows. |
| Company name | The name of your organization as it appears on the indemnity registered with the Bacs service. |
| Company Service User Number | Enter the Service User Number (SUN) allocated to your organization by the sponsoring PSP. |
| DDI lead time | Not used with Bacs Manual |
| DDIs per payer file | Not used with Bacs Manual. |
| Transactions per Collection file | Not used with Bacs Manual |
| Number of generated files | Used to generate a deduplication number for your service bureau or sponsoring PSP. If you haven’t used Standard 18 before, enter 0 (zero). Otherwise, ask your financial officer for the File Number value from the most recent UHL1 record, position 38-40, of your last Standard 18 file. |
Create a Bacs Manual target
To create a new target:
- Launch the FinDock app and select Setup.
- Click the ProcessingHub tile to open up the ProcessingHub setup page.
- Click on the Targets tab and click Add Target to create a new target.
- Add a name for the new target, select ‘PaymentHub BACS’ for Target, and for type, select Bacs Manual.
- Enter the required information about this bank account into the respective target fields and click Save.
Sort code and account check
For Bacs Direct Debit payments initiated through the FinDock Payment API, FinDock automatically performs a sort code and bank account check of the payer information. This helps avoid failed DDI registrations due to incorrectly entered values. The result is included in the synchronous response of the paymentIntent API call.
With FinDock Giving Pages, the checks are also implemented by FinDock. If you are using your own payment form/page design, you need to ensure errors are handled gracefully if invalid information is entered.
In addition to the automated checks, you can use the following validate sort code and bank account combinations:
- In a Flow, for instance, to create or update one-time or recurring payments:
- Apex Action (recommended): use
Check sort code & bank account(apex-paybacs__SortCodeBankAccountInvocable). This is the recommended way of integrating with a Flow. - LWC: use the FinDock component Check Sort Code and Bank Account
- Apex Action (recommended): use
- On a page layout
- Add the Check Sort Code and Bank Account component to Installment, Recurring Payment, Payment Profile, Opportunity, NPSP Recurring Donation, and/or Fundraising objects Gift Commitment, Gift Commitment Schedule and Gift Transaction. Records other than payment profiles need to have a related payment profile for the validation to work.
- For other objects, you can use a Screen Flow and add the Lightning component to your screen and pass one of the supported Objects record IDs related to your record.
- In custom code (Apex): use the global class
SortCodeBankAccountInvocable.
Using Sort Code Bank Account Check in a Flow
To add the sort code and bank account validation to a Flow:
- In your Flow add an Apex Action.
- Search for
Check sort code & bank account(apex-paybacs__SortCodeBankAccountInvocable). - Under Set Input Values, toggle the parameters to “Include”. Note: Please make sure to either toggle Sort code & Bank account OR Payment Profile Id depending on what input variable you wish to use.
- Either manually assign your own variables to the output parameters under “Advanced” or use the default
[api_name_of_your_action].isvalidand[api_name_of_your_action].message.
For input parameters, the Apex Action requires you to either provide a sort code and bank account combination or the record Id of payment profile with those values by mapping a variable to the parameters. When executed, the Apex Action sets two variables that indicate whether the provided combination was valid or not. If the combination is not valid, a message with more information is returned if available.
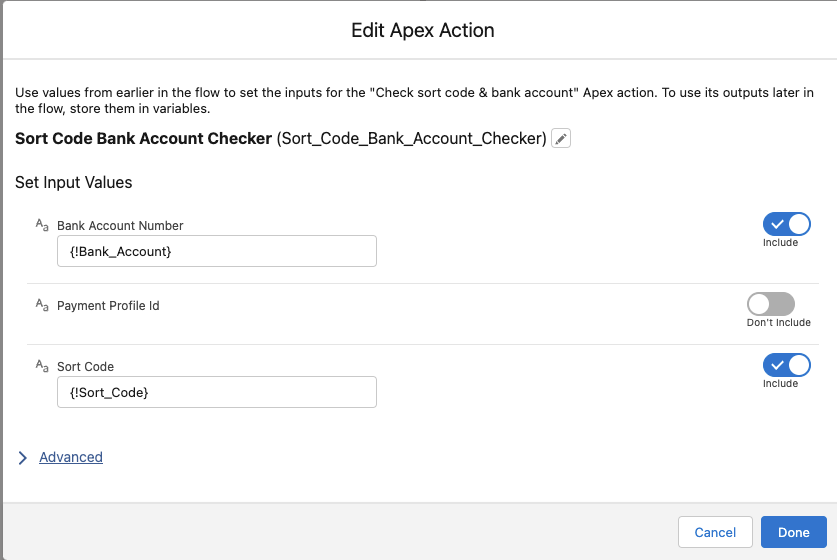
You can either use the output parameters to send the user to a specific screen or redirect them back to the previous screen where they entered the values.
We recommend you implement the Apex Action in an existing screen to have the best user experience. However, you can also directly drag the LWC into your screen flow and pass the same variables to the parameters.
Input Parameters
| Setting | Description | Example Values | API name |
|---|---|---|---|
| Sort Code | Payer sort code | 200000 | - |
| Bank Account Number | Payer bank account | 55779911 | - |
| Payment Profile Id | Payer payment profile for Bacs DD | a0O3X00000gqLUUUA2 | - |
Output Parameters
These can be in your Flow as resources under ACTIONS/Outputs of your Apex Action.
| Setting | Description | Example Values | API name |
|---|---|---|---|
| Is Valid | Whether sort code and bank account combination is valid | True / False | [your_apex_action].isValid |
| Message | Return message from validation service if available | Invalid sort code and bank account combination | [your_apex_action].message |
Using the Sort Code Bank Account Check in Apex
To use the Sort Code Bank Account check in your custom code, implement the Global Class SortCodeBankAccountInvocable, passing either the Payment Profile Id or a sort code and bank account combination as follows:
Sort Code & Bank Account
SortCodeBankAccountInvocable.SortCodeBankAccountRequest request = new SortCodeBankAccountInvocable.SortCodeBankAccountRequest();
        request.bankAccount = '111';
        request.sortCode = '222';
        List<SortCodeBankAccountInvocable.SortCodeBankAccountRequest> requestList = new List<SortCodeBankAccountInvocable.SortCodeBankAccountRequest>{
            request
        };
        List<SortCodeBankAccountInvocable.SortCodeBankAccountResult> result = SortCodeBankAccountInvocable.sortCodeBankAccountInvocableAction(requestList);
Payment Profile Id
SortCodeBankAccountInvocable.SortCodeBankAccountRequest request = new SortCodeBankAccountInvocable.SortCodeBankAccountRequest();
        request.paymentProfileId = 'ABCDEFGHIJKL';
        List<SortCodeBankAccountInvocable.SortCodeBankAccountRequest> requestList = new List<SortCodeBankAccountInvocable.SortCodeBankAccountRequest>{
            request
        };
        List<SortCodeBankAccountInvocable.SortCodeBankAccountResult> result = SortCodeBankAccountInvocable.sortCodeBankAccountInvocableAction(requestList);
To make the Apex action work with a schedule-triggered flow, you must use a Pause element before the Apex action, as explained in this Salesforce article. Please also keep in mind hard Salesforce limits. The bank account and sort code check Apex action is not bulkified.
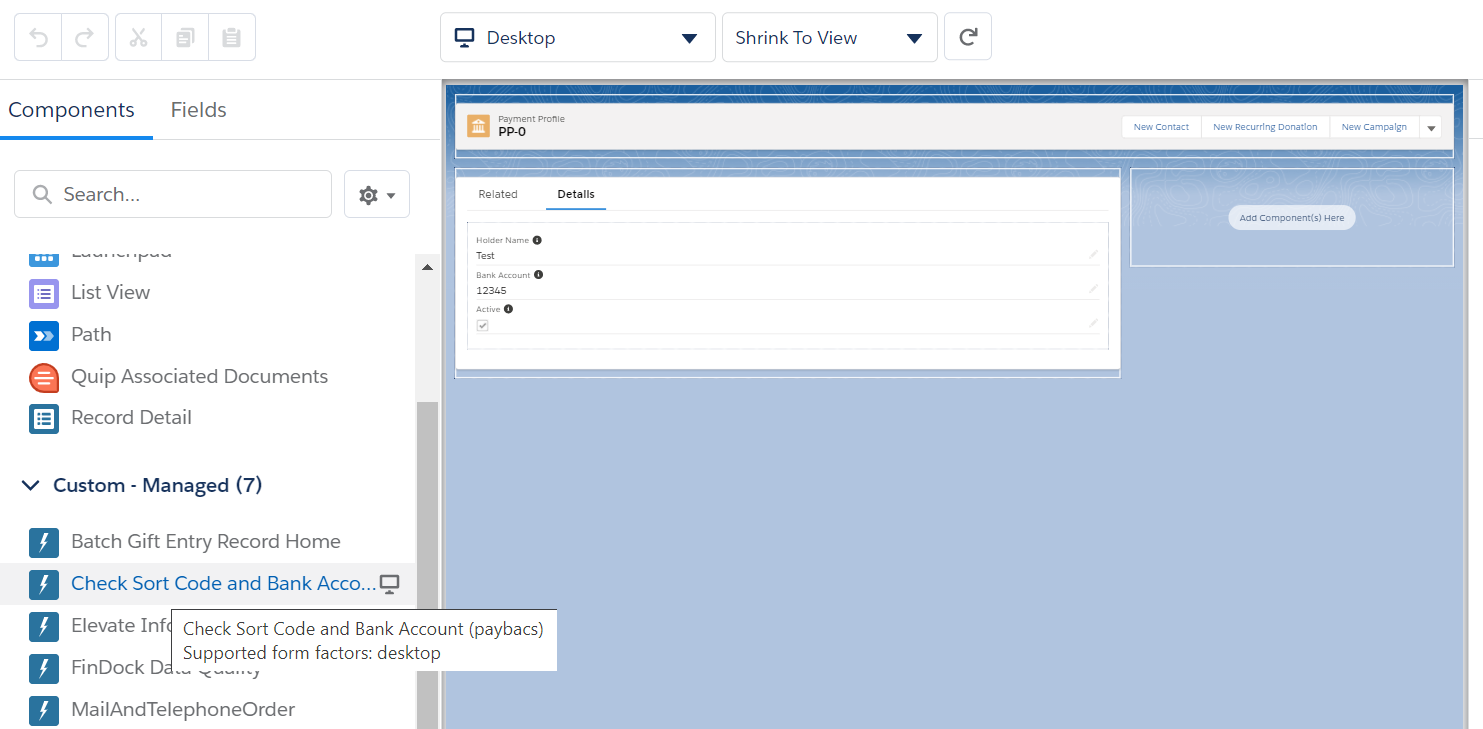
Adding the Check Sort Code and Bank Account to a record layout
You can add the Lightning component Check Sort Code and Bank Account to your Payment Profile layout (or other record - see above) to validate when manually entering payment information.
To set up manual sort code and bank account checking:
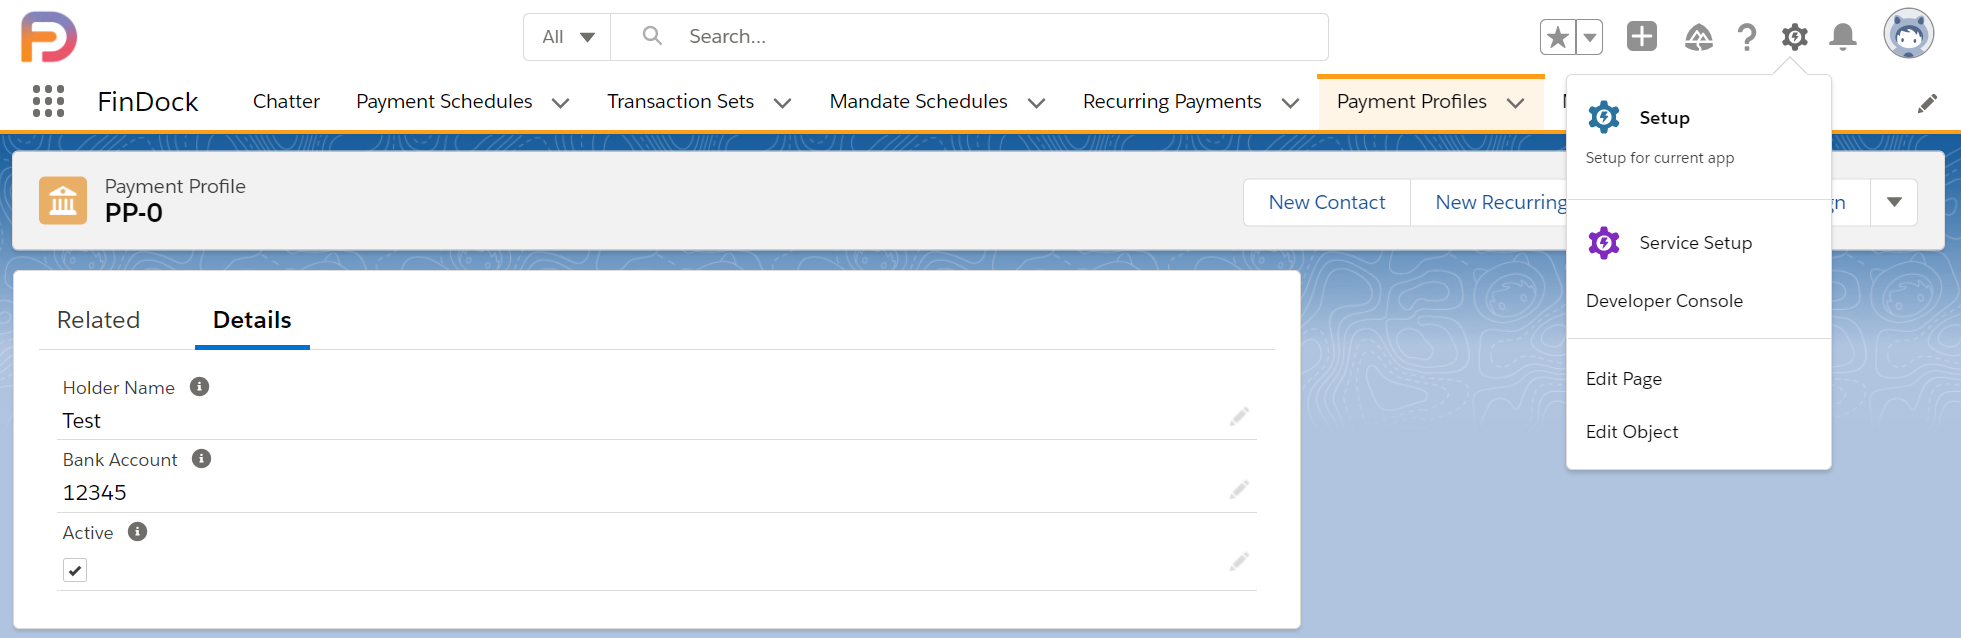
- Go to a Payment Profile record.
- Click the settings cog in the upper right and select Edit Page.
- Drag the Check Sort Code and Bank Account component to your page layout.
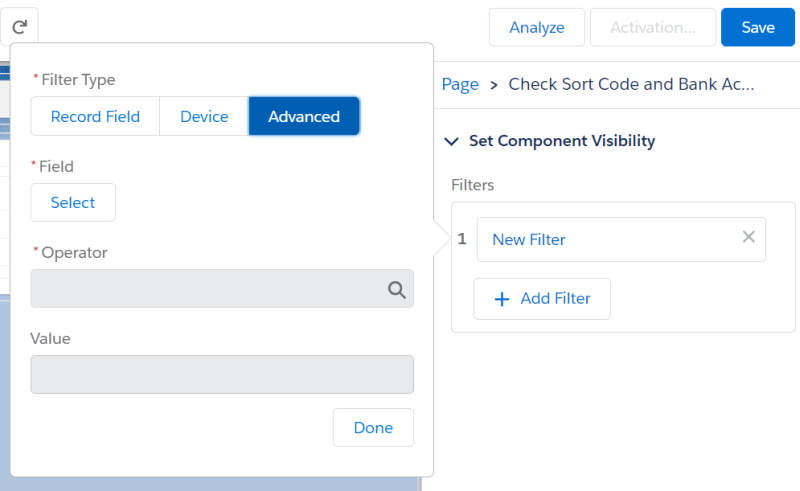
- Click Add Filter under Set Component Visibility to the right.
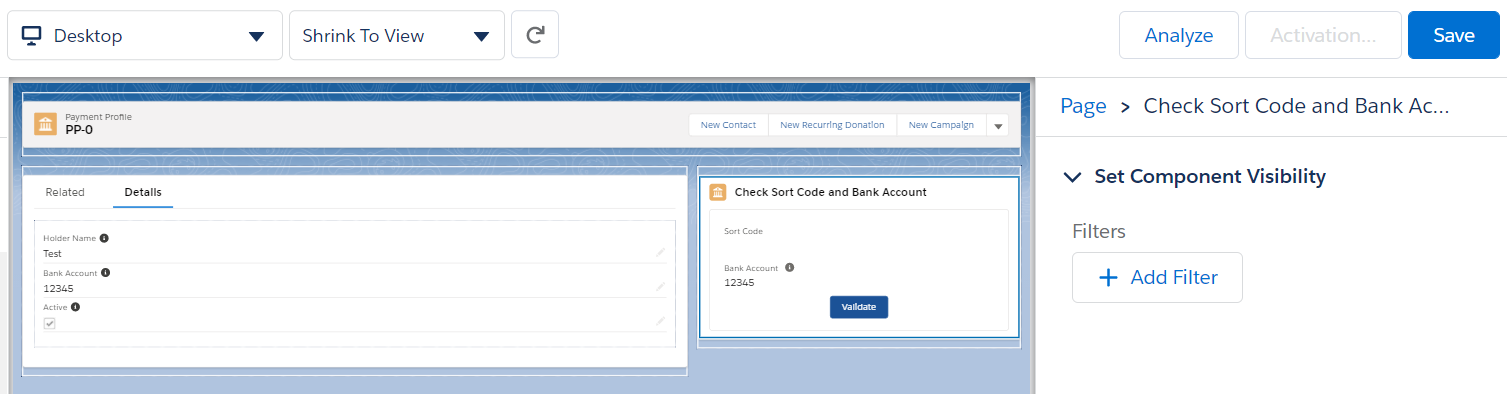
- Click Advanced and under Field, click Select.
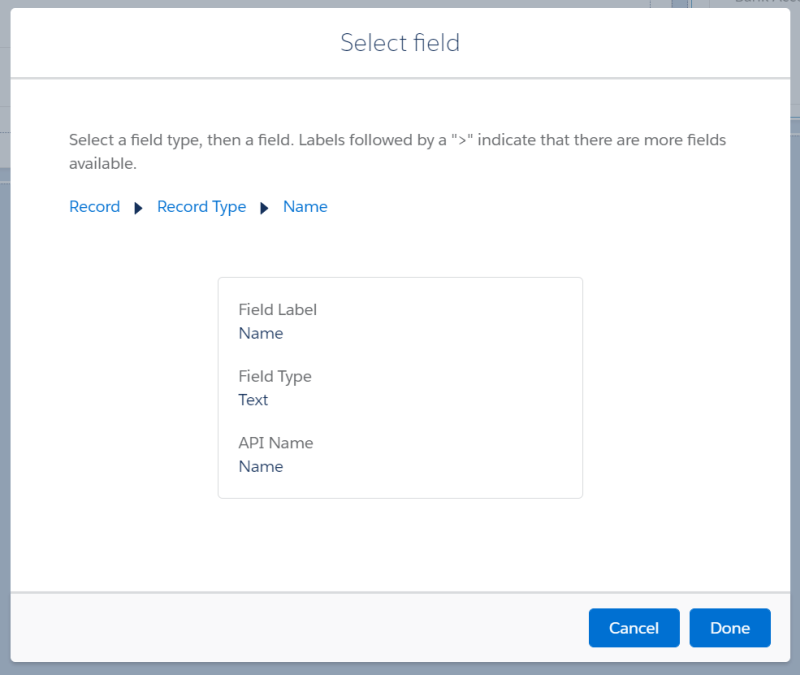
- In the pick lists, select Record, then Record Type, then Name, and click Done.
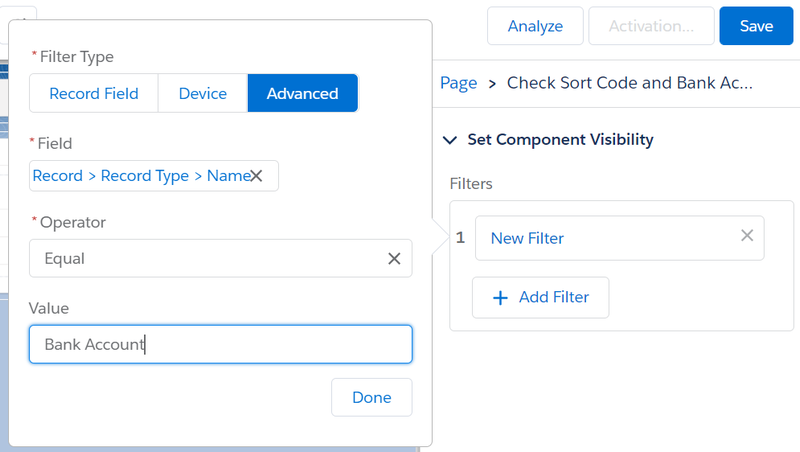
- Add an equal operation with "Bank Account" as the value, then click Done.
- Click Save in the upper right to save the layout change and component filter settings.
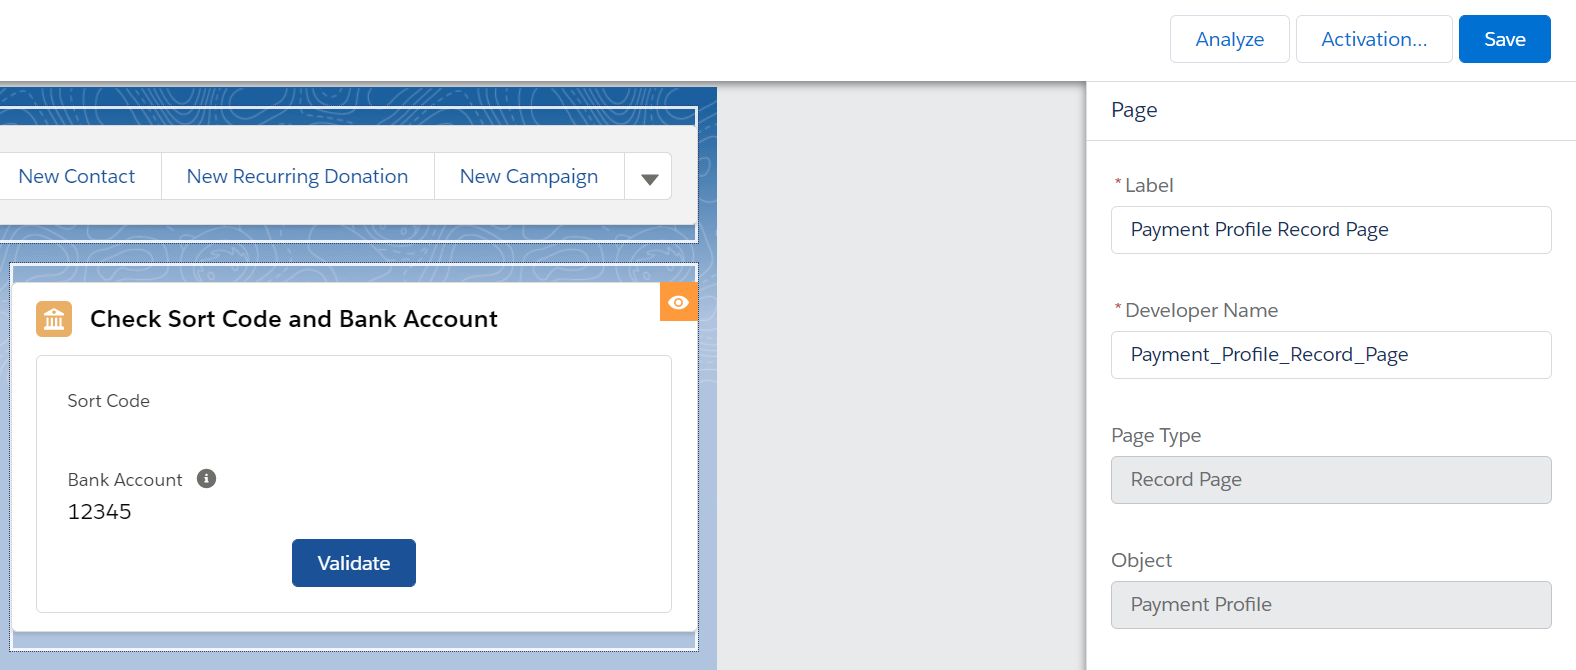
The component appears on payment profiles with UK bank accounts, but it is not visible for other payment profiles.
Recommendations and best practices
Here are a few recommendations and best practices we have collected based on customer experience and our own work with Bacs requirements.
Implement Bacs calendar in Salesforce
It is important that mandate and payment schedules do not run on non-processing days as defined by the Bacs calendar. This would create potential issues with calculated dates.
To ensure FinDock runs schedules only on Bacs processing days, you can add non-processing days as holidays using the Set Business Hours options in Salesforce. When implemented, these dates are respected both by individually created mandate and payment schedules, as well as by recurring schedules.
Custom handling of Bacs Notification Period
Out-of-the-box, FinDock does not know your Notification Period or other cooling off rules you may have. When File Accepted is clicked at the end of a mandate schedule run, new mandates attached to the schedule get status Success with the Active checkbox marked. At this point, installments linked to the mandate can be collected immediately.
You need to build your own customization to ensure the first payment collection does not happen before the end of your cooling off period. This can be done, for example, by:
- Setting the start date of recurring payments in the future (account for cooling off time)
- Suppressing installment creation during the cooling off period
- Modifying the Due Date on the first installment to match the date in the advance notice sent to the payer
Confirm transaction codes after data migration
If you are migrating DDI and payment data to FinDock, ensure that the migration takes into account Bacs transaction codes. FinDock needs to be able to tell from the resulting installment and mandate records what transaction code should be used in the next payment schedule run.
- For DDIs with no payments (for recurring direct debit): set the Use First on next run checkbox to true on the corresponding mandate.
- For payments that need to be re-presented: set the corresponding installment status to Pending recollection.
Testing Bacs Manual setup
Your testing should cover at least the following:
- Test sign up: use your own form on a webpage/app or use Giving Pages to create a new payer and confirm the data is correct
- Test lodgement: run a mandate schedule to create a lodgement file and confirm the Standard 18 content is correct
- Test collection: run a payment schedule to create a collection file and confirm the Standard 18 content is correct
Payment API
To create a new Bacs DD payer in your Bacs Manual configuration, you can use the following messages with the Payment API.
One-time Bacs Direct Debit
{
   "SuccessURL": "https://www.example.com/success",
   "FailureURL": "https://www.example.com/error",
   "Payer": {
       "Contact": {
           "SalesforceFields": {
               "FirstName": "Eric",
               "LastName": "Johnson",
               "Email": "eric@johnson.com"
           }
       }
   },
   "OneTime": {
       "Amount": "30"
   },
   "PaymentMethod": {
       "Name": "Direct Debit",
       "Processor": "PaymentHub-BACS",
       "Target" : "BACS-target",
       "Parameters" : {
           "bankAccount" : "13537846",
           "sortCode": "205132",
           "holderName" : "E. Johnson",
           "description": "test"
       }
   },
   "Settings": {
       "SourceConnector": "PaymentHub"
   }
}
Recurring Bacs Direct Debit
{
   "SuccessURL": "https://www.example.com/success",
   "FailureURL": "https://www.example.com/error",
   "Payer": {
       "Contact": {
           "SalesforceFields": {
               "FirstName": "Eric",
               "LastName": "Johnson",
               "Email": "eric@johnson.com"
           }
       }
   },
    "Recurring": {
         "Amount": "25",
         "Frequency": "Monthly",
         "StartDate": "2020-11-01"
    },
   "PaymentMethod": {
       "Name": "Direct Debit",
       "Processor": "PaymentHub-BACS",
       "Target" : "BACS-target",
       "Parameters" : {
           "bankAccount" : "13537846",
           "sortCode": "205132",
           "holderName" : "E. Johnson",
           "description": "test"
       }
   },
   "Settings": {
       "SourceConnector": "PaymentHub"
   }
}