Configuring FinDock for NPSP
The Nonprofit Success Pack (NPSP) is provided by Salesforce.org to the nonprofit industry, bringing donor management, pledge management and more to the Salesforce platform.
When NPSP is used, it is the “source” of payment data in Salesforce. New payment data in FinDock is automatically forwarded to NPSP based on your org setup. This article details how to install and configure the FinDock for NPSP source connector.
Install and activate the NPSP source connector
Follow the standard procedure for installing and activating the PaymentHub for NPSP package.
Add permissions for NPSP
For the NPSP source connector itself, you need to assign the NPSP4PaymentHub All FLS permission set to admin and operations users.
Make sure that you include the required general permissions as well as NPSP-specific items:
- Full access to Opportunity (and NPSP fields added to Opportunity)
- Full access to Opportunity Payment (
npe01__OppPayment__c)
Configure NPSP Opportunity stages
Before starting the FinDock for NPSP configuration, you need to add a stage to the Opportunity object to track the FinDock reversal payment flow.
FinDock also uses Posted and Pledged stages. Please make sure they are included in your Opportunity stages configuration. All stages need to be mapped to an installment status.
When configuring the Reversed stage, take your possible workflows into consideration. Should the stage have type Open or Closed/Lost?
From the FinDock installment status perspective, a reversed installment is typically a closed case - you won’t try to collect that particular installment again. If this is also your opportunity workflow, e.g. you don’t continue to work with an opportunity that has been reversed, then the Reversed stage can be Closed/Lost.
However, if you have workflows that involve re-opening a reversed opportunity, then the Reversed stage type should be Open.
To add Reversal stage to the Opportunity object:
- Open the Object Manager in Salesforce Setup.
- Find the Opportunity object, click on Fields and Relationships and using Quick Find, search for the Stage field.
- Click on the field label to open the field details, scroll down to the Opportunity Stages Picklist Values related list, and click New.
- Add “Reversed” as a Stage Name and set
- Type = depends on your workflow(s)
- Probability = set percentage as needed, e.g. 0%
- Forecast Capability = select value as needed; e.g. Omitted or Canceled
- If you need to be able to manually select the Reversed stage, enable it for the Sales Processes relevant to the Nonprofit Success Pack.
- Click Save to save your new stage.
Modify NPSP matching rules
The default matching rules for Contact include the NPSP Contact Personal Email Match. This rule does not work with FinDock because the rule does not use the standard Salesforce email field and instead matches against the Personal Email field (npe01__HomeEmail__c). FinDock deduplication is based on the standard email field (Email) only.
Create a new custom matching rule that has the same setup as the default NPSP rule, but uses the standard email field. For instructions, please follow the Salesforce guidance.
Configure general settings
The setting values need to be defined by the integration partner and may be updated later by a Salesforce admin.
To configure the NPSP connector:
- Launch the FinDock app and click the Setup tab.
- Under Extensions - Source, click the PaymentHub-for-NPSP tile.
- On the General Settings tab, modify the settings as needed. See the table below for further information about each setting.
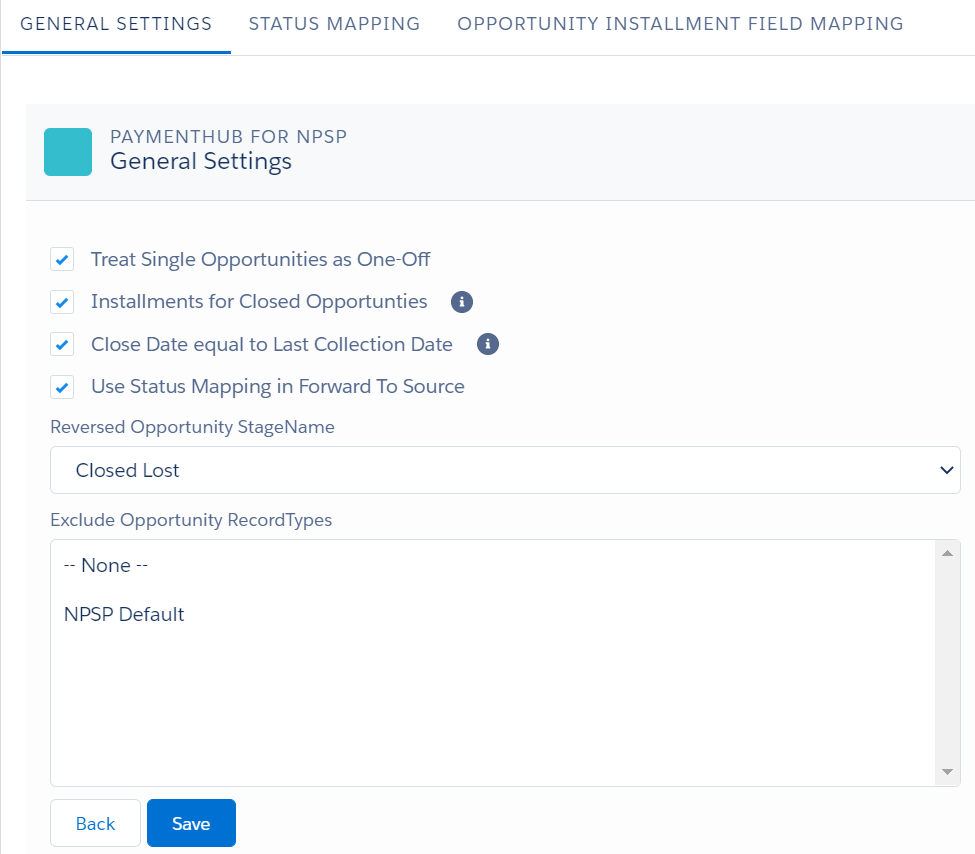
- Click Save when you are done.
- Modify Status Mapping as needed.
- Continue to the Opportunity-Installment Field Mapper.
NPSP general settings
| Setting | Description |
|---|---|
| Treat Single Opportunities as One-Off | If an opportunity is not part of a recurring donation, the opportunity is treated as a single payment for payment methods that require indicating if a payment is single or recurring. |
| Installments for Closed Opportunities | By default FinDock does not create installments for newly created opportunities with a closed status. When migrating donation data, for example, enabling this setting makes sure installments are created for all opportunities. |
| Close Date equal to Last Collection Date | Enabling this overrides the default Salesforce behavior for setting the Opportunity Close Date. When enabled, the opportunity Close Date is always equal to the Last Collection Date on the related installment. When disabled, the default Salesforce behavior may in some cases set the Close Date to today’s date instead of the intended Installment Last Collection Date. For further information, please refer to this Salesforce help article. |
| Use Status Mapping in Forward To Source | By default, FinDock checks first if there is a status mapping. If not, the related opportunity is set to the default closed opportunity stage value according to your NPSP configuration. If this default NPSP setting is not defined, FinDock falls back to Posted. This setting should not be disabled unless certain customization requires it. |
| Reversed Opportunity StageName | This is a fallback stage for reversed opportunities if the Reversed status of installments does not have a specific mapping to a stage name, i.e. if the status mapping is incomplete. |
| Exclude Opportunity RecordTypes | Disables creation of installments when an opportunity is created with a specific record type. Updates to these opportunities also do not trigger installment updates. |
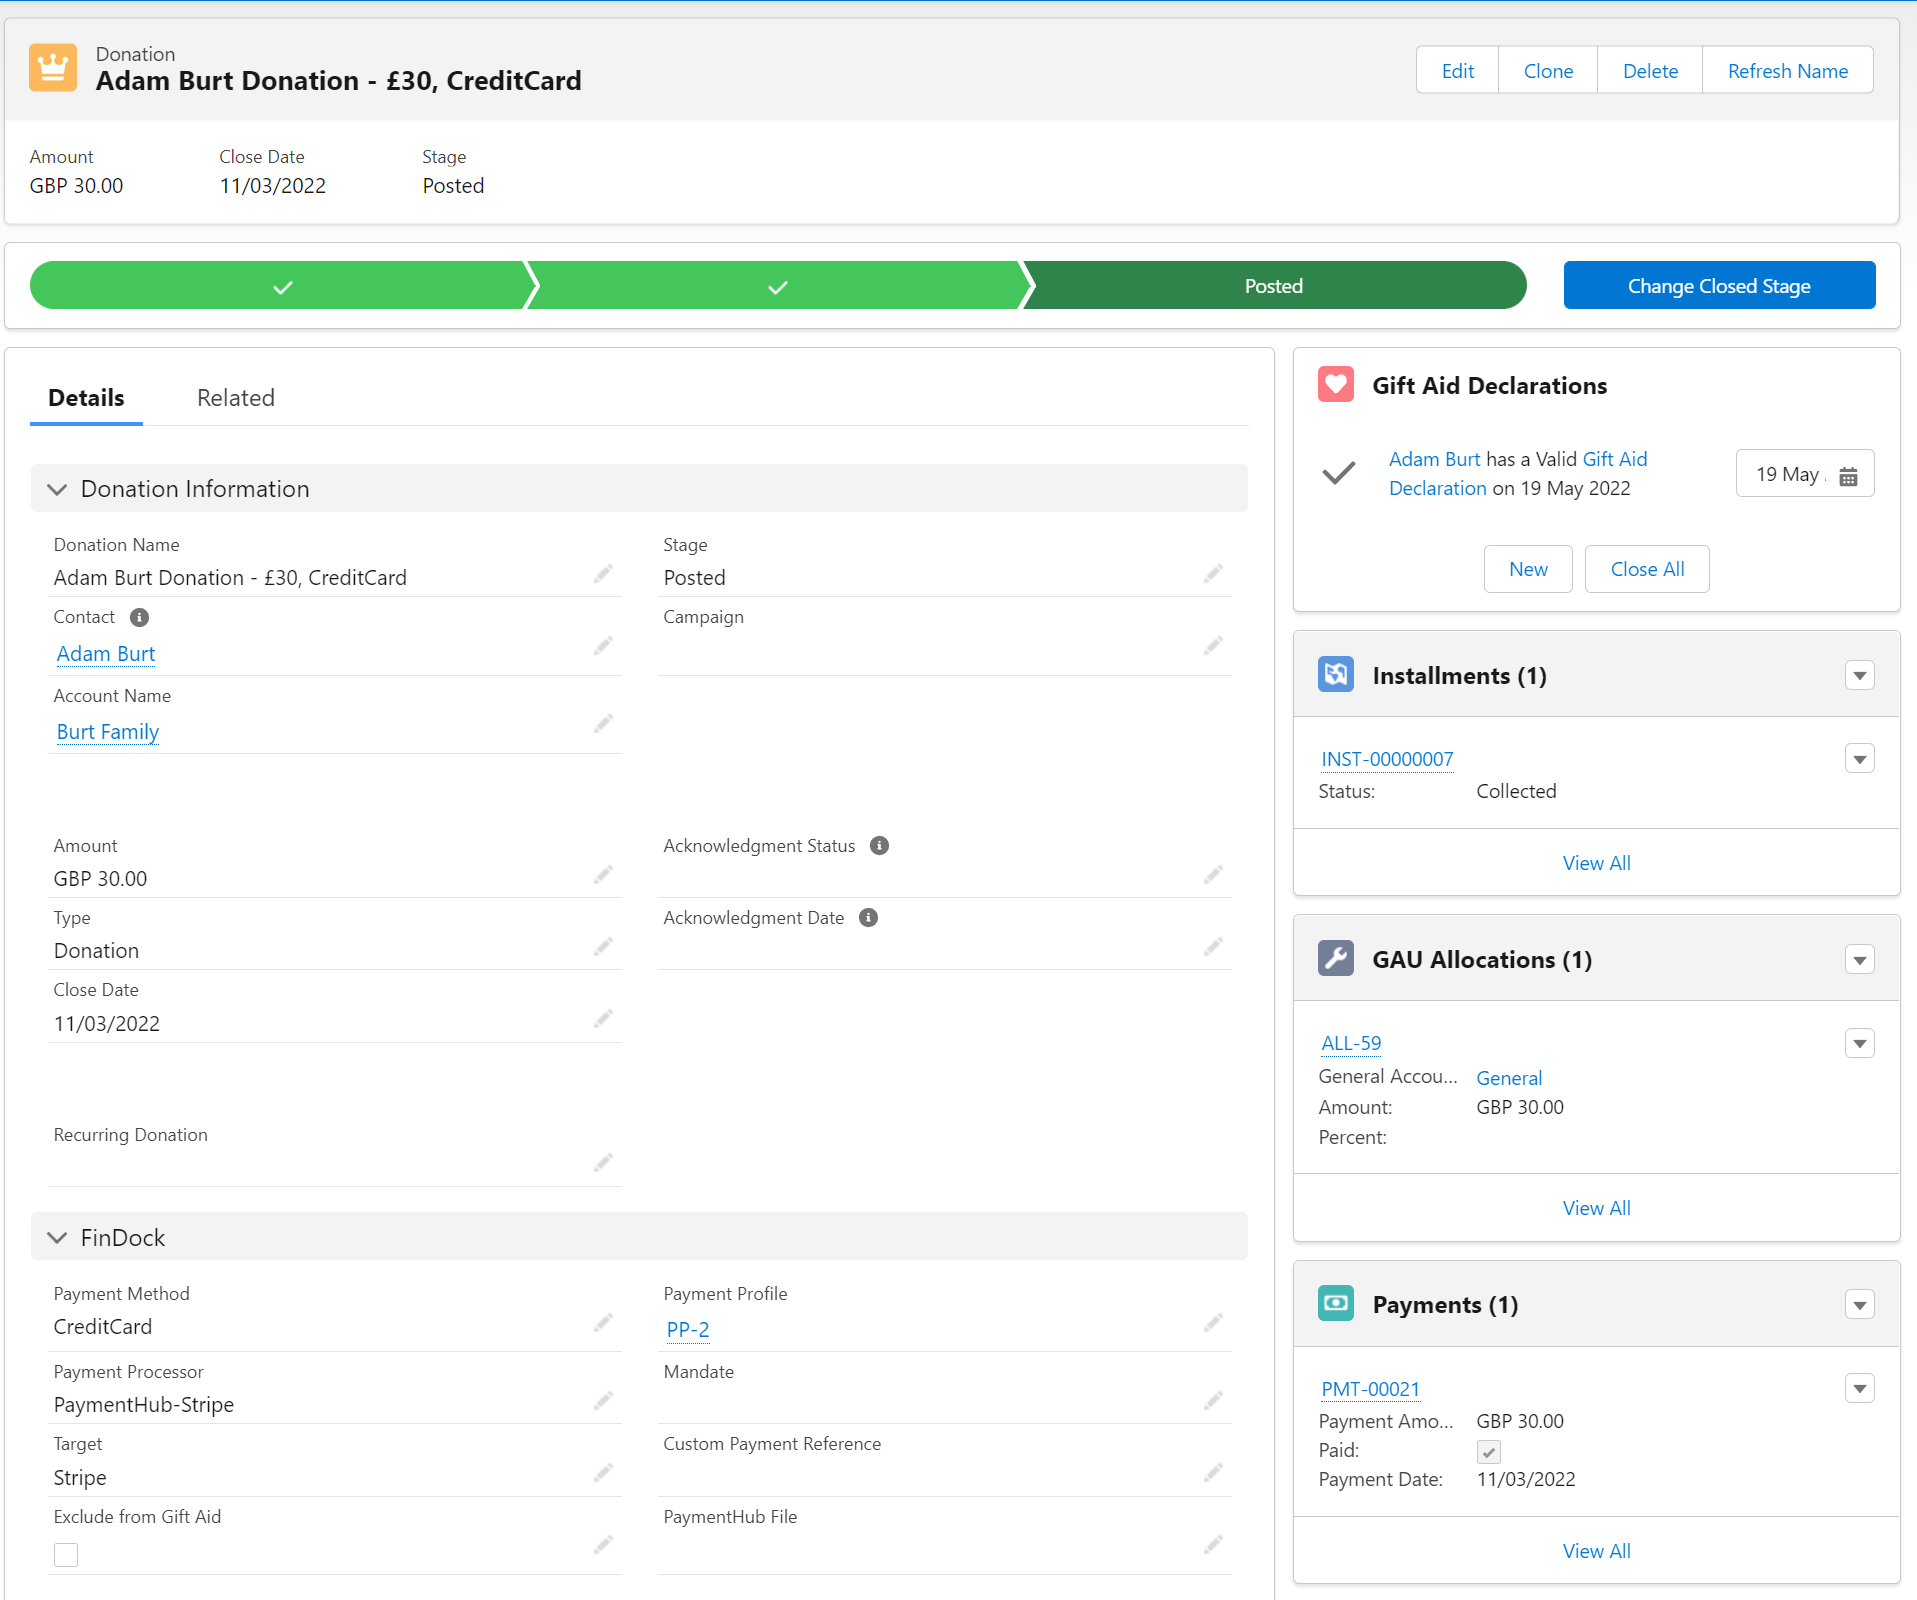
Configure layouts
To make the FinDock related fields visible to NPSP users, make sure to add them to the page layouts for the NPSP objects that are used. We recommend adding at least the following FinDock fields:
- Custom Payment Reference
- Mandate
- Payment Method (add
npsp4hub__Payment_Method__cand removenpsp__PaymentMethod__c) - Payment Processor
- Payment Profile
Below is an example of a layout for Opportunity (Donation).
Here is a layout example for Recurring Donation.
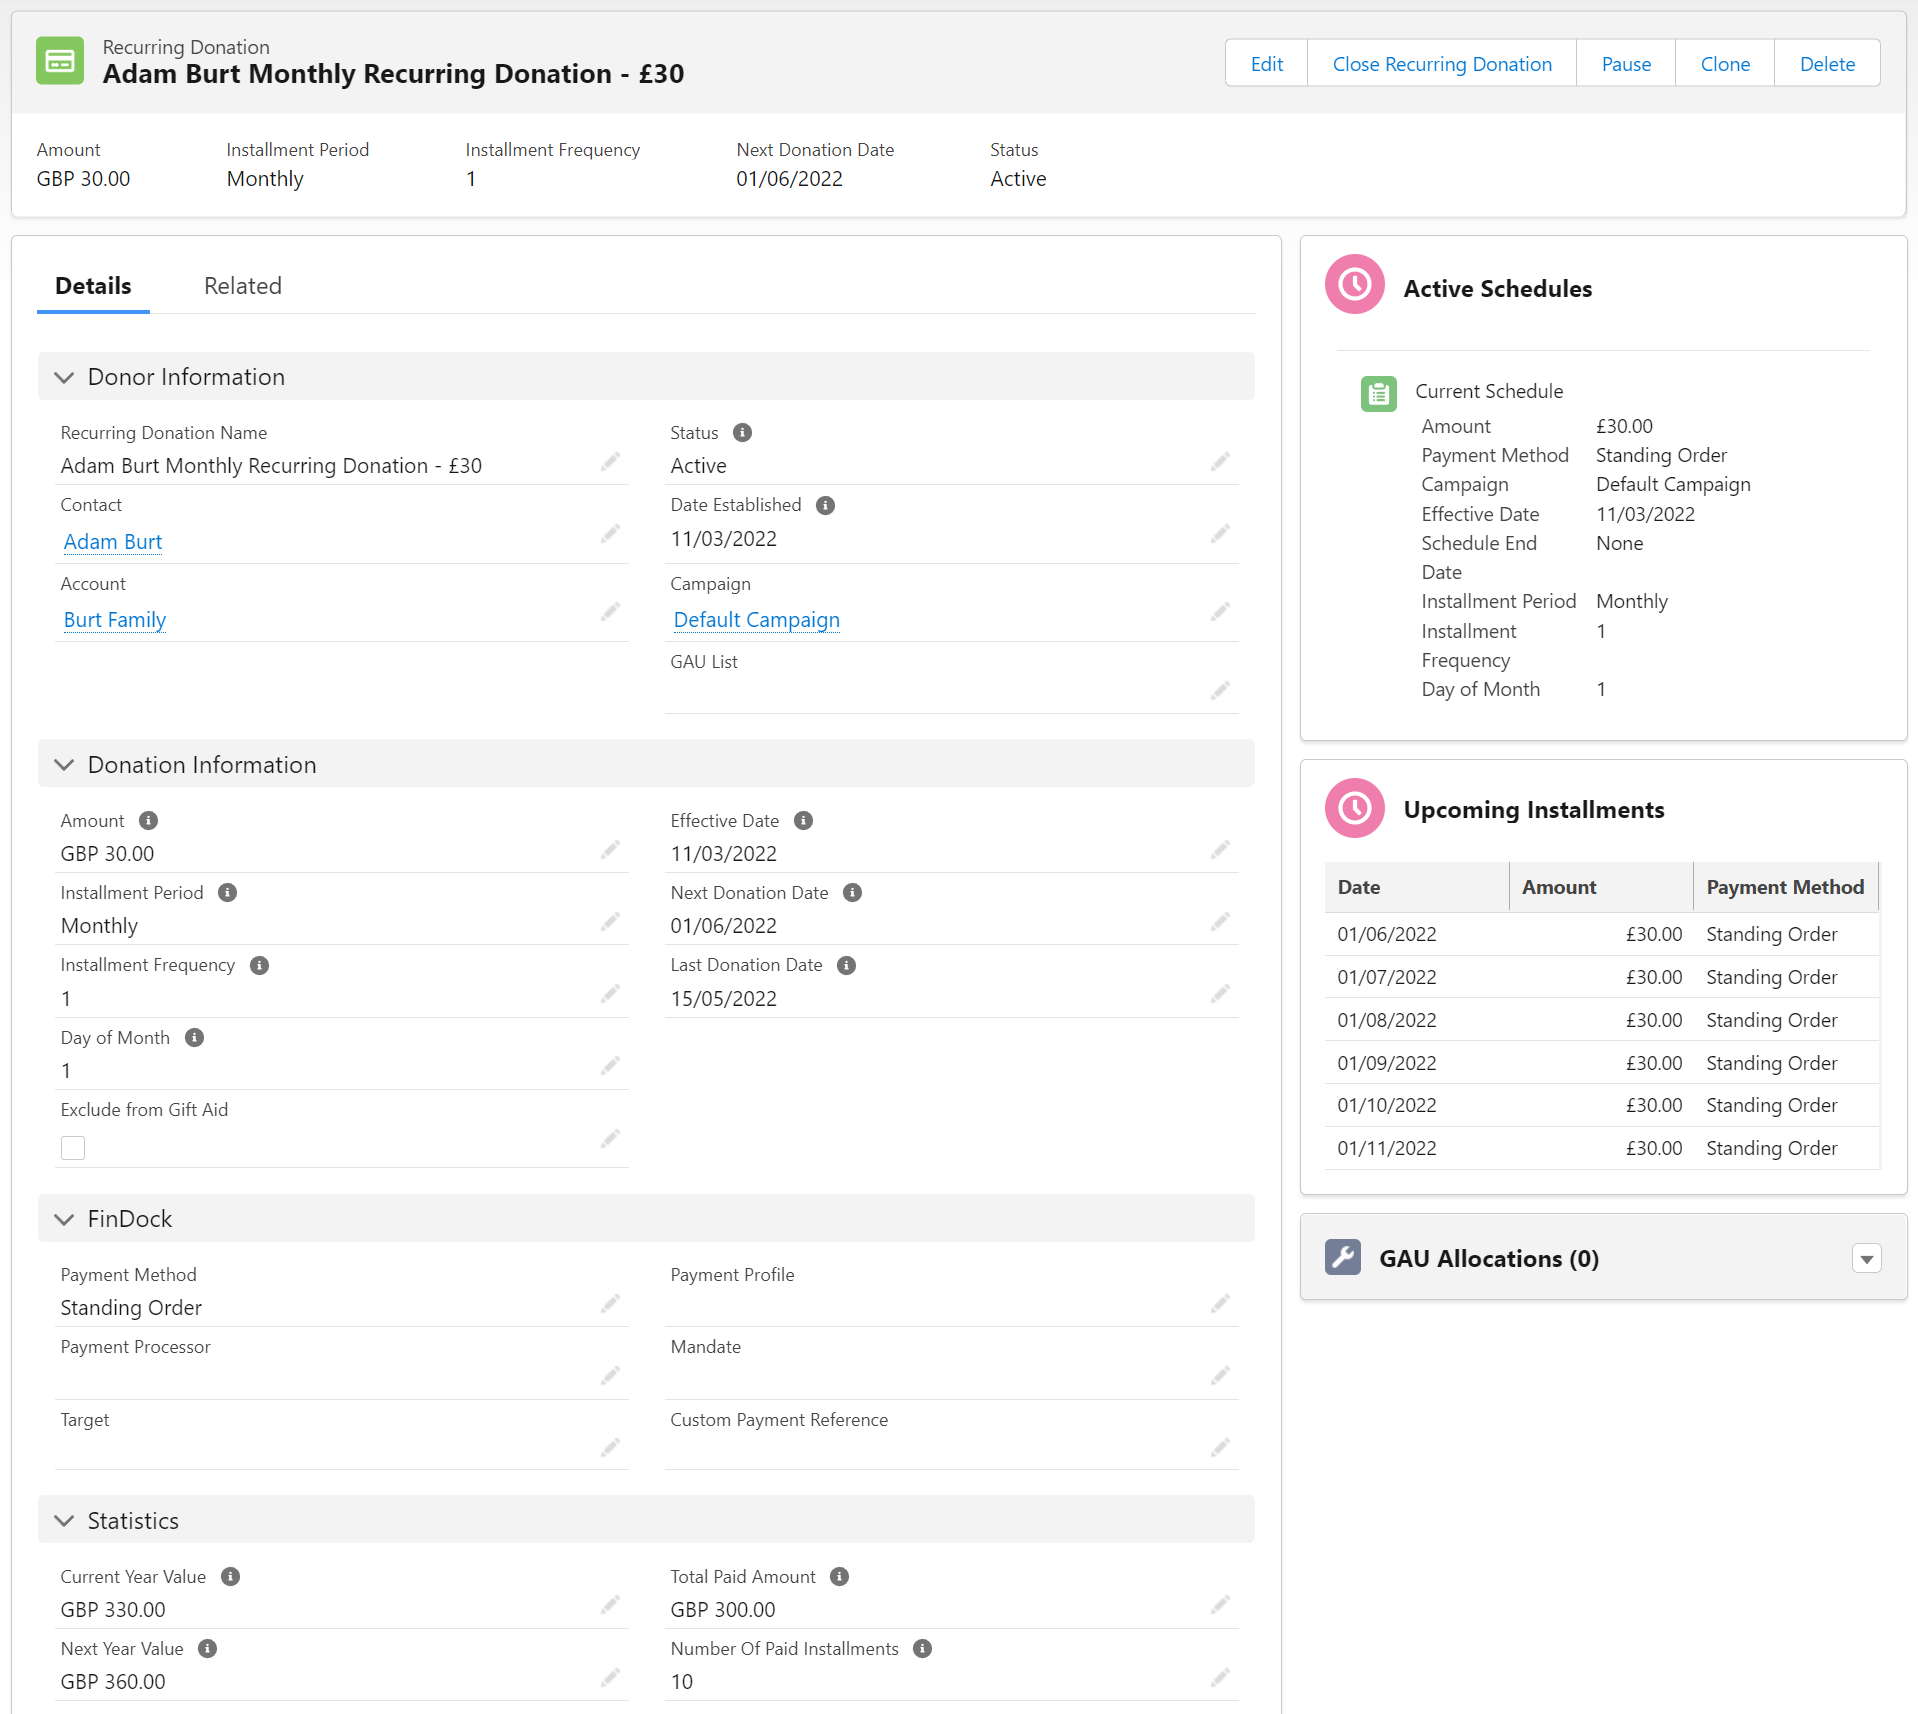
We also recommend adding at least the Payment Profile related list to the Contact and/or Account layouts. This allows users to view existing Payment Profiles for donors.
For more information on page layouts, and how to configure/change page layouts, see the Salesforce Page Layouts article.
In addition, if they have been enabled as part of Enhanced Recurring Donation, you need to disable the NPSP overrides for the New and Edit buttons on the Opportunity and Recurring Donation objects. Switch the Lightning Experience Override option back to "Use the Salesforce Classic override" under the object Buttons, Links, and Actions settings.
Payment API with NPSP
The Payment API fully supports initiating payments and registering them as opportunities or recurring donations in NPSP. However, this can only be done with authenticated access.
You can use the following message examples to test Payment API integrations.
New contact with single opportunity using Stripe
{
    "SuccessURL": "https://www.example.com/success",
    "FailureURL": "https://www.example.com/error",
    "Payer": {
        "Contact": {
            "SalesforceFields": {
                "FirstName": "Eric",
                "LastName": "Johnson",
                "Email": "eric@johnson.com"
            }
        }
    },
    "OneTime": {
        "Amount": "50"
    },
    "PaymentMethod": {
        "Name": "Creditcard",
        "Processor": "PaymentHub-Stripe"
    },
    "Settings": {
        "SourceConnector": "PaymentHub-for-NPSP"
    }
}
New contact with recurring donation using Stripe
{
    "SuccessURL": "https://www.example.com/success",
    "FailureURL": "https://www.example.com/error",
    "Payer": {
        "Account": {
            "SalesforceFields": {
                "Name": "Eric Johnson account",
                "BillingStreet": "1234 Some Street",
                "BillingCity": "Some City"

            }
        }
    },
     "Recurring": {
          "Amount": "25",
          "Frequency": "Monthly",
          "StartDate": "2022-06-01"
     },
    "PaymentMethod": {
        "Name": "CreditCard",
        "Processor": "PaymentHub-Stripe"
    },
    "Settings": {
        "SourceConnector": "PaymentHub-for-NPSP"
    }
}