Configuring Manual Review
When importing bank statements, FinDock automatically tries to match each transaction record with an installment. In some cases, however, no match is found. These records are flagged for further processing which can be done either through Guided Matching or Manual Review.
We recommend using Guided Matching which provides more refinement and support for the reconciliation process. Manual Review is considered deprecated in favor of Guided Matching.
This article explains how to customize the transaction details of the Manual Review to fit your organization’s needs.
Gather information
Configuring the Manual Review details requires a solid understanding of how your finance department determines matches in their reconciliation process. We recommend customizing the review details together with a key stakeholder from the finance department who knows business logic of the reconciliation process. Ideally you can plan some fine-tuning after making your initial configuration.
Open configuration options
The following steps will help you open and navigate the configuration page.
- Launch the FinDock app and select Setup.
- Click the Manual Review tile to open the configuration options.
There are four areas that you can customize:
- Matching Object Settings: configure search results based on transaction details; for example, find Contacts based on the account holder name.
- Related Information Setting: define what related records should be displayed in search results. For example, display outstanding installments related to the contact found in the search.
- Search Layout: customize the fields shown in search results. For example: show FirstName, LastName, Email for each contact found based on the Matching Object Settings.
- Other: define the default payment method for manual review. If this default is set, it is used for all transactions in manual review.
Configure a matching object
Use this option to add a new rule for search results based on the transaction details. To add a matching object:
- On the Manual Review setup page, click the Matching Object Settings tab.
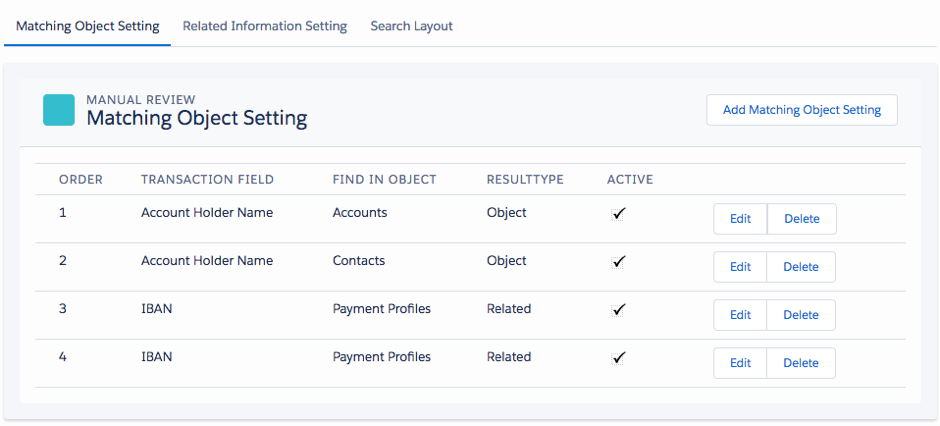
- Click Add Matching Object Setting to open a new matching object record.
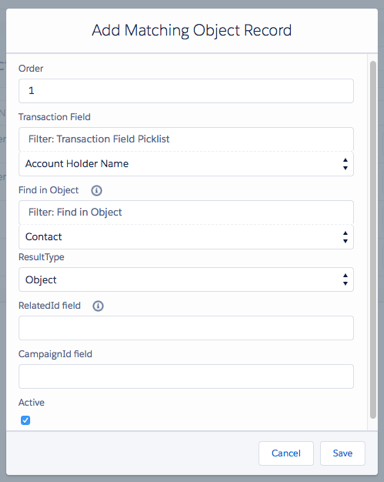
- In the ‘Order’ field, enter a priority number - the lower the number, the higher the search result appears in the search results list.
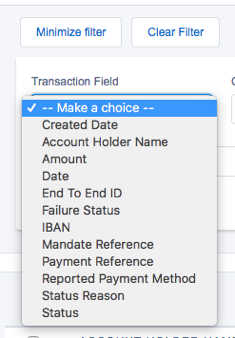
- Under ‘Transaction Field,’ select a field to search.
- Under ‘Find in Object,’ select the object you want to find based on the transaction field search.
- Under ‘ResultType,’ select what value you want to return in the search result.
- The ‘RelatedId field’ can contain the API name of the related Id field for ResultType: Related. This setting is mandatory when ResultType is Related. In this case, you need to populate the field with a lookup field (for example, to Contact or Account).
- In the ‘CampaignId’ field, you can specify the originating campaign for this search result. Using this option links the payment to be that specific campaign.
- Make sure the ‘Active’ checkbox is marked, and then click Save.
- If you want to keep the matching object setting but not use it, you can just unmark the ‘Active’ checkbox instead of deleting the setting.
The matching object setting activates as soon as you save it.
ResultType: Related
If you select ‘Related’ for ResultType in the matching object setting, you can return a record related to the search result. For example, if you define IBAN as the transaction field to search and Payment Profile the object value to return, rather than returning the payment profile value, you can return the contact related to the payment profile.
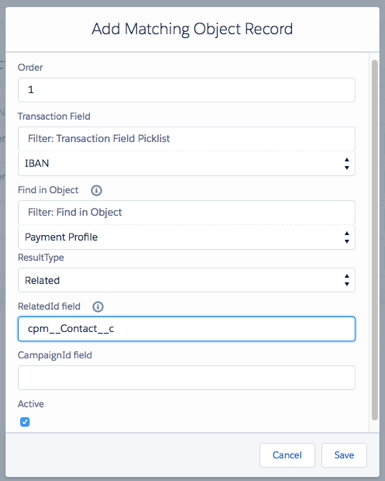
You can add multiple records to return various related records. If the related Id field is empty, no search result is returned.
Configure related information
Use the Related Information Setting to define what related records should be displayed as part of search results.
To add related information:
- On the Manual Review setup page, click the Related Information Setting tab.
- Click Add Related Setting to open a new related object record.
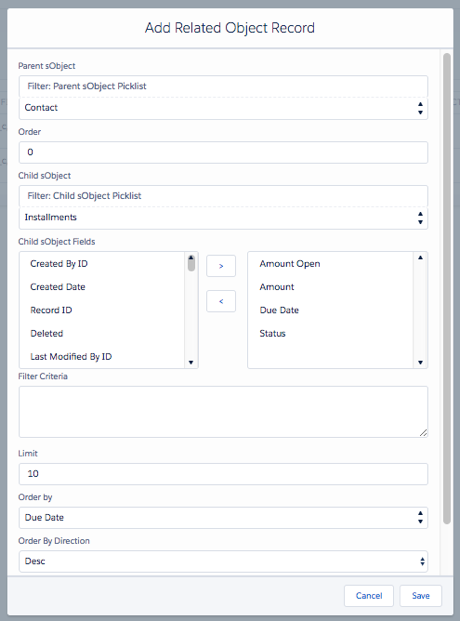
- Under ‘Parent sObject,’ select the object returned in the Matching Object Settings result.
- On the ‘Order’ field, enter a priority number - the lower the number, the higher the related information appears in the search results.
- Under ‘Child sObject,’ select the object (related to Parent sObject) that you want to configure.
- Under ‘Child sObject Fields,’ add or remove fields from the related object to show for each child object record.
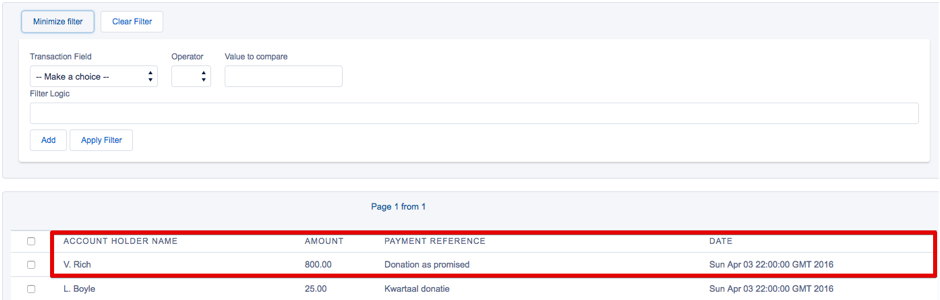
- Under ‘Filter Criteria,’ you can limit the installment records shown based on their values. The filter criteria are written as an SOQL WHERE query. For example, the following query limits the installments to show only those that are not yet collected and have a payment method other than credit card.
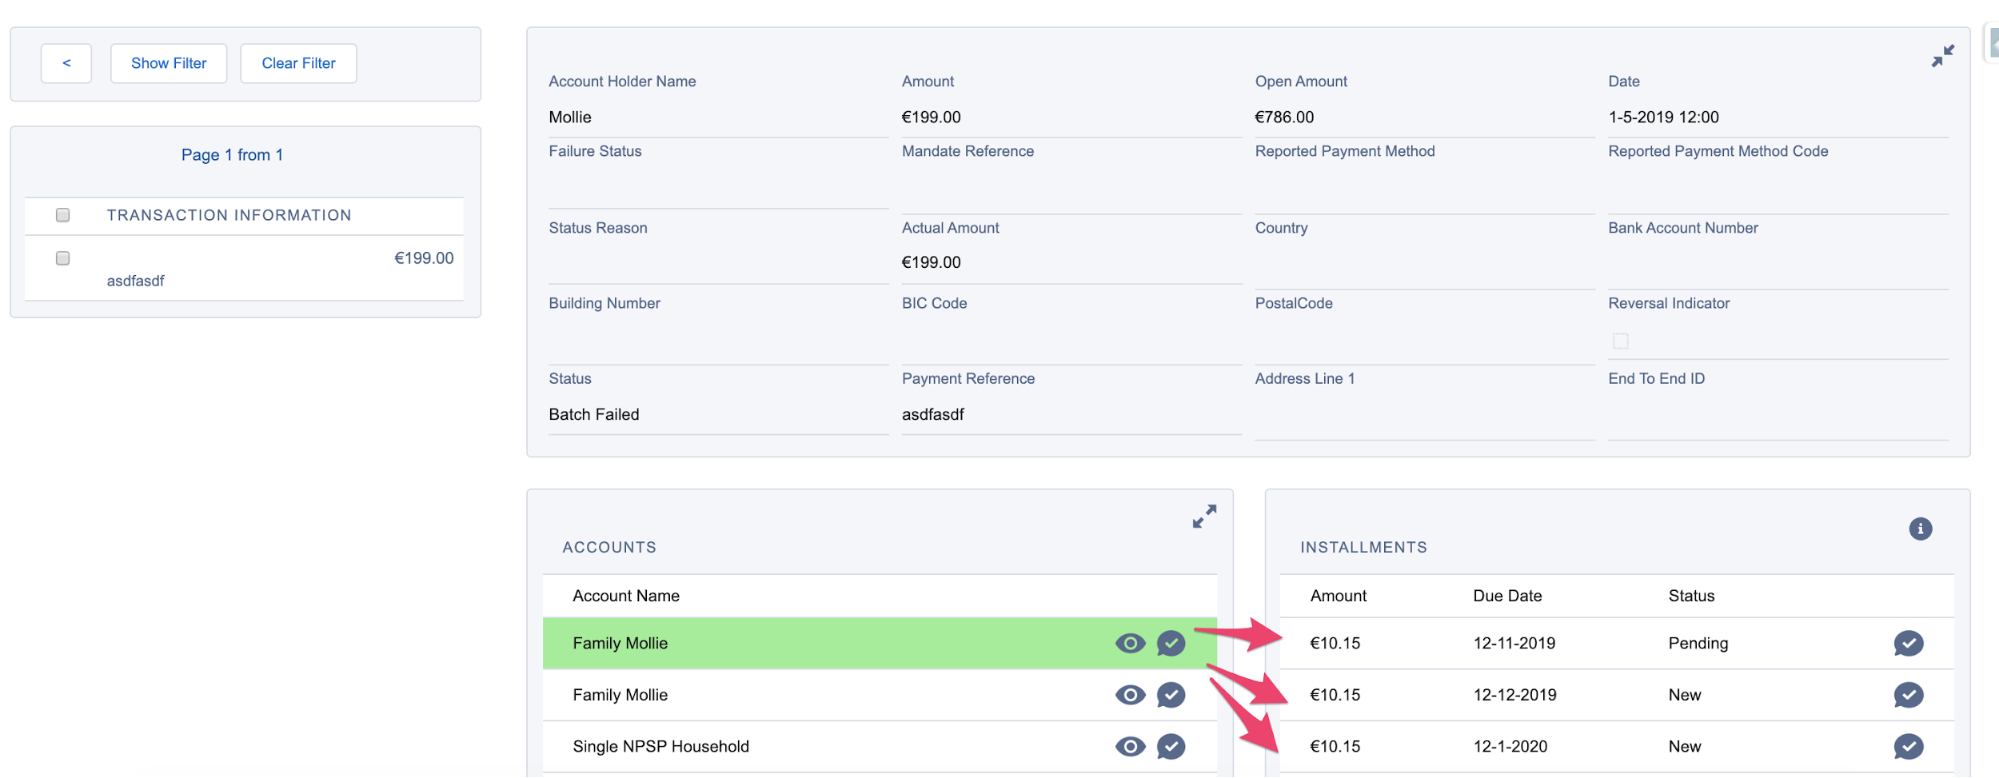
cpm__Status__c != ‘Collected’ANDcpm__Payment_Method__c != ‘credit card’ - In the ‘Limit’ field, enter a number (low enough to keep things readable) to specify how many child records you want to show. This step and the prior step affect what searching displays. In the screenshot below shows a search for accounts and the related installments.
- Use the ‘Order by’ and ‘Order By Direction’ options to define how records are displayed.
- Make sure the ‘Active’ checkbox is marked, and then click Save.
- If you want to keep the related object setting but not use it, you can just unmark the ‘Active’ checkbox instead of deleting the setting.
The related object setting activates as soon as you save it.
Configure search layout
Use the search layout options to further customize transaction details displayed in Manual Review. The layout determines what fields are shown for each type of search result as defined in the Matching Object Settings. To add related information:
- On the Manual Review setup page, click the Search Layout tab.
- If the matching object is already listed, you can click on that object to edit the layout.
- To add a new layout, click the Add Search Layout button.
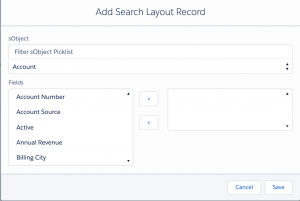
- Select a field to display on the left and click the ‘>’-button to add it to the displayed fields.
- Click Save to store the layout definition.
If no search layout is configured, the name field is shown by default.
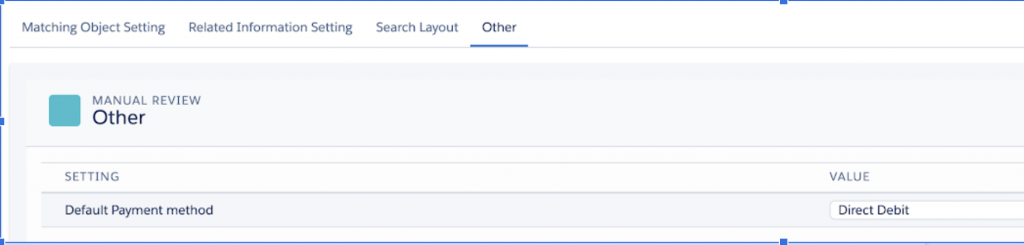
Configure default payment method
Under the Other tab on the Manual Review setup page, you can define the default payment method for manual review. If this default is set, it is used for all transactions in manual review. Using this option allows ProcessingHub to automatically set the Payment Processor and Target during automated matching. For instance, you can:
- Set the default payment method to your most common payment method, like direct debit. The downside, though, is that some transactions will be wrongly classified.
- Introduce a custom payment method ‘Unknown’ and use that as default. This does not eliminate the need to manually add the payment method during review, but does allow the ProcessingHub to set the Payment Processor and Target.
Configure fields available for manual review
In addition to the Manual Review configuration itself, you can affect what is available for review in the transaction details by modifying Salesforce field sets. Manual Review utilizes field sets to determine what fields to display. These field sets allow you to add custom fields or fields from an installed Salesforce apps to the manual review transaction details. For more information on working with field sets in Salesforce, see Creating and Editing Fieldsets.
Transaction field sets
The Transaction object has four field sets that impact Manual Review.
Expanded Transaction View
This field set is used when the transaction record list is expanded (in filter view, for instance). The items outlined in red are from the Expanded Transaction View field set.
Filter Fields
This field set determines what fields on the transaction are available as filters.
Manual Review Extensive
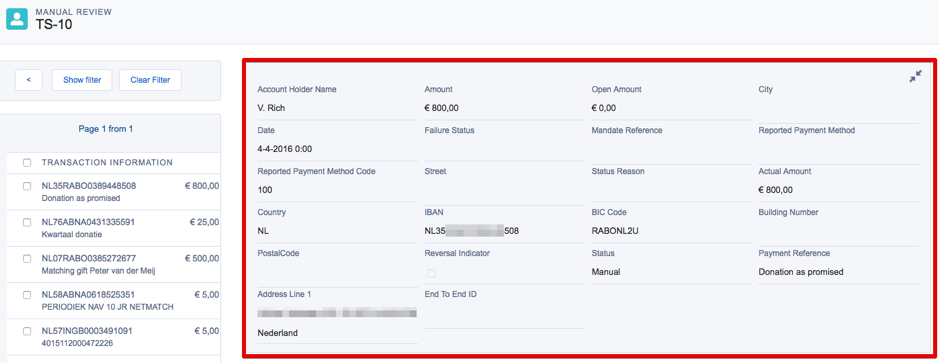
This field set determines what fields are visible if the transaction details are expanded, as shown in the highlighted area here:
Manual Review Summary
The Manual Review Summary field set determines what fields are visible if the transaction details are collapsed, as shown in the highlighted area here:

Payment field sets
The Payment object has three field sets that impact Manual Review.
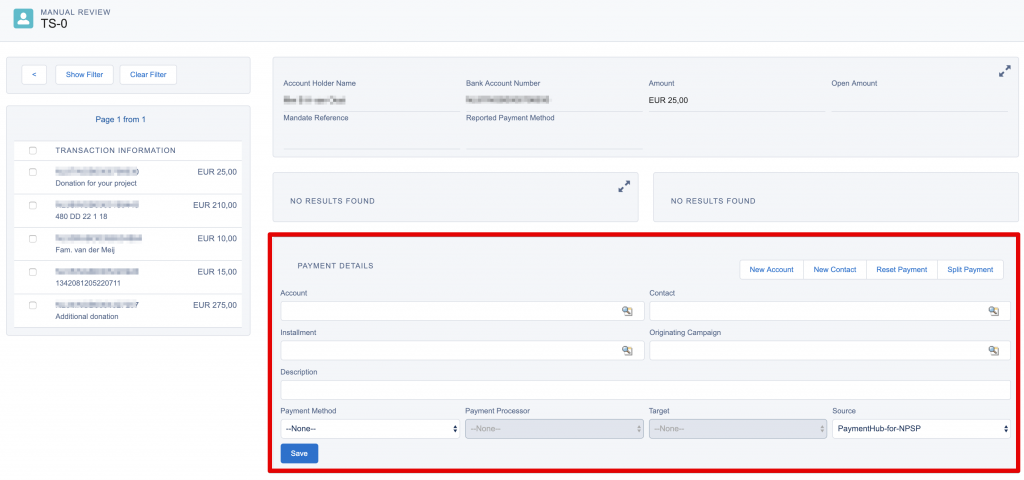
General Payment Details
This field set determines what fields are available in the manual review payment details pane, highlighted here:
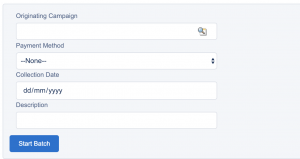
Manual Review Batch Process
This field set determines what fields are available for the batch processing popup which is displayed after filtering the transactions.
Split Payment Details
This field set determines what fields are available for split payment actions, as highlighted below:

Account Fieldset
The account object has one fieldset.
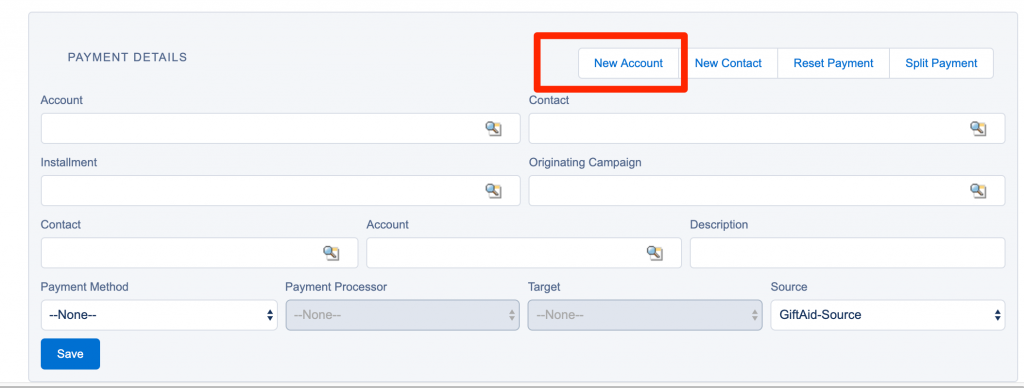
New Account Manual Review
This field set determines what fields are available on the New Account popup after clicking the New Account button.

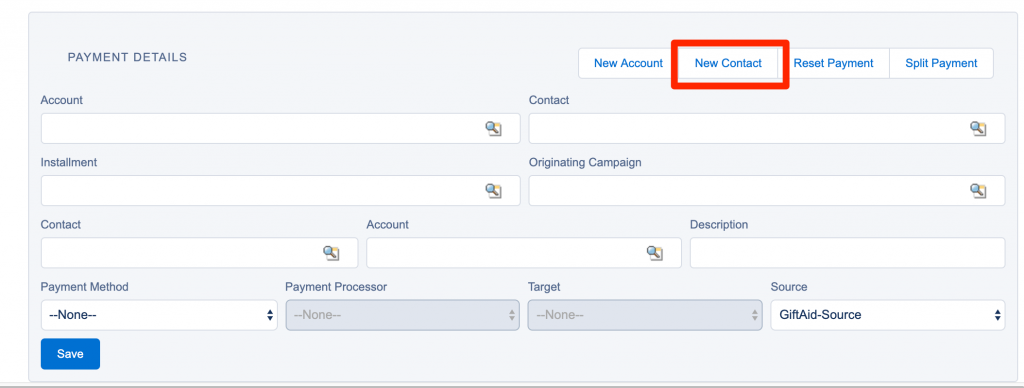
Contact
The Contact object has only one field set that impacts Manual Review.
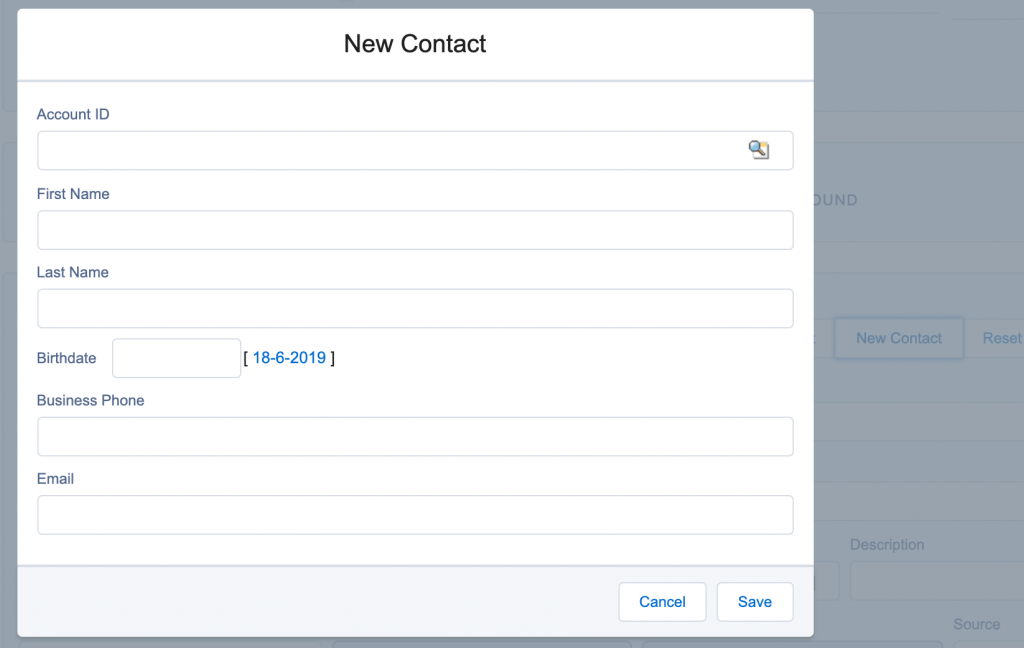
New Contact Manual Review
This field set determines what fields are available on the New Contact popup after clicking the New Contact button.