Creating SEPA targets
To be able execute SEPA direct debit runs or import CAMT files, you need to first define at least one SEPA target. Targets include a range of information, so we recommend collecting the required information before you get going with the target creation. Before you can create a target, please make sure to get the following information from the organization. This article outlines creating generic SEPA targets. For SEDA (Italy) targets, please see SEDA for SEPA payment extension.
SEPA target details
To make creating targets easier, we recommend gathering the required details before you start creating targets. The following table includes all the settings for a generic SEPA target.
| Setting | Description |
|---|---|
| Name | The name of the target should be something that is recognizable within your organization. This name is not shown outside of your organization, but it is used to distinguish easily among different accounts. |
| Target | The payment extension to be used with this target. For SEPA targets, select ‘PaymentHub SEPA.’ |
| Type | This is the SEPA implementation to be used with this target. The type affects which settings are needed for the target. SEPA is for generic SEPA bank accounts, and SEDA is for Italian SEPA bank accounts. |
| Associate charges to | Some banks include charges within transactions, especially with direct debit reversals. These charges are stored automatically and matched against a particular account in Salesforce. Either select or create a relevant Salesforce account record to store these charges. Enter the Salesforce Id of the account you selected. You can find the Salesforce Id from your browser navigation bar.  |
| Bank account addition | This is the BIC or CODA number of the bank handling the SEPA transactions for this target. Example: INGBNL2A |
| Bank account number | This is IBAN for your target that will be used for SEPA transactions. |
| Bank identification number | The Generic Account Identification number for alternative bank detection. This is used, for instance, when you have a special contract with your bank. |
| CAMT message type | For each target, you need to define whether it will be used for importing CAMT.053 or CAMT.054 files. Currently it is not possible to process both CAMT.053 and CAMT.054 bank statements for the same target. However, the data created in Salesforce when processing CAMT.054 is equal to CAMT.053. |
| CBI Clearing System Member Id | An unique identifier of your organization and uniquely identifies your relationship with CBI Bank. |
| Company name | This is the creditor name is the name that appears on the bank statement of your customer or donor. |
| Payslip option | Define here whether you want the payslip to be attached in the original format as a PNG file or both. |
| Creditor ID | This is the SEPA Creditor ID provided by your bank when you made the direct debit contract. |
| CAMT duplication protection | Prevent duplicate CAMT files from processing (yes/no) |
| GroupHeader - Initiating Party - OrgId | Some banks may have additional requirements for SEPA transactions. To comply with these requirements, you can fill in the Initiating Party details. One option is: GroupHeader – Initiating Party – OrgId (text field). The other option is: GroupHeader – Initiating Party – SchemeName (picklist ‘CORE’ | ‘CUST’) If these fields are used, the values are added to the SEPA transactions accordingly. |
| PAIN file validation | When enabled, PAIN files are validated after generation and before uploading to Chatter. Validation of files with a large number of transactions may take a while. |
| PAIN.008 - CBI | When enabled, PAIN.008 files are generated according to CBI standards. |
| Maximum records per file | Your bank may impose limits such as the maximum number of transactions per PAIN file. These are usually included in the contract with your bank. If such a limit exists, enter the value here. Otherwise, leave as is. |
| Maximum records per sequence type | Your bank may impose limits on the maximum number of records per sequence type. These are usually included in the contract with your bank. If such a limit exists, enter the value here. Otherwise, leave as is. |
| GroupHeader - Initiating Party - SchemeName | (See above, GroupHeader - Initiating Party - OrgId) |
| Upload files to Chatter | Set toggle to active if you want the files generated by ProcessingHub to be uploaded to Chatter. In the majority of cases, this should be selected unless you have your own connection with the bank. |
Create SEPA targets
Targets are created and managed through the ProcessingHub setup page.
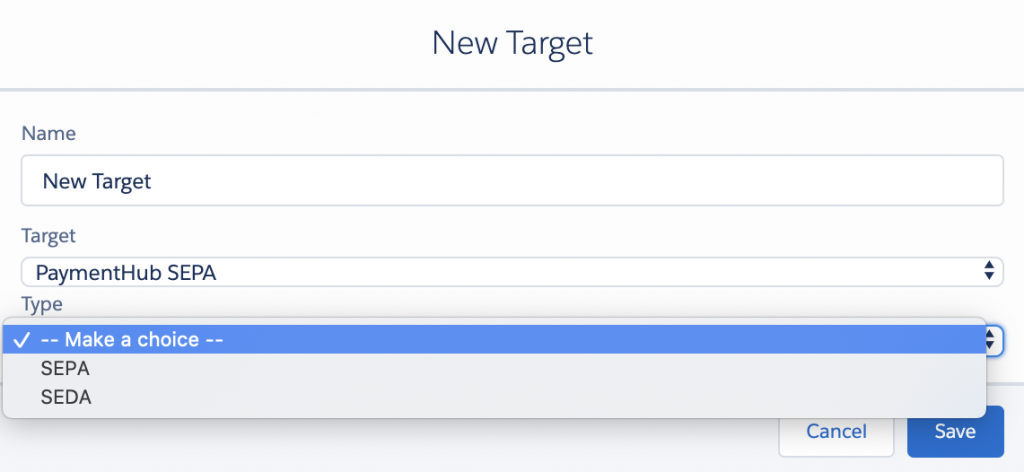
To create a new target:
- Launch the FinDock app and select Setup.
- Click the ProcessingHub tile to open up the ProcessingHub setup page.
- Click on the Targets tab and click Add Target to create a new target.
- Add the name for the new target, select ‘PaymentHub SEPA’ for Target, and for type, select SEPA if it is a generic SEPA target (bank). Click Save when you are ready.
- Go back to the Targets tab, click the button to the right of the target you just created and select Settings.
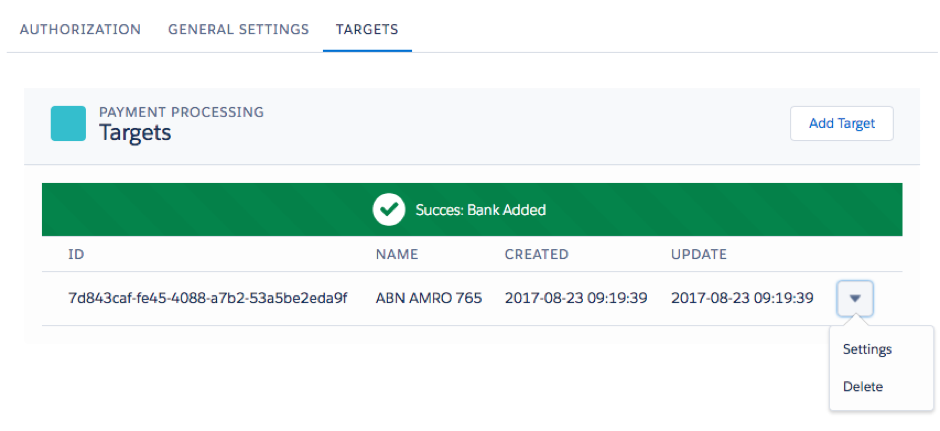
- Enter the information you previously gathered about this bank account into the respective target fields and click Save.
- Repeat steps 1-6 for each new account.