(Classic) Getting started with the Payment API
The Classic Online Experience with Payment API version 1 will be decommissioned at the end of 2024. All Payment API integrations should migrate to version 2, the Enhanced Online Experience, by January 2025.
The FinDock Payment API allows external systems to initiate personalized customer journeys for one-time or recurring payments to FinDock. The most common Payment API use cases include:
- Donation forms
- Invoice payment forms
- Webshop checkout forms
- These and other use cases can be implemented with any remote platform that supports outbound REST calls, such as website and social media platforms, mobile apps, and so forth.
How it works
The API is set up so that a developer can use a simple sequence of actions to complete payment transactions.
- Get details via Payment API from the Salesforce configuration about available payment methods and source app.
- Request initial details from the customer or donor.
- Put in a payment request with the data you have collected to the Payment API.
- Based on the API response, perform additional actions, such as redirecting or additional data collection
- Provide final status confirmation of the transaction to the customer or donor.
Before you start
Before you can start to develop an integration with the FinDock payment API, you need:
- A licensed installation and configured FinDock app in a Salesforce environment or ‘org’ with payment methods you want to use set up properly. Ask your Salesforce admin or vist Installing FinDock packages.
- Authenticated access through a ‘Connected App’ with Oauth2 flow in the above Salesforce org authentication
- OPTIONAL: Find out about (and perform) specific Salesforce configuration like deduplication rules and custom fields. For more information about deduplication and the FinDock API, please see the "Deduplication and enrichment" section below.
- Check out the latest version of our API
- If you want to build a generic API for several organizations, get in touch so we can support you better.
We recommend you develop your API against a Salesforce Sandbox environment. You can use a 30-day trial of FinDock to get started. You will need a license afterwards.
Endpoints
All endpoints are based on the specific Salesforce org you are going to use with the FinDock Payment API. The endpoints consist of three parts:
- The Salesforce domain URL. You can find this under Salesforce Setup > Company Settings > My Domain.
- The Payment API base URL:
/services/apexrest/cpm/v1.0/Payment - The Payment API endpoint: e.g.
/Payment
For example, if your domain is https://findock-dev-ed.my.salesforce.com, you would send your payment requests to: https://findock-dev- ed.my.salesforce.com/services/apexrest/cpm/v1.0/Payment For a full list of endpoints, please visit our API reference guide.
Developing a typical Payment API flow
Step 1: Determine payment methods and processors.
Before you can do anything with the API, you need to find out which payment
methods are available, and which payment processors are used for those
methods. FinDock provides several informational endpoints to find out what
configuration has been done in a specific Salesforce environment. If you
perform a GET on /PaymentMethods with a bearer token similar to Bearer
00D3X000002nlLm!AQ0AQP9WRbZoTA5kQNZEmLql6EUrJwl9nSUZsF_ih83YlAmhOf..LIuXzx_UE3httOZ3IahVRTnnzHP_gtl3fK5HRQCtMMBy in the Authorization header, you get the following response:
    {
       "ResponseCode": "001",
       "IsSuccess": true,
       "PaymentMethods": [
           {
               "Processors": [
                   {
                       "SupportsRecurring": true,
                       "RequiresAuthorization": true,
                       "Parameters": [],
                       "Name": "PaymentHub-Mollie",
                       "IsDefault": true
                   }
               ],
               "Name": "CreditCard"
           },
           {
               "Processors": [
                   {
                               "Name": "SEPA-Target",
                               "GlobalTarget": "PaymentHub-SEPA"
                           }
                       ],
                       "SupportsRecurring": false,
                       "RequiresAuthorization": false,
                       "Parameters": [],
                       "Name": "PaymentHub-SEPA",
                       "IsDefault": true
                   }
               ],
               "Name": "Direct Debit"
           },
    }
The response tells you this Salesforce org supports credit card payments through Mollie and direct debit payments through SEPA. If any ‘Parameters’ are returned, these need to be provided in the /Payment request message as ‘ParameterMap’ in the PaymentMethod object.
If the API returns no payment methods, this most likely means no payment methods have been activated. For more information, see Activating payment extensions.
Alternatively, you can get PaymentMethods and PaymentProcessors through the GET /PaymentProcessors endpoint, which returns similar data in the response, but grouped by Processor instead of Payment Method.
Step 2: Determine source.
The “source” in the FinDock context is where payment data resides. This can be
either FinDock (standalone configuration) or another Salesforce app like Nonprofit Success Pack. In the latter case, a source connector is configured to merge data to the source app and create data in Salesforce. Through the API, find out what source connector has been configured in the specific Salesforce org you are accessing. If you perform a GET on /SourceConnectors with a bearer token in the authorization header, you get the following response:
    {
        "ResponseCode": "001",
        "IsSuccess": true,
        "SourceConnectors": [
            {
                "Slug": "GiftAid-Source",
                "Name": "GiftAid Source Package",
                "IsDefault": false
            },
            {
                "Slug": "PaymentHub-for-NPSP
                "Name": "NPSP Source Package",
                "IsDefault": false
            },
            {
                "Slug": "PaymentHub",
                "Name": "PaymentHub",
                "IsDefault": false
            }
        ]
    }
This Salesforce org supports creating data with FinDock standalone (PaymentHub) and syncing with the Salesforce Non-Profit-Source-Package (NPSP) and Gift Aid for the UK market.
Step 3: Create the submission form.
There are two ways to build up your submission form for the actual payment or donation: hard-coded or dynamic.
Hard-coded: Get payment methods, processor and source for the specific Salesforce org ahead of time and hard-code them into your payment form.
- Pro: fast implementation
- Cons:
- Details required to perform a payment may change.
- Configuration (e.g. available payment methods) in the Salesforce org may change
- No personalization of the payment journey based on Salesforce data
If you decide to hard-code this configuration in your API call, make sure to stay up-to-date with releases of both FinDock and the PSP you are using and apply changes accordingly. You could also regularly poll the API for changes.
Dynamic: For each payment or donation perform the /PaymentMethods and /SourceConnectors call in step one, and then build the form based on the returned data. With this approach, you don’t need to refactor your donation form if anything changes on the Salesforce/FinDock side. You can apply business logic based on real-time data from the Salesforce org.
Step 4: Make the payment.
To make a payment, perform a POST to /Payment with at least a Payer, Payment, Payment Method and Source Connector in the request body and a Bearer token in the Authorization Header:
    {
        "SuccessURL":"http://www.success.nl",
        "FailureURL":"http://www.fail.nl",
        "Payer":{
            "Contact":{
                "FirstName":"Eric",
                "LastName":"Johnson"
            }
        },
        "Payment":{
            "Amount":10
        },
        "PaymentMethod":{
            "Name":"CreditCard",
            "Processor" :"PaymentHub-Mollie"

        },
        "SourceConnector":{
            "Name":"PaymentHub"
        }
    }
In this example, only the most basic parameters are used. Please visit our API Reference for a full list and detailed description of API request and response parameters.
FinDock creates the required Installment and Contact records in Salesforce based on the request message. The Salesforce IDs of these records are returned in the response:
    {
        "ResponseCode": "001",
        "IsSuccess": true,
        "SourceConnector": {
            "Name": "PaymentHub"
        },
        "RedirectURL": "https://myfindock-developer-edition.eu29.force.com/apex/moph__redirect?failureRedirectURL=http%3A%2F%2Fwww.fail.nl&installmentId=a083X00001brHBqQAM&paymentMethod=CreditCard&recurring=false&successRedirectURL=http%3A%2F%2Fwww.success.nl",
        "PaymentMethod": {
            "Processor": "PaymentHub-Mollie",
            "Name": "CreditCard"
        },
        "Payment": {
            "InstallmentId": "a083X00001brHBqQAM"
        },
        "Payer": {
            "ContactId": "0033X000032VA73QAG",
            "ContactDeduplicated": false,
            "AccountDeduplicated": false
        }
    }
Step 5: Redirect for additional details.
If additional information (like credit card details) are required, use the redirect URL from the response message to redirect the customer/donor to the payment form provided by the payment processor. Once the transaction is completed, the customer/donor is redirected to a final ‘success’ URL specified in the initial request.
Step 6: Processor updates FinDock.
After the transaction is completed successfully, the payment processor updates the status of the transaction with FinDock. FinDock updates the required data in Salesforce by creating a payment under the previously created installment record.
Next steps
Perform a single or recurring payment through the API based on your business requirements. For further information, see How to use the Payment API.
Authentication
Please refer to our API reference guide for further information.
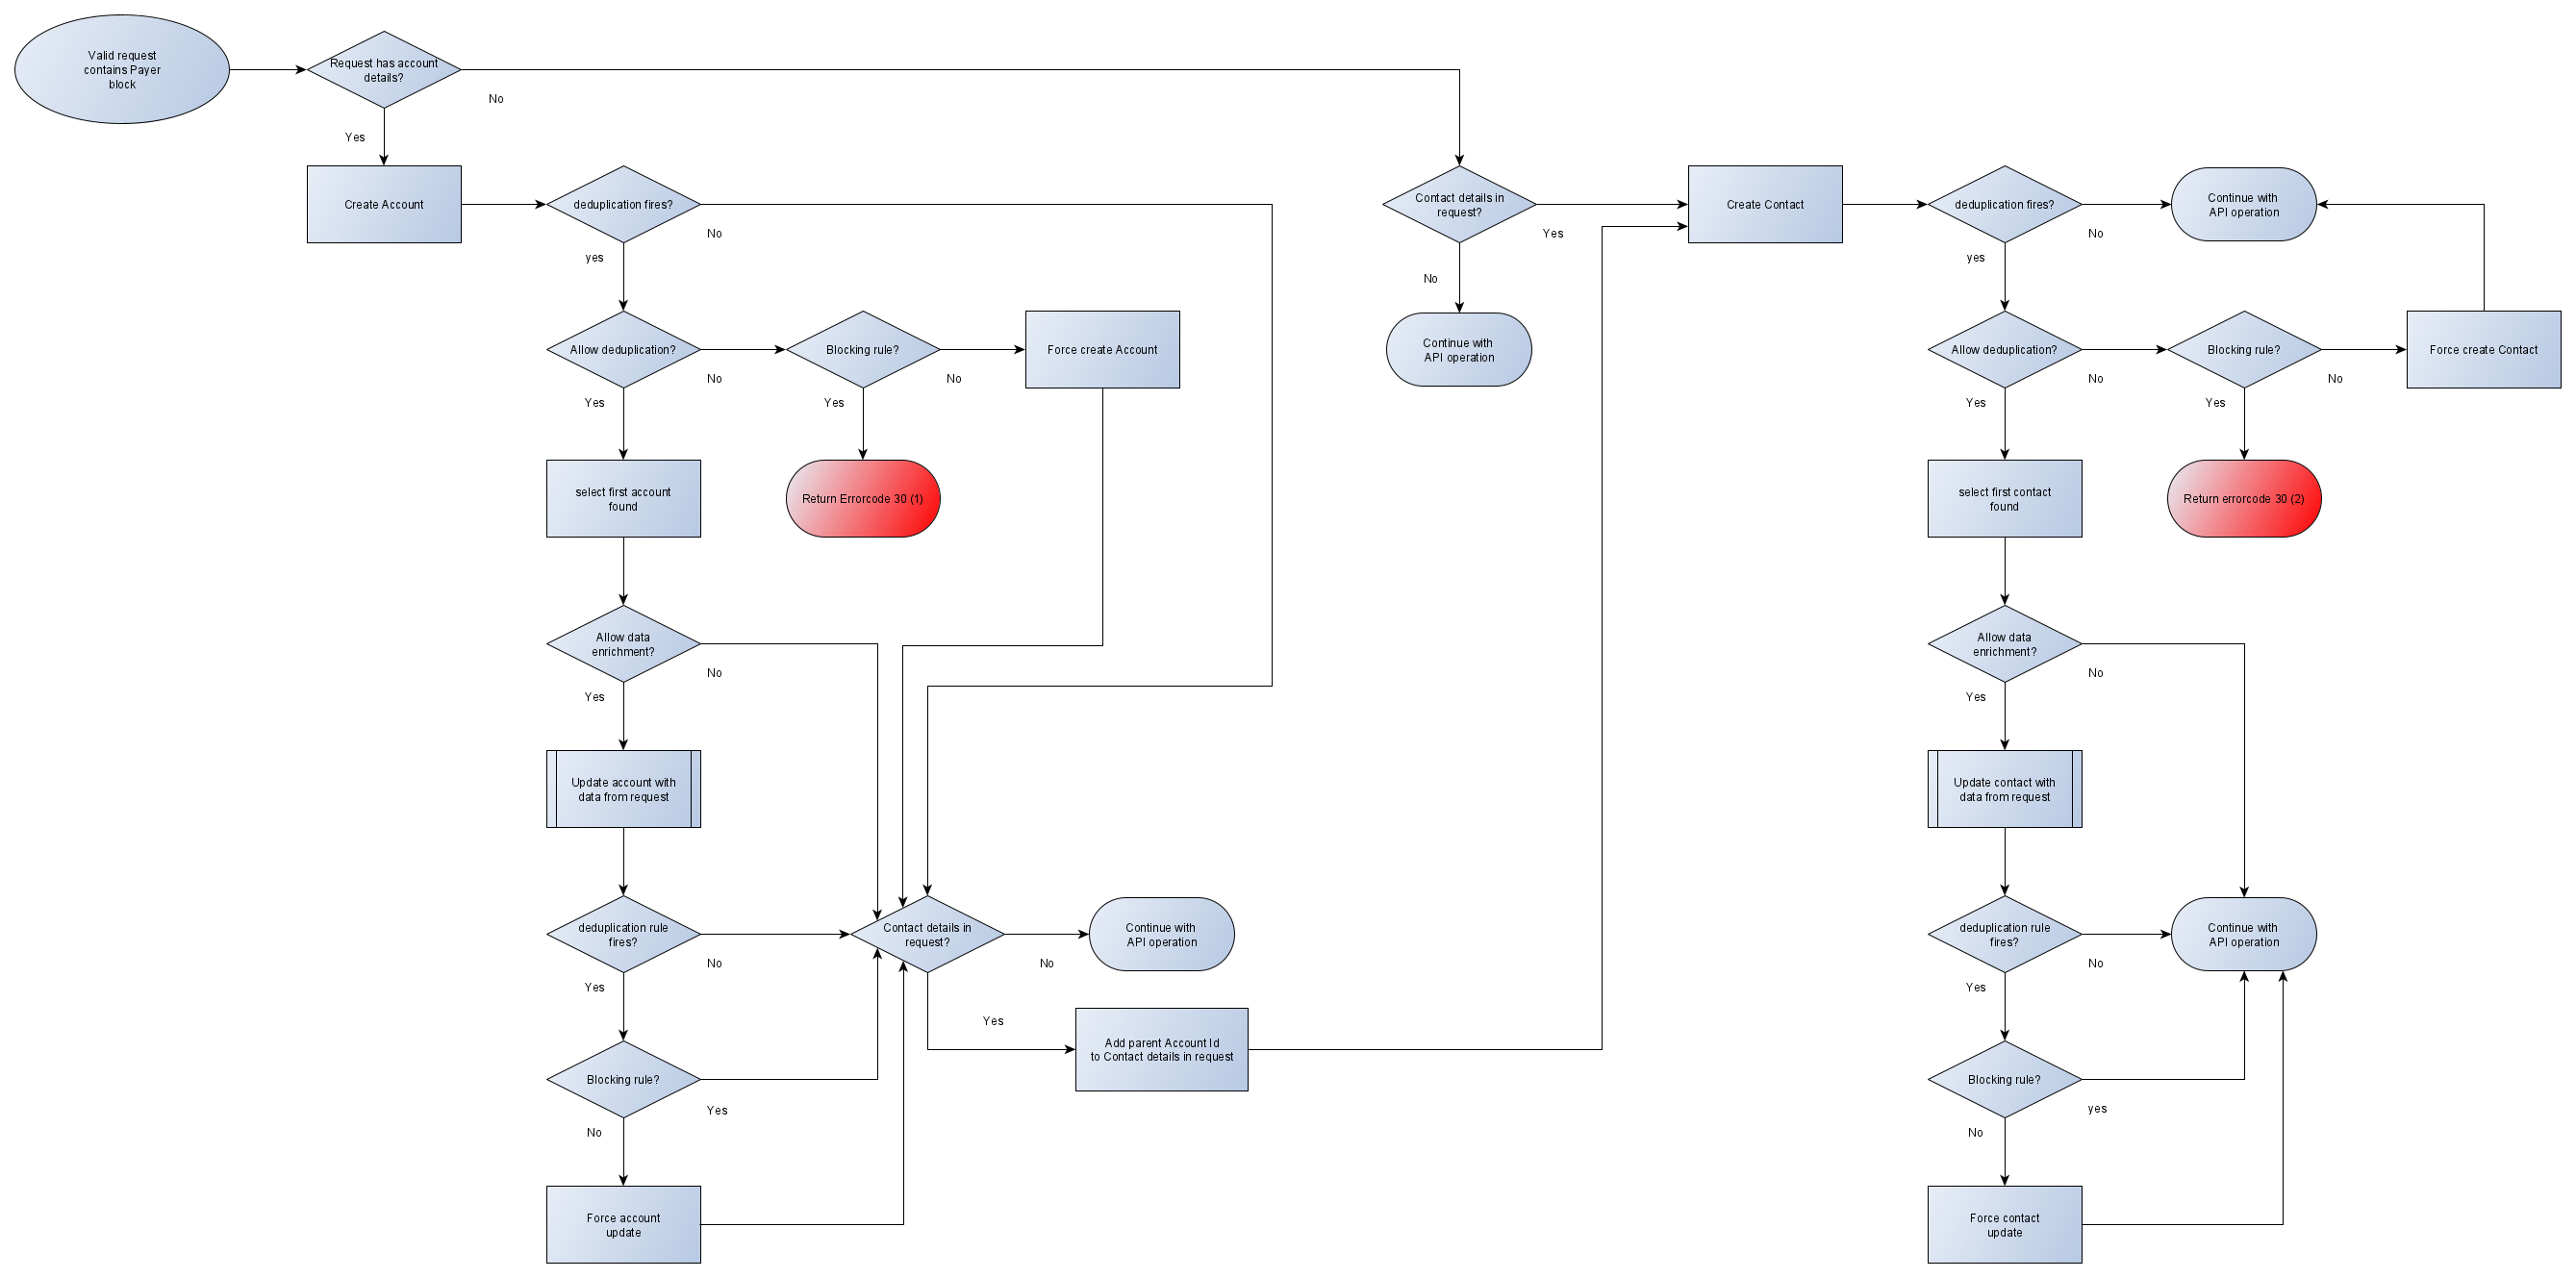
Deduplication and enrichment
To maintain data integrity and quality, the Payment API supports deduplication using Salesforce deduplication features and FinDock data enrichment options.
The processing rules need to be configured in Salesforce before the Payment API can apply deduplication and data enrichment. Confirm with your Salesforce administrator on the correct set of rules for your business case.
The deduplication and enrichment flow depends on the source data model. If you are using FinDock Standalone or FinDock for NPSP, the following flow is used:
If you are using FinDock for Converse, the following flow is used:
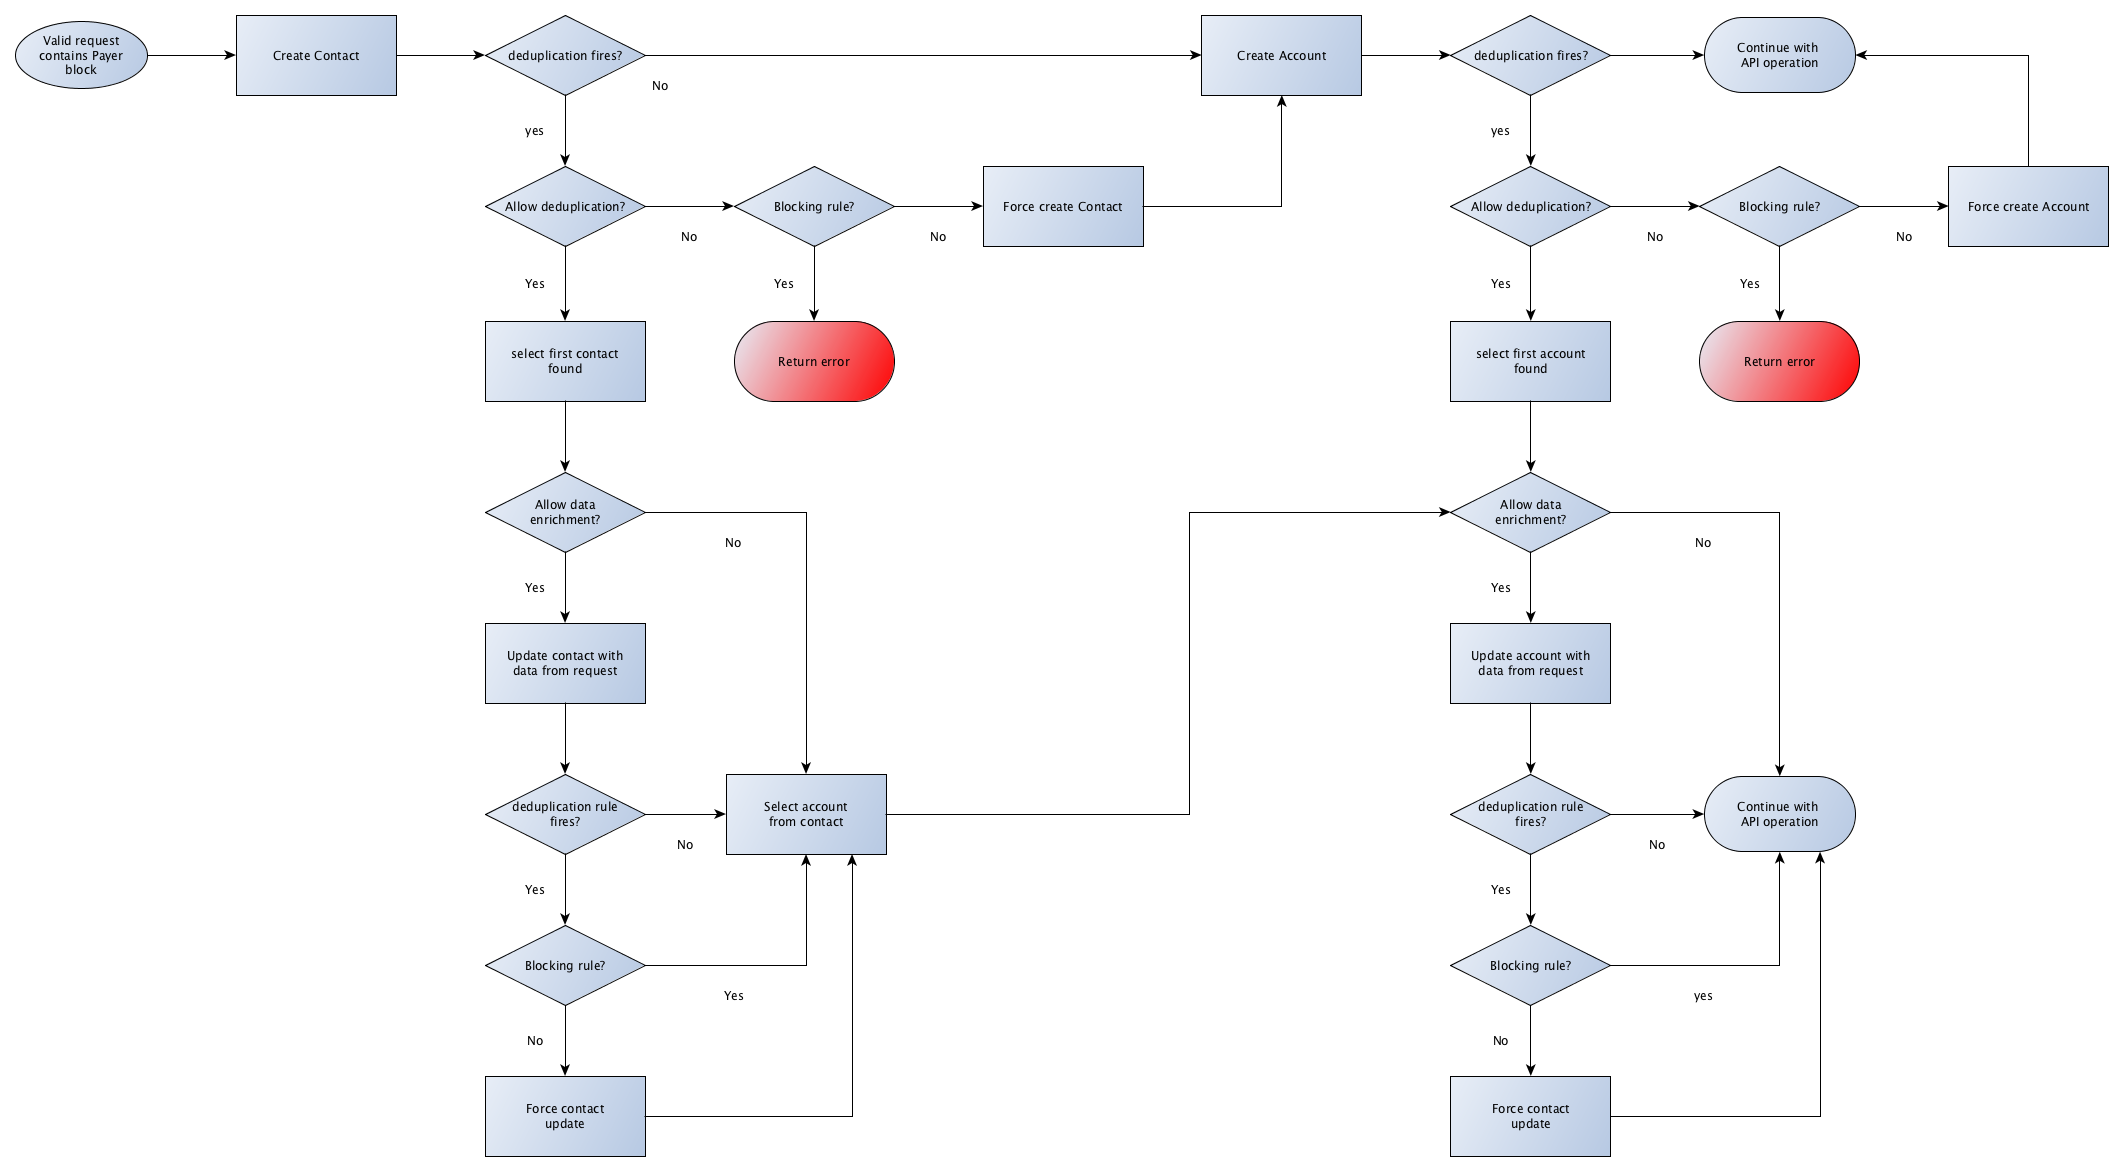
There are currently two API objects where deduplication is relevant:
- Payer: which contains the Salesforce objects Contact and/or Account.
- Payment Method: in which the Payment Profile is deduplicated.
The main object for deduplication and enrichment is the Payer object. The Payer object facilitates the creation of Salesforce Contact and Account sObjects, which lie at the core of your CRM data. This is where you have the most flexibility in applying processing rules. The Payer object allows deduplication to be enabled or disabled, along with a variety of options for fine-tuning deduplication and enrichment. For the PaymentMethod object deduplication is always active to ensure that no duplicate Payment Profiles are created.