Guided Matching rule types
When creating custom Guiding Matching rules, you need to first choose a rule type. The available types depend on the field to which the new rule applies. The rule editor automatically limits the types depending on the selected field.
Rule Type: Constant
Use this rule type to set the value of a transaction field to a constant value.
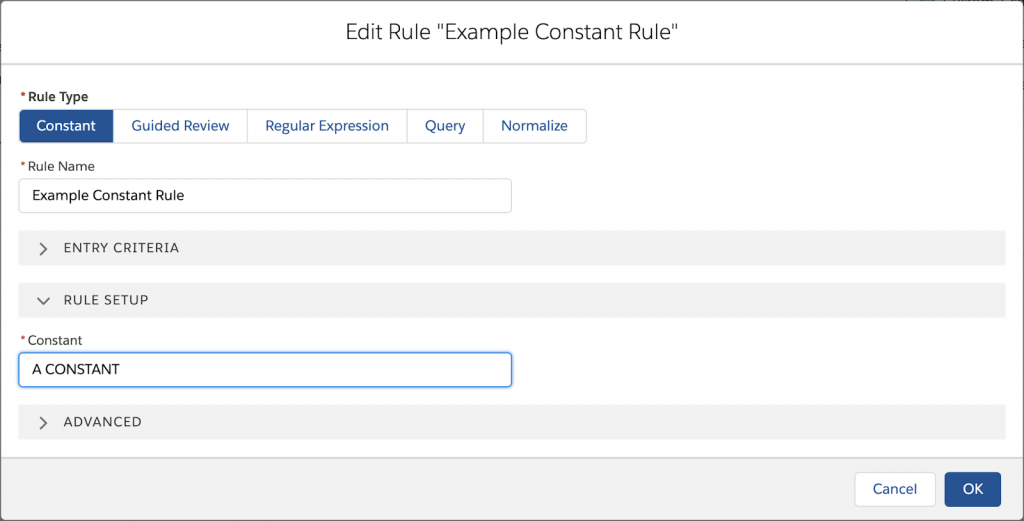
Constant setup
| Setting | Description |
|---|---|
| Constant | The constant value for the transaction field |
Rule Type: Regular Expression
Use this rule type to extract a value from a transaction field according to a regular expression. If the regular expression rule is used for a checkbox field, the checkbox field is checked if a match can be found. For example, let’s say you want to mark all transactions with the word ‘GIFT' in the payment reference. First, you create a ‘Has Gift’ checkbox custom field on Transaction, and then, using the Regular Expression rule type, create a rule with regular expression ‘GIFT’.
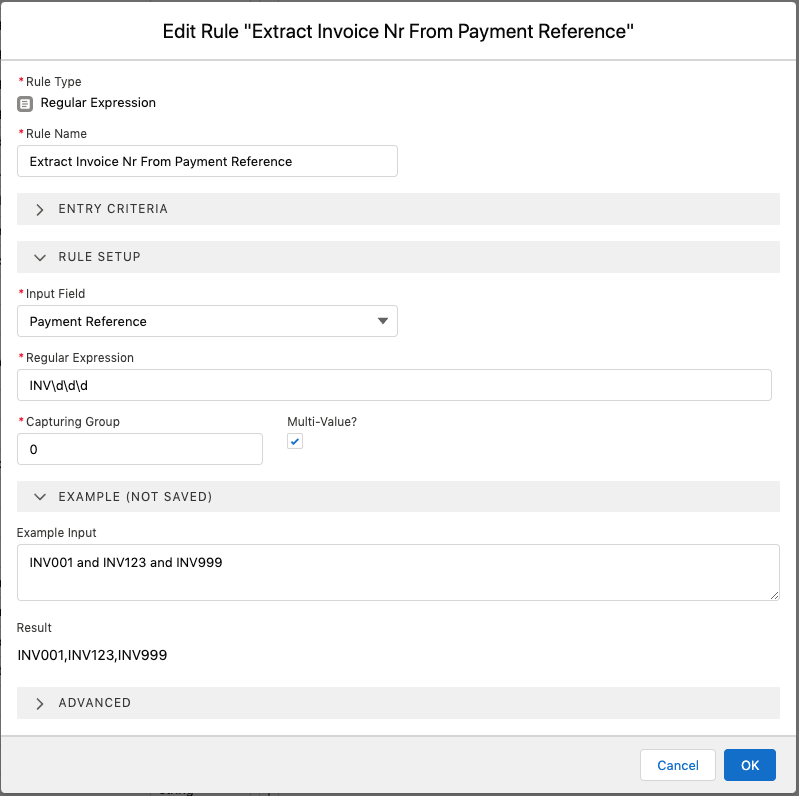
Regular Expression setup
| Setting | Description |
|---|---|
| Input Field | Field from which a value is extracted using a regular expression. |
| Regular Expression | A regular expression is a string that is used to match another string using a specific syntax. For further information, please refer to Oracle documentation. A nice tool and playground is RegExr. |
| Multi-Value? | If checked, all matched patterns are returned comma separated. If the total string is longer than fits in the Results field, only what fits is stored. |
| Capturing Group | FinDock uses the REgEx outcome of the defined capturing group to store on the Transaction field. See this Salesforce developer doc |
| Example Input | Example text for the regular expression and capturing group. This is for testing and verifying that the regular expression behaves as expected. |
| Capturing Groups | All the resulting capturing groups given the specified regular expression and example input. |
| Result | The result given the calculated capturing groups and the specified capturing group. |
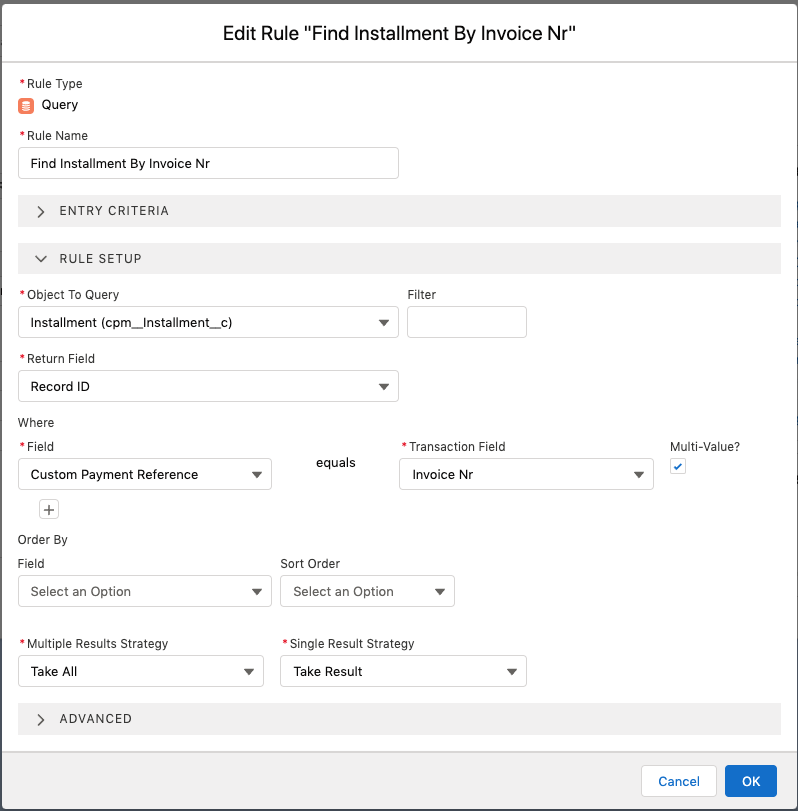
Rule Type: Query
Use this rule type when you want to find a value by using a query of Salesforce data. Generated SOQL is logged in the Guided Matching Log field, and the query execution time is logged as queryTimeMillis. If Guided Matching fails, check these logs. Slow queries can lower matching performance. Values above 500 are too high. Please refer to standard Salesforce query performance best practices to solve issues in this area.
You should only query indexed fields. Querying a non-indexed field significantly lowers search performance. To index custom fields, under the general options for the field, set External ID to true.
The queries can be defined for matching multiple dynamic criteria on transaction fields, where a field value on the query object is matched to a field value on the transaction record. For example, you can match transactions against installments that have the same contact and the same amount.
For query rules on Payment Profile, the new Primary Identifier field should be used.
Criteria against a transaction field are only available if the comparison operator is ‘equals.’ Only the first and mandatory criterion (Account = Account in the example below) is included in the generated SOQL query. All ‘value’ criteria (Status != “Collected” in the example screenshot below) are included in the generated SOQL query. However, other ‘field’ criteria (Amount = Amount and Originating Campaign = Campaign in the example) are not included in the generated SOQL query. These are filtered out by looping through the query result set.
Make sure you use the most specific comparisons first. Salesforce has a per-transaction governor limit of 50,000 for total number of records retrieved by SOQL queries. The Guided Matching Query rule type explicitly checks if the query returns more records than allowed by the Salesforce limit with the addition of LIMIT [Remaining Rows] to each generated query. If the number returned equals Remaining Rows, it is assumed that the governor limit has been exceeded, and the Transaction or Inbound Report records are set to Failed with a clear error message indicating the query limit was exceeded.
Query setup
| Setting | Description |
|---|---|
| Multi-Value? | The checkbox appears to the right of the first query criterion Transaction Field. If checked, the value in the Transaction Field is interpreted as a comma-separated list of values, and the query uses any of these values. |
| Multiple Results Strategy | Strategy for what to do if the query returns more than one field. With Guided Review, the transaction record goes to guided review. Users are shown a table with all resulting records and need to select one of the records. Take First means the first record found is automatically selected. No Result sets the rule status to ‘Done, No Result’ and the next rule is processed. If the Take All option is selected and there are multiple results, the query result is written in field “Multiple Installment Ids” as a comma-separated list of records, and the Installment lookup is left empty. If there is just one result, the Installment lookup is filled with the result and “Multiple Installment Ids” is left empty. |
| Single Results Strategy | Strategy for what to do if the query returns only one field. Guided Review sets the transaction record to go to guided review. Users are shown a table with all resulting records and need to select one of the records. Take Result means select the record that was found. |
| Object to Query, Return Field, Where and Order by Fields | Together these fields are used to form a SOQL query. Note that for the where clause, SOQL is not case sensitive. |
| Filter | A filter for the Object to Query drop-down list, which can be very long. This value is not saved in any way. |
| Result Fields to Display | Only if Multiple Results Strategy ‘Guided Review’ is selected. Use this field to define how the table in guided review is rendered. |
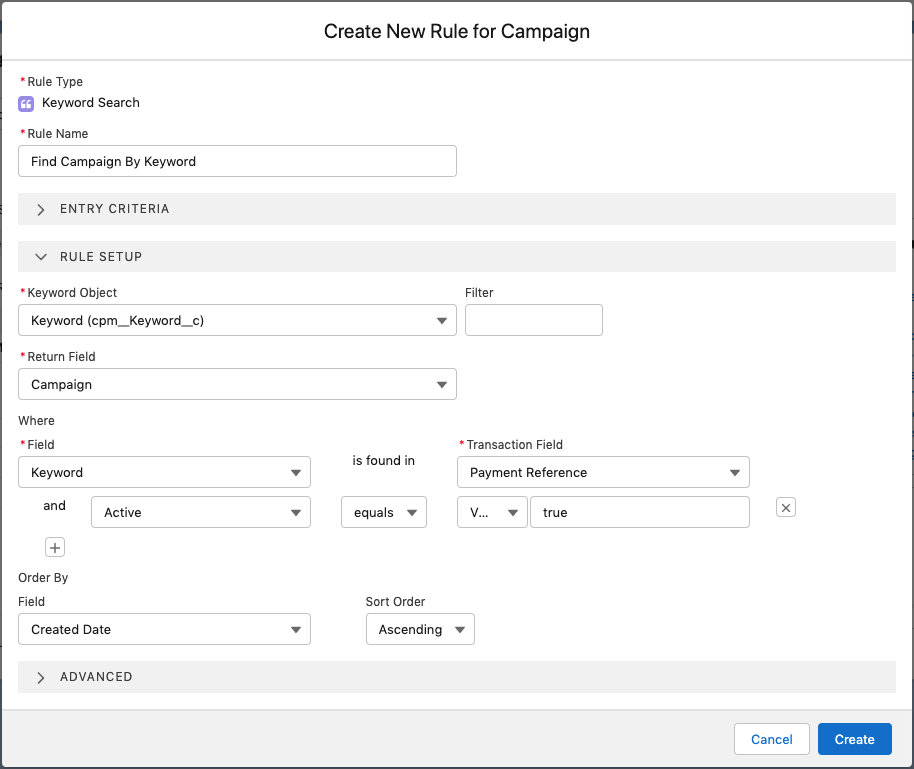
Rule Type: Keyword Search
Use this rule type to match transactions or inbound reports to specific keywords. You can search for up to 500 keywords in a rule, but keep in mind the searching process is quite heavy. The searching stops on the first keyword found.
Before you can use Keyword Search rules, you need to have your keywords defined in Salesforce. You can do this with standard objects and fields or create a custom object for this purpose. The Keyword Search rule returns the selected field when matched, this could be a lookup to an object, a text field or any field.
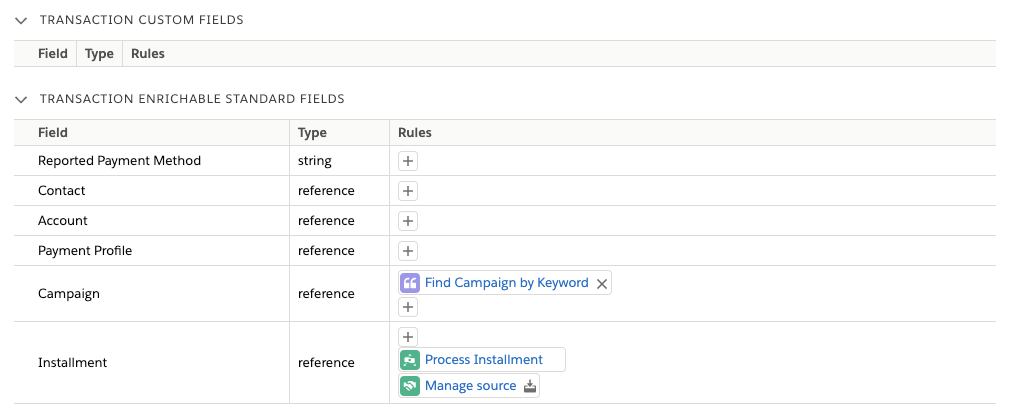
Below is an example rule that searches through keywords defined in a Keyword custom object and returns a Campaign field.
Keyword matching case insensitive.
Keyword Search setup
| Setting | Description |
|---|---|
| Keyword Object | Select the object (custom or standard) where your keywords are defined. |
| Filter | Use a filter to narrow the Keyword Object drop-down list, which can be very long. The filter value is not saved in any way. |
| Return Field | Defines which field on the Keyword Object contains the return value for a successful search. The Return Field value is added to the transaction field where the rule is used. |
| Where | Specifies the conditions for applying the Keyword Search rule. Those records that fulfill a specified condition. Define where the keywords are found in the Keyword Object, where they are located in the transaction record, and what the matching relationship should be. Use the plus button to add additional conditions. |
| Order by | Use Field and Sort Order to order the search results if needed. |
Keywords as regular expressions
The Keyword Search rule is based on regular expressions. That means your keywords are interpreted with regex logic. You can leverage this capability by, for example, adding regex constructs in your keyword values to cover a wider range of possibilities than exact one-to-one matches. For example, if you have run a campaign for supporting Syrian refugees and want to capture all possible transactions that have different spellings for “Syria,” you could have these in your keyword list:
- Syr.a
- Syr[iy]a
- Syria|Syrya
- Syr.*a
- Syr.?a
Rule Type: Normalize
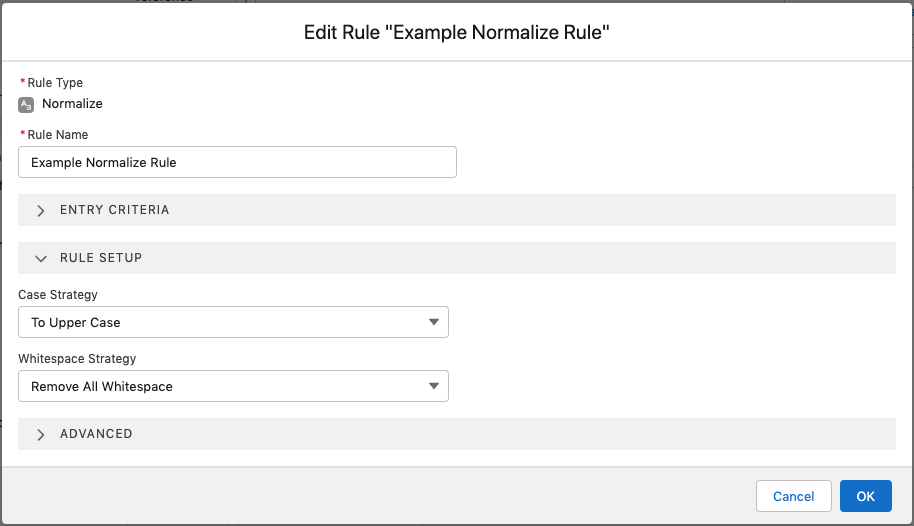
Use this rule type to change how a string is presented. For example, the raw string for a campaign code could look like ‘Save THE TIGer.’ You can use a normalize rule to change that to ‘savethetiger.’
Normalize setup
| Setting | Description |
|---|---|
| Case Strategy | Define how to handle capitalization. Select None to not normalize case. Select To Upper Case to change all characters to uppercase. Select To Lower Case to change all characters to lowercase |
| Whitespace Strategy | Define how to handle whitespace. Select None to ignore whitespace. Select Trim to remove whitespace at the start and end of the string. Select Remove All Whitespace to remove whitespace anywhere in the string. |
Rule Type: Fixed Width Extract
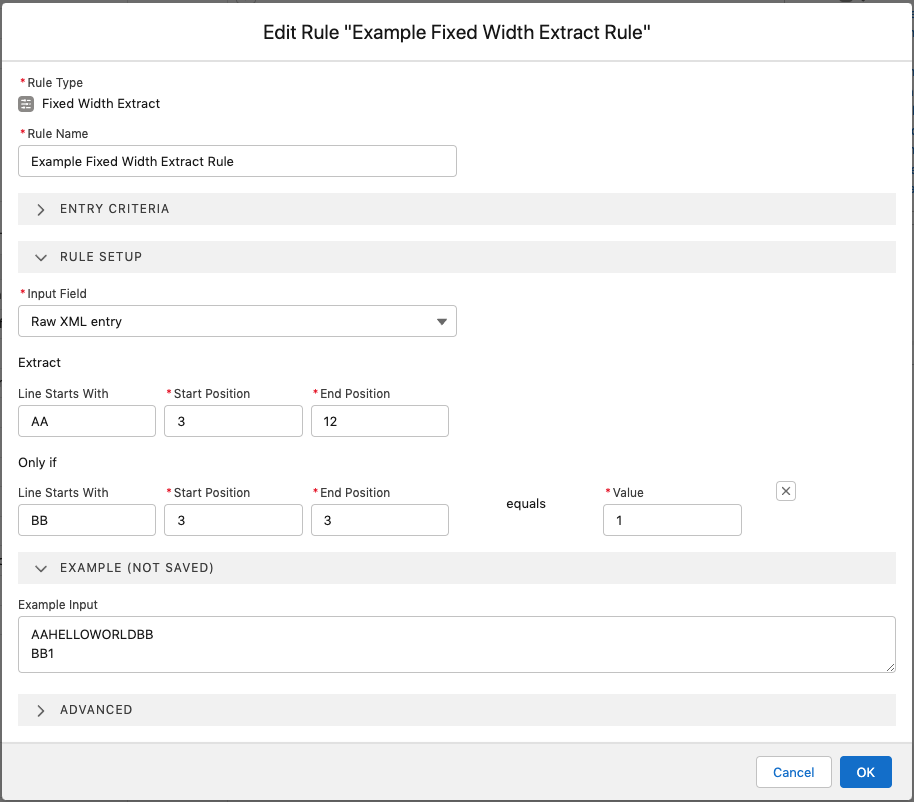
Use this rule type to extract a value from a Transaction or Inbound Report field according to the position of the value in the field. There are many payment files which are structured according to fixed positions, such as CODA and N43.
Extracted values are trimmed of excess filler spaces by default.
Fixed Width Extract setup
| Setting | Description |
|---|---|
| Input Field | Field from which a value is extracted using fixed position parameters. |
| Line Starts With | A value will be extracted from the first line starting with this value. If this is left empty, extraction begins from the first line of the field. |
| Start Position | First position in the line of the value to be extracted. Note that the first position in a line is 1. |
| End Position | End position in the line of the value to be extracted. The characters between start and end position will contain the result of the extraction. |
| Only If Line Starts With, Start Position, End Position and Value | Many fixed length file formats have switches in the file. In order to make it easy to base logic on these switches, this rule includes an “Only if” refinement. The extraction rule is used only if Line Starts With, Start Position and End Position equals the Only If Value. If no “Only If” refinement is provided, the rule will be processed if the entry criteria are met. |
Rule Type: Guided Review
If you know certain fields may need something from the user conducting the review, use this rule type to define the manual actions for the reviewer.
Guided Review setup
| Setting | Description |
|---|---|
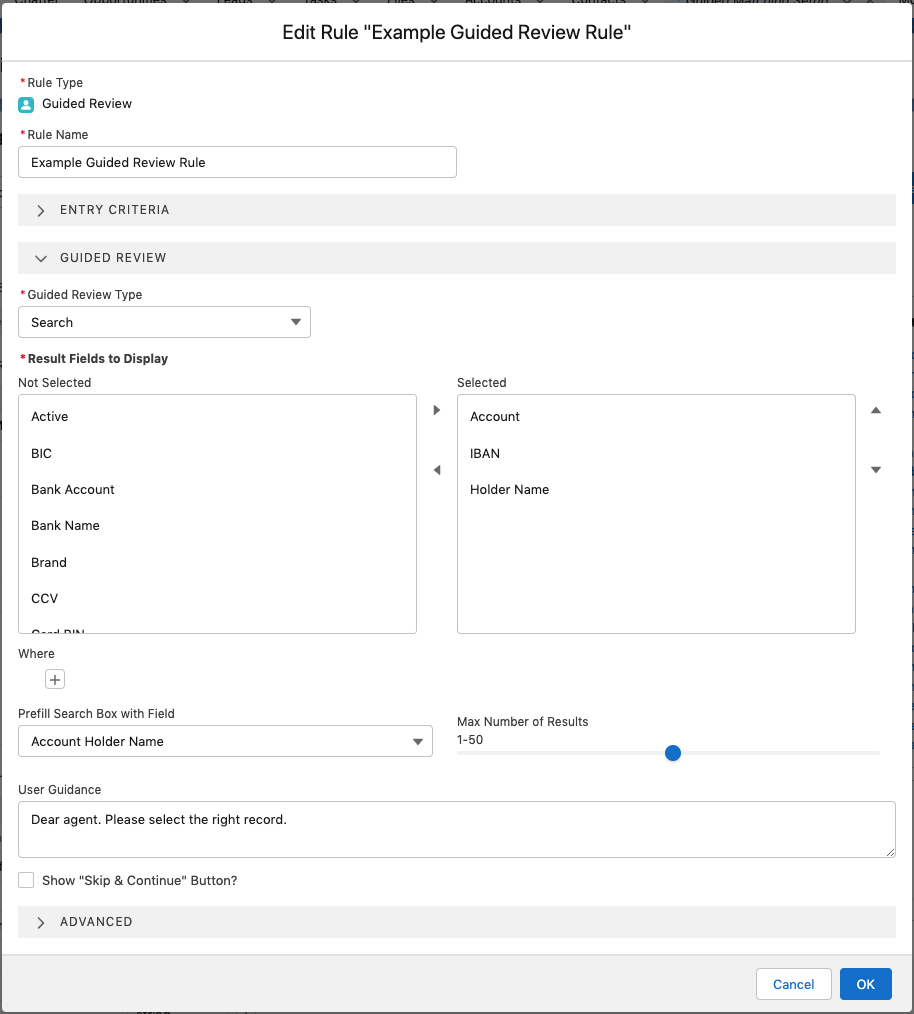
| Guided Review Type | Defines the review action. Salesforce field: the Salesforce field is shown to the user in the Guided Review component in edit mode. The user can set the value. Search (only for reference type fields): guided review asks the user for a search query after which a SOQL query is performed on all fields to find related records. Users can select one of the results, after which guided matching continues. Combined Contact and Account Search (only on Contact): this is similar to Search, except that it allows searching Contact and Account at the same time. |
| Result Fields to Display | Specify which fields to display in the search results of the guided review component; only relevant for Search, Combined Contact and Account Search. |
| Prefill Search Box with Transaction Field | Select a transaction field to prefill the search box and automatically do the first search based on the field value; only relevant for Search, Combined Contact and Account Search. |
| Max Number of Results | Specify how many results are displayed in the search results (range 1-50); only relevant for Search, Combined Contact and Account Search. |
| User Guidance | Special guidance for the guided review that is displayed to the reviewer. |
| Show “Skip & Continue” Button | Select this option to allow the user to just skip the current guided review rule and proceed to the next rule. |
Rule Type: Create Record
Use this rule type to create a Record, Contact, Payment Profile or Installment. For Contact, Payment Profile and Installment, mapping is automatic wherever possible to ensure data is created in a way that FinDock supports. The auto-mapping is described clearly in the rule setup section. For the Create Payment Profile rule, you can also map the correct record type.
Enforce uniqueness should be enabled (FinDock general settings) if you use a create Payment Profile rule. The Payment Profile enforce setting is enabled by default for FinDock installations after the June 2020 release. You can use a create rule for Payment Profile without enabling enforce uniqueness. However, processing this rule may lead to duplicate records in some cases. In the example below, a record is created based on information in the processed file.
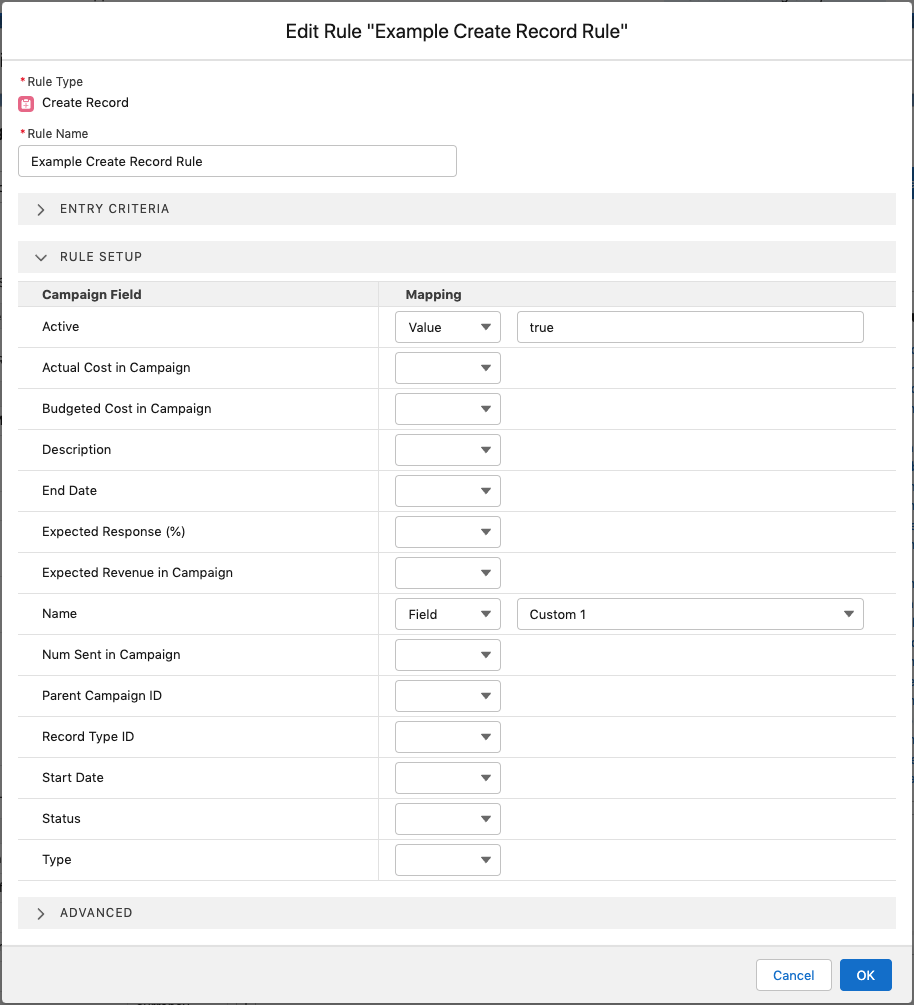
Create Record setup
| Setting | Description |
|---|---|
| Mapping | Each field of the created object can be mapped. A field can be either mapped to a constant value or to a Transaction field. |
| Upsert Field | Under advanced settings, select this option if you want the rule to use an upsert operation, instead of insert, using the selected field as key. Upserting ensures there is no chance of duplicate records being created. A deduplication approach using a query rule to first find existing records and then only create if not found catches most duplication scenarios. However, this approach cannot 100% guarantee no duplications because of the parallel processing characteristics of Guided Matching. |
Rule Type: Update Record
Use this rule type to update any object. This rule can be added to any lookup or master-detail field.
The rule will be skipped if no record is related to the Transaction or Inbound Report record. In all other cases, it will update the related record according to the mapping you have defined.
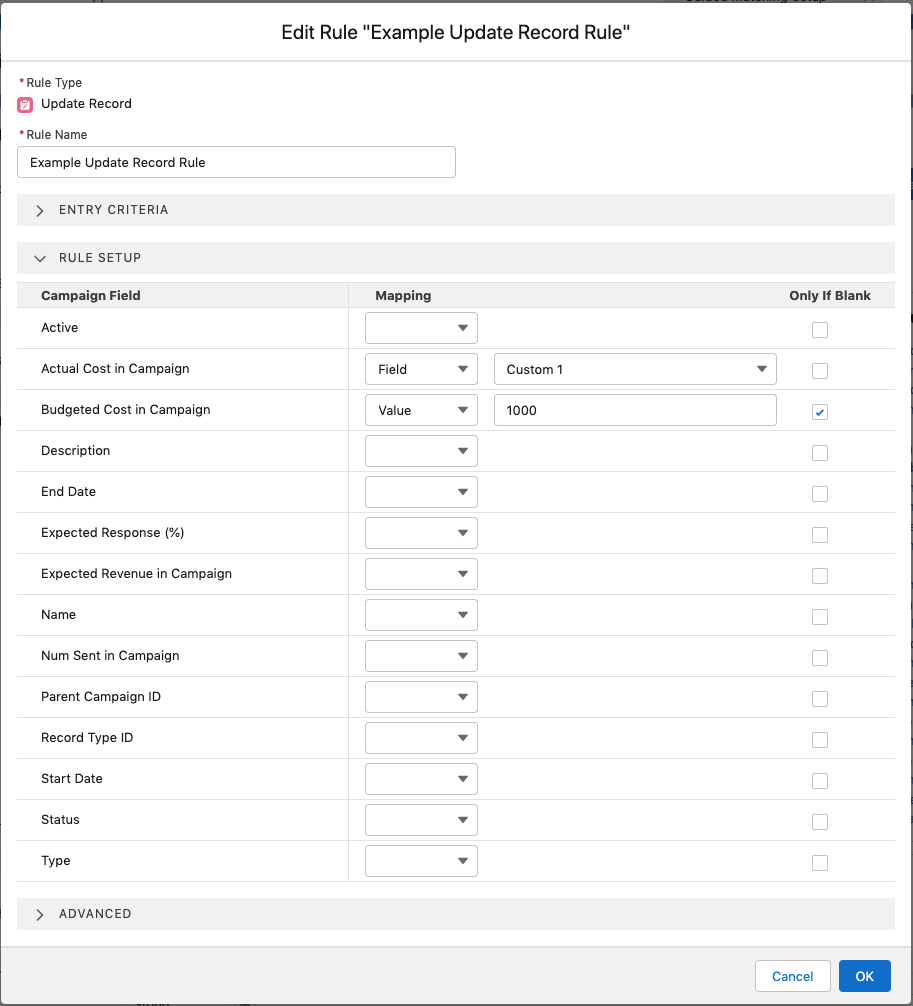
Update Record setup
| Setting | Description |
|---|---|
| Mapping | Each field of the related object can be mapped. A field can be either mapped to a constant value (mapping type: Value) or to a Transaction or Inbound Report field (Mapping type: Field). If the “Only If Blank” checkbox is selected, the field will only be updated if does not already have a value. |
Special update rule for Campaign
The Update Campaign Member rule is a special update case because Salesforce does not allow lookups to Campaign Member. The Update Campaign Member rule instead acts on the text field “Campaign Member Id” which comes pre-shipped from FinDock on Transaction and Inbound Report.
Rule Type: Manage Source
If you have NPSP as a source package, the Manage Source rule creates an NPSP Opportunity if no existing Installment (and thus Opportunity) was found. To create the Opportunity FinDock uses the mapping as defined in the NPSP Opportunity Installment mapper.
The Manage Source Rule Type is included in all managed rule sets and can not be added through the Guided Matching setup.
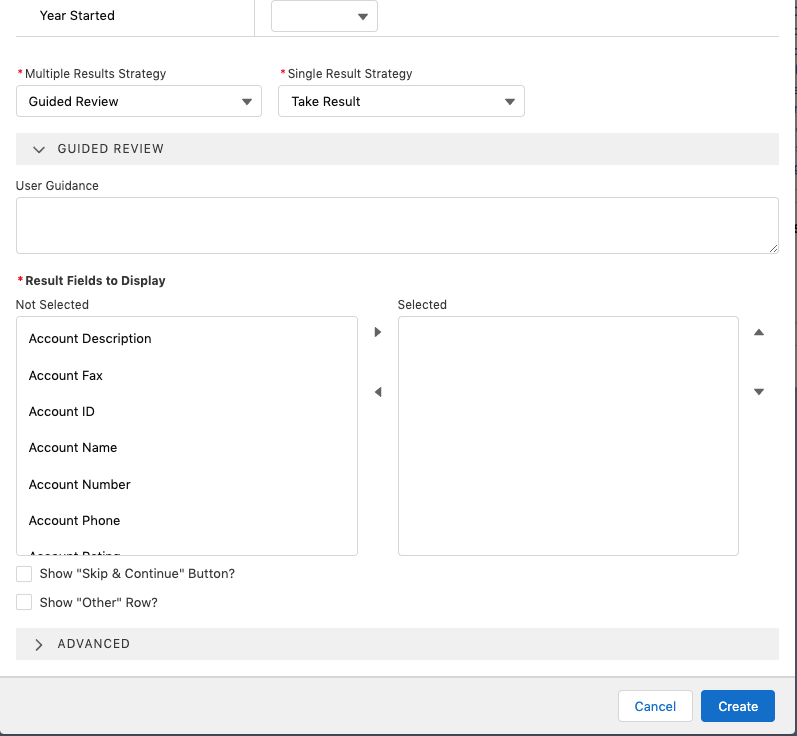
Rule Type: Find Duplicate
Every reference field on Transaction and Inbound Report records has the Find Duplicate rule type. For the purposes of this explanation, we use the Account reference field as the example.
Creating a new rule is mostly about mapping between Account and the Transaction or Inbound Report record. This mapping defines how an Account record is created in memory so that it can be checked for duplicates in Salesforce according to the active Duplicate Management rules (standard Salesforce functionality). The following screenshot shows a simple mapping to the Account Type field on Account.
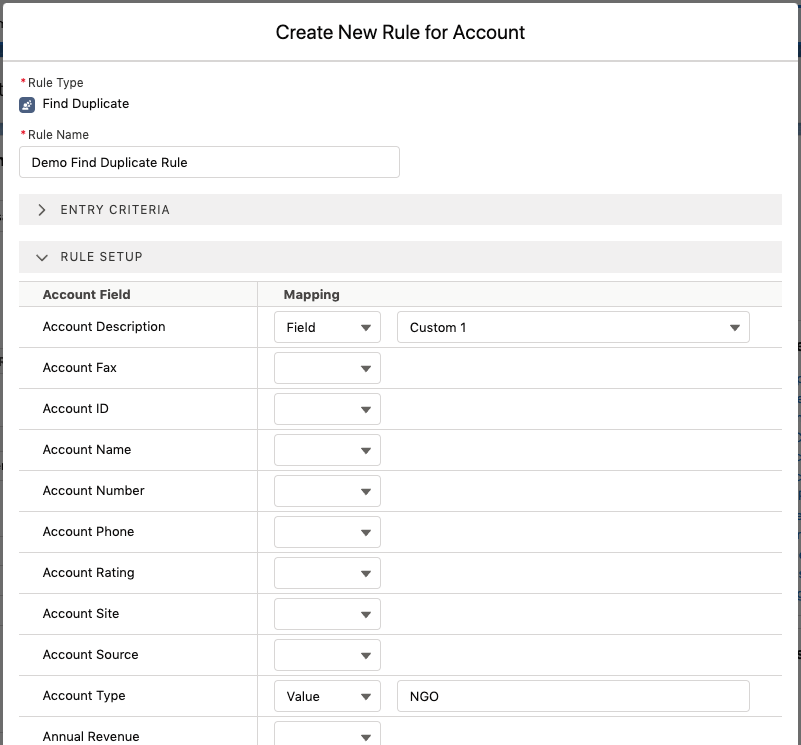
The Find Duplicate rule type has Multiple Results Strategy, Single Result Strategy, and Result Fields to Display settings which behave the same way as they do for the Query rule type.
Rule Type: Create Campaign Member
This rule behaves the same as the generic Create Record rule type, but is specifically for the Campaign Member object. The rule setup uses a lookup of the Campaign Member Id for Transaction or Inbound Report records.
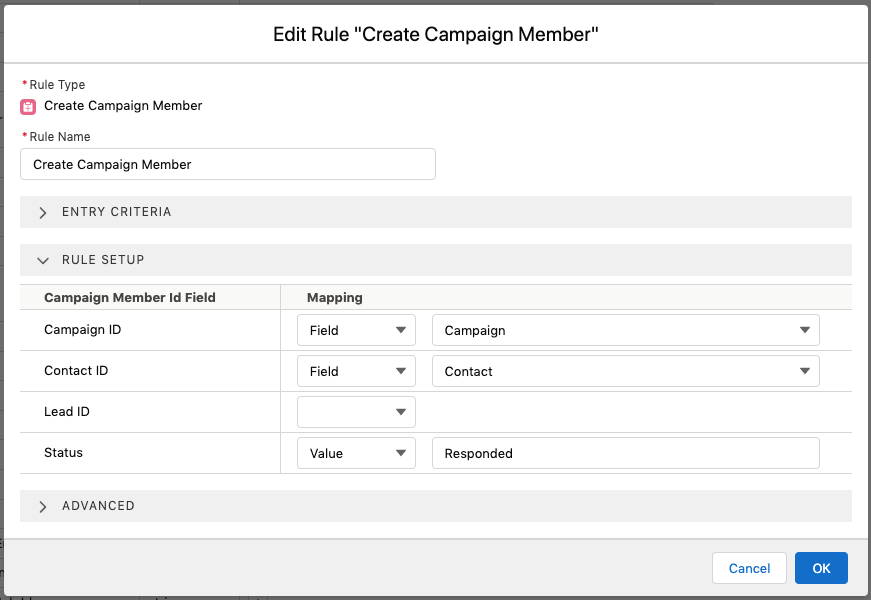
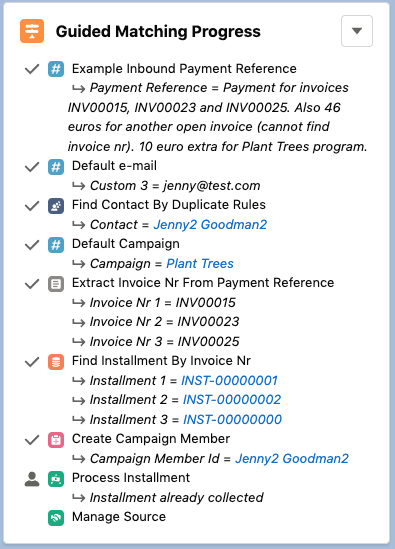
If a lookup results in a new Campaign Member record, you can see the action in the Guided Matching Progress component.
Rule Type: Process Installment
This rule is always included in the rule exception plan as the last step of Guided Matching using a three-step process as outlined here.
Step 1 - Installment Change Calculator
First the Process Installment rule calculates the required installment changes to fully match the Transaction or Inbound Report record. These changes are not applied to any record at this point.
The Installment Change Calculator takes as input:
- A Transaction or Inbound Report record
- A list of one or more identified installments (order is important for the calculation algorithm)
As output, the calculator determines the required installment changes to fully match the input record. An installment change can be:
- New status for the installment
- Amount for the first Payment record that needs to be calculated
- If there is an overpayment, the amount for the second Payment record is calculated. (This is only for overpaid installment scenarios in which the overpaid part, the remaining amount, is inserted into the system as a separate Payment record.)
- New Last Collection Date for the installment
- New Last Reversal Date for the installment
The process continues until all the full transaction amount has been accounted for.
The Installment Change Calculator has three overpaid installment handling options you can select from the Overpaid Installment Handling picklist.
- Book Remainder On Next: In the case of overpayment, the full overpayment amount is always allocated when the rule is processed. A payment is created for the full open amount on the first installment. The remaining amount is booked on further identified installment(s). If there are no further identified installments, the transaction or inbound report always goes to Guided Review.
- Book All On First: The full amount is booked against the first installment with two Payment records: (1) with the open amount, and (2) the remaining amount.
- Leave Remainder on Transaction / Inbound Report: In the case of overpayment, the overpaid amount is added to the Open Amount on the Transaction or Inbound Report. This open amount can be used to partially or fully pay further installments each time Guided Matching is executed on the record. For further information, see the examples below.
Overpayment handling examples
If you have and Transaction or Inbound Report record for 250 and two installments for 100, this is how the overpayments can be handled.
Book All on First
Installment 1: Collected (overpaid)
| Payment 1: 100
| Payment 2: 150
Installment 2: Pending (or similar status)
Book Remainder on Next
Installment 1: Collected
| Payment 1: 100
Installment 2: Collected (overpaid)
| Payment 1: 100
| Payment 2: 50
Book Remainder on Transaction / Inbound Report (first execution)
Installment 1: Collected
| Payment 1: 100
Installment 2: Collected
| Payment 1: 100
Record: Partially Matched, Open Amount: 50
Process Installments (second execution, 3rd installment for 100 identified)
Installment 3: Partially paid
| Payment 1: 50
Record: Matched, Open Amount: 0
If you use the Book Remainder on Transaction / Inbound Report option, you can still end with Guided Review based on the Guided Review Assessment. However, the already processed installments are not editable, unlike with the Book Remainder on Next option.
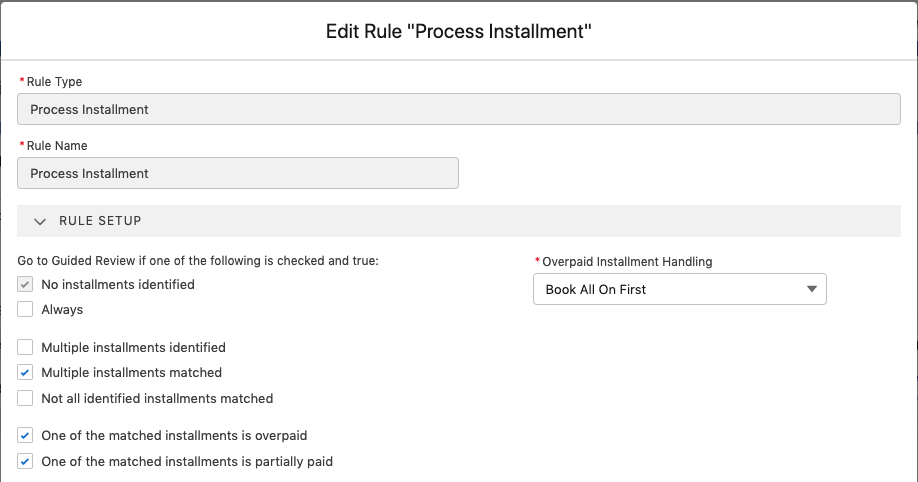
Step 2 - Guided Review Assessment
Based on the calculated changes, FinDock determines if processing can be done automatically or if manual validation is needed, in which case the record is put into Guided Review. There are six criteria for making this assessment, and they can be enabled as part of the Process Installment rule setup.
- Always: The record is always put into Guided Review, regardless of matching status.
- Multiple installment identified: If a previous query rule identified more than one installment, the record is put into Guided Review.
- Multiple installments matched: If the calculated installment changes include more than one installment, the record is put into Guided Review.
- Not all identified installments matched: If more installments were identified by an earlier query rule than have been matched, that is, not all identified installments have been used, the record is put into Guided Review.
- One of the matched installments is overpaid: If more money was received than expected so that one installment is overpaid, the record is put into Guided Review.
- One of the matched installments is underpaid: If less money was received than expected so that one of the installments is only partially paid, the record is put into Guided Review.
If FinDock determines that the Transaction or Inbound Report record does not need to go into Guided Review, the calculated changes from step 1 are processed, meaning that all affected installments are updated, and payments are created accordingly.
Step 3 - Guided Review
Transaction or Inbound Report records that go into Guided Review are presented as shown here:
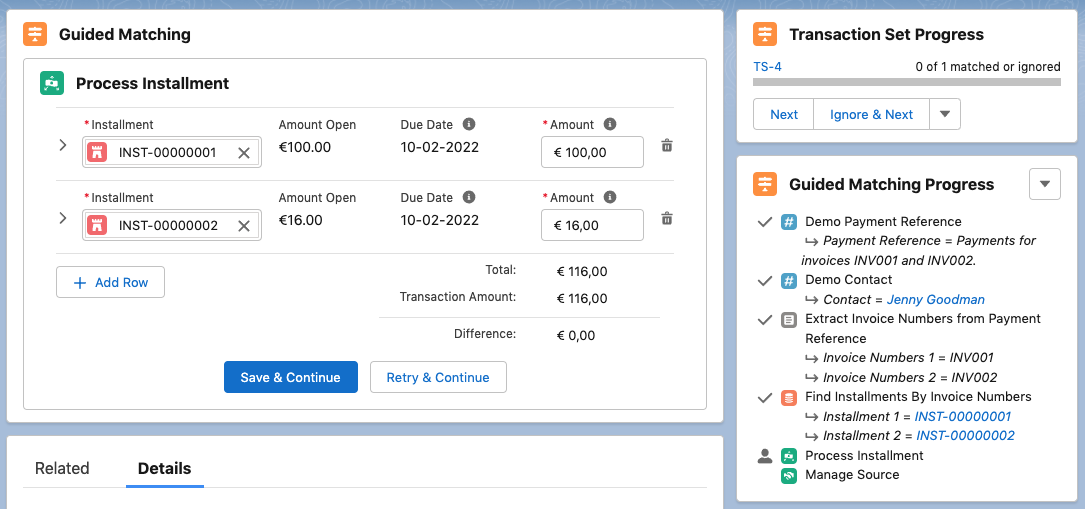
By clicking on an installment record, you can expand the view to see details prefilled with calculated installment changes, as shown here:
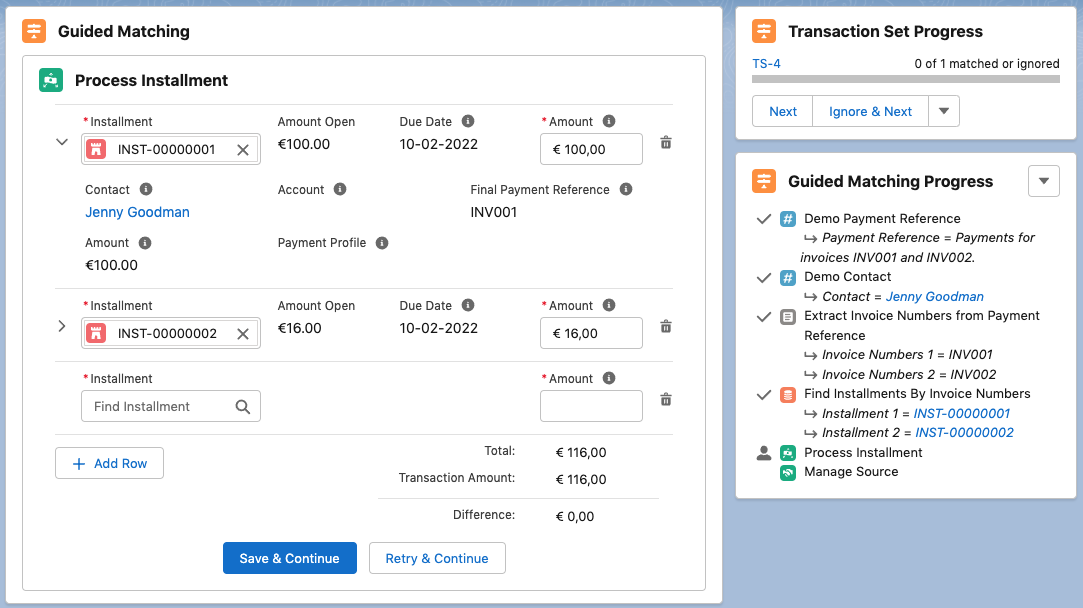
The first selected field in the configuration is displayed as the third field in the third row (empty in the above screenshot). Next selected fields are shown in further rows below.
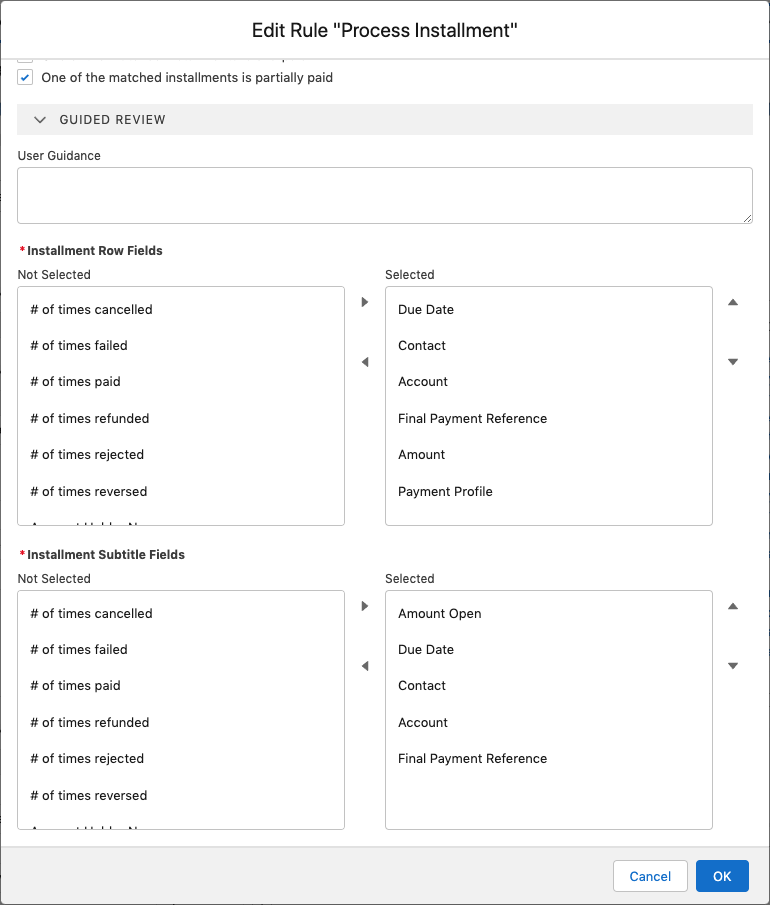
The fields that are displayed in an installment row are configurable (see Installment Row Fields configuration screenshot below).
The Installment lookup shows as default results all installments that:
- Have the same Contact or Account as the matched record
- Are not closed (status is not Collected, Reversed, Refunded, Rejected, Canceled or Failed).
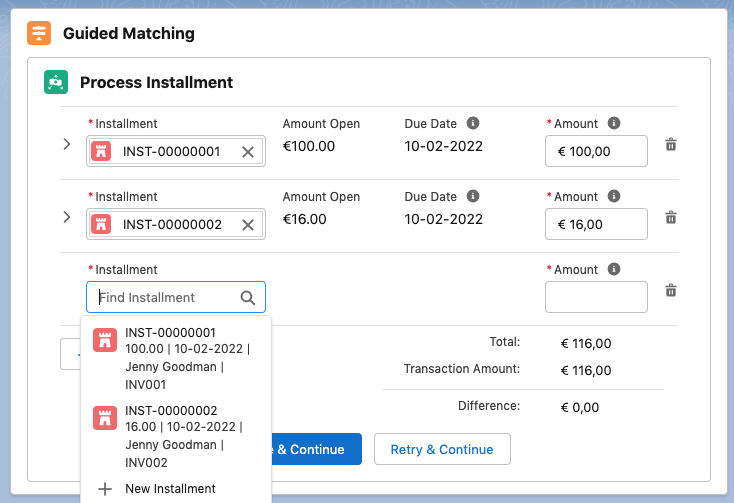
The search box searches in all Installments fields and shows results as:
- Title: Installment Name
- Subtitle: Configurable (see Installment Subtitle Fields configuration screenshot above)
If + New Installment is used, a new tab opens to create a new installment. The New Installment form (pictured below) is prefilled with:
- Contact, taken from the Transaction / Inbound Report record
- Account, taken from the Transaction / Inbound Report record
- Amount, remaining amount
- Amount Open, remaining amount
- Source: Default source
- Status: New
- Due Date: Date on the Transaction / Inbound Report record
- Bank Statement Description: Payment Reference on the Transaction / Inbound Report record
- Payment Method, Payment Processor, Target
- If Transaction: Transaction Set > Default Payment, etc.
- If Inbound Report: Directly from the Inbound Report
- Payment Profile, taken from the Transaction / Inbound Report record
- External ID: Prefilled with generated unique string
The New Installment form regularly polls if an installment has been created with the expected external Id. For this to work, the External Id field must be on the Installment page layout.

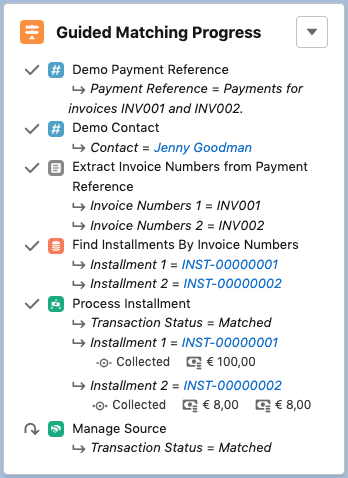
Save & Continue is disabled until the full Transaction Amount has not been accounted for. After clicking Save & Continue, the form is processed, which is seen in the progress component which shows the payment amounts for the installments.
Process Installment decision matrix
The table below outlines the default behavior for how FinDock decides what to do with an installment based on the Transaction or Inbound Report record.
| Entry Type | Installment Record Type | Additional Criteria | Record Status after Processing | Installment Status after Processing | Installment Amount Open after Processing | Payments after Processing |
|---|---|---|---|---|---|---|
| Credit | Receivable | Record Amount = Installment Amount Open | Matched | Collected | 0 | New payment with Record Amount |
| Credit | Receivable | Record Amount < Installment Amount Open | Matched | Partially Paid | Installment Amount Open – Record Amount | New payment with Record Amount |
| Credit | Receivable | Record Amount > Installment Amount Open | Matched | Collected | Installment Amount Open – Record Amount | New payment with Record Amount |
| Debit | Payable | Record Amount = Installment Amount Open | Matched | Paid | 0 | New payment with -1 * Record Amount |
| Debit | Payable | Record Amount < Installment Amount Open | Failed | N/A | N/A | N/A |
| Debit | Receivable | Record Amount = Installment Amount & Installment Status = Collected & Installment Amount Open = 0 | Matched | Reversed | Installment Amount | New payment with -1 * Record Amount |
| Debit | Receivable | Other | Failed | N/A | N/A | |
| Credit | Payable | Record Amount = Installment Amount & Installment Status = Rejected | Matched | Reversed | 0 | No payment |
| Credit | Payable | Record Amount = Installment Amount & Installment Status = Paid & Installment Amount Open = 0 | Matched | Reversed | 0 | New payment with Record Amount |
| Credit | Payable | Installment Amount Open after calculation <= 0 | Matched | Paid | Installment Amount Open + Record Amount | New payment with Record Amount |
| Credit | Payable | 0 < Installment Amount Open after calculation < Installment Amount | Matched | Partially Paid | Installment Amount Open + Record Amount | New payment with Record Amount |
| Credit | Payable | Installment Amount Open after calculation >= Installment Amount | Matched | Outstanding | Installment Amount Open + Record Amount | New payment with Record Amount |