(Classic) Stripe for FinDock
This article describes Stripe integration with version 1 of the Payment API. The Classic Online Experience with Payment API version 1 will be decommissioned at the end of 2024. All Payment API integrations should migrate to version 2, the Enhanced Online Experience, by January 2025.
FinDock integrates with Stripe, an international Payment Service Provider (PSP). Please note that contractual limitations with Stripe apply with this integration, meaning that if your contract doesn’t cover a certain payment method, the FinDock extension won’t support it either.
| Multi-merchant | Multi-currency |
|---|---|
| Payment Method | One-time | Recurring | Refunds |
|---|---|---|---|
| Apple Pay | |||
| Credit Card | |||
| Google Pay | |||
| Ideal |
Pre-requisites
- FinDock is installed and configured.
- A source connector is installed and configured.
- A Salesforce Site is configured.
Install and activate Stripe for FinDock
Follow the standard procedure for installing and activating the Stripe for FinDock payment extension.
Set permission for callbacks
To receive callbacks from Stripe, you need to add the ‘Stripe integration user’ permission set to the site guest user Callbacks Profile. For further information, see Configuring a Salesforce Site.
Link FinDock to Stripe
After the Stripe payment extension is activated in FinDock, you need to link it to your Stripe account.
To link FinDock to Stripe:
- Launch the FinDock app and click Setup. You will see a red mark on the Remote Site Settings tab indicating that the remote site settings for Stripe are disabled.
- Open the Remote Site Settings tab and, depending on your org, activate the test and production endpoint of Stripe: https://api.stripe.com. You should see a notification saying “Success: The remote site setting "Stripe" has been activated successfully.
- Go back to the Setup tab.
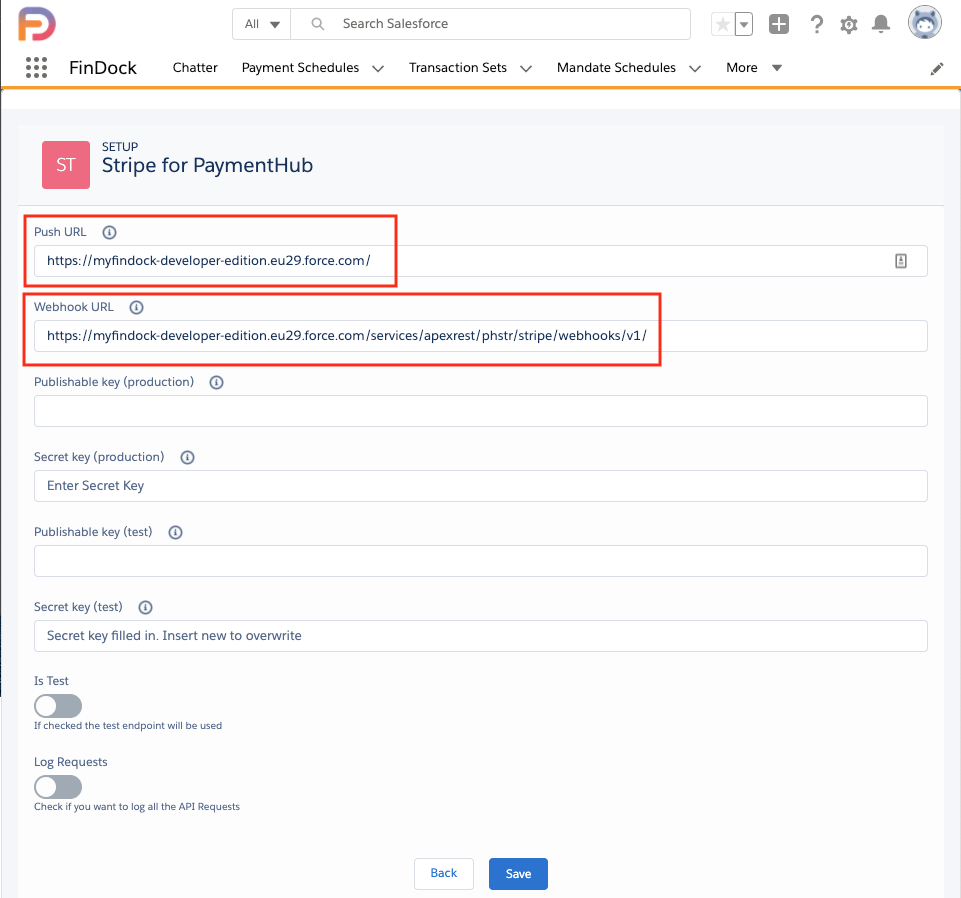
- Scroll down and click on the PaymentHub-Stripe tile.
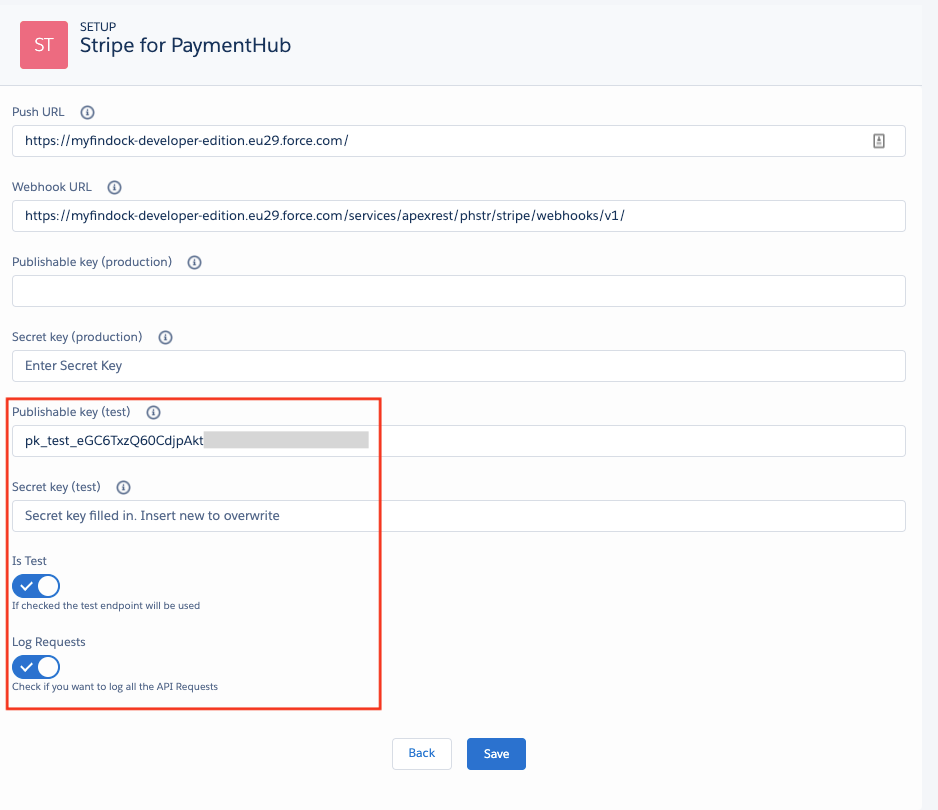
- In the Push URL field, enter the configured Salesforce site used for the Callback URL. Make sure you use https:// and end the URL with forward slash /.
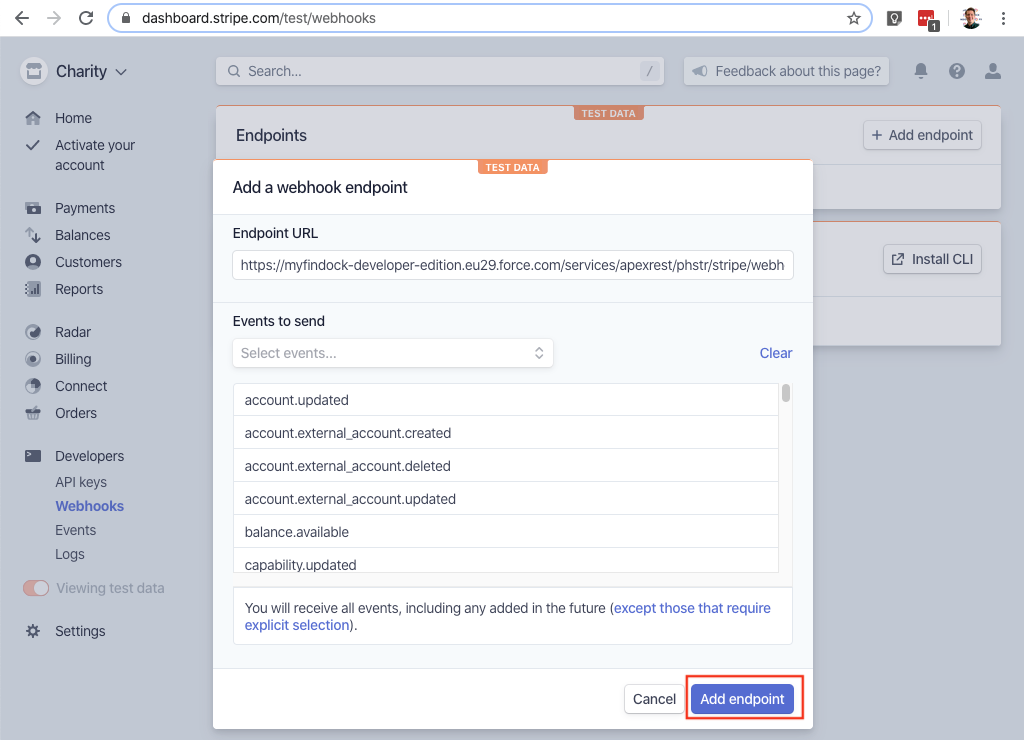
- The Webhook URL is generated automatically based on the Push URL. Copy the webhook URL and be ready to add it to a Stripe setting (e.g. paste to a text editor if needed).
- Log in to your Stripe account.
- Navigate to Developers > Webhooks.
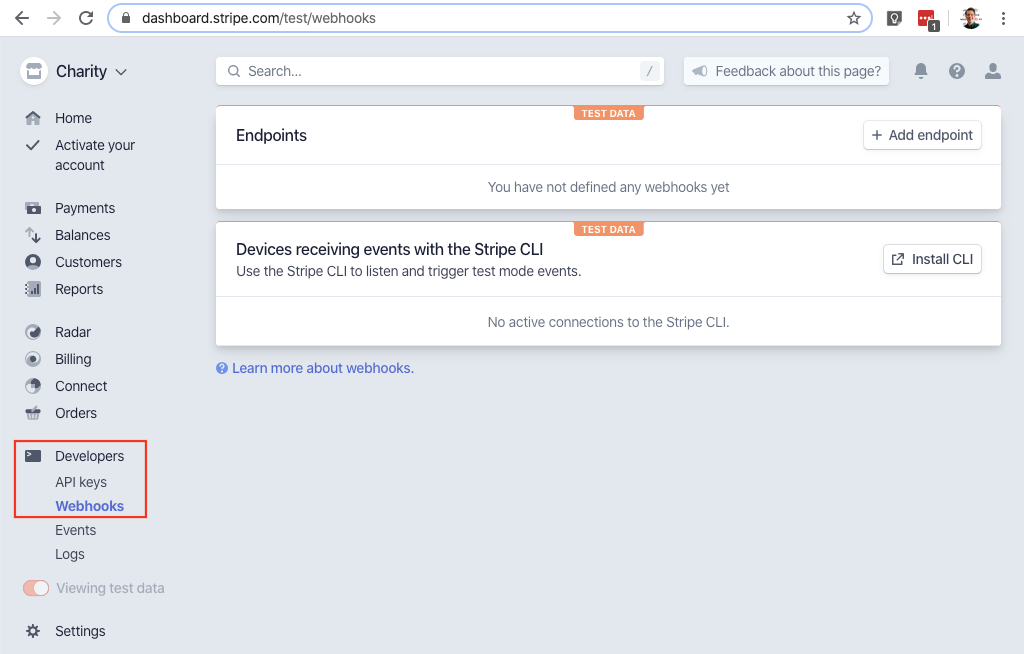
- Click ‘+ Add endpoint’.

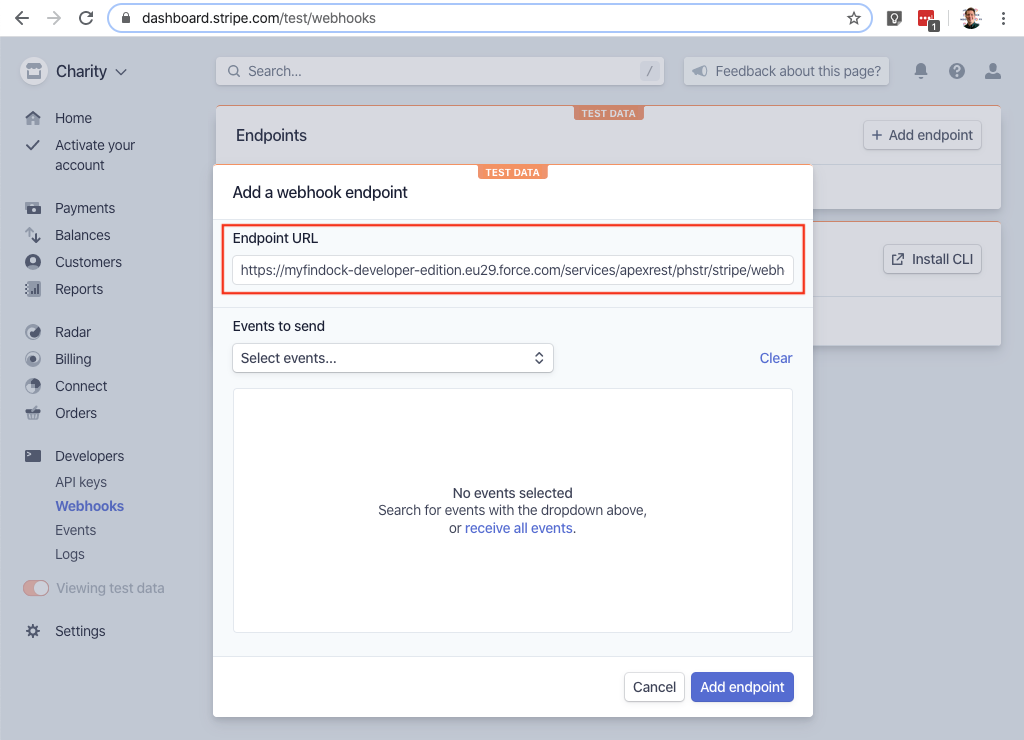
- Paste the webhook URL copied from step 2 into the Endpoints URL.
- Click the ‘receive all events’ link.
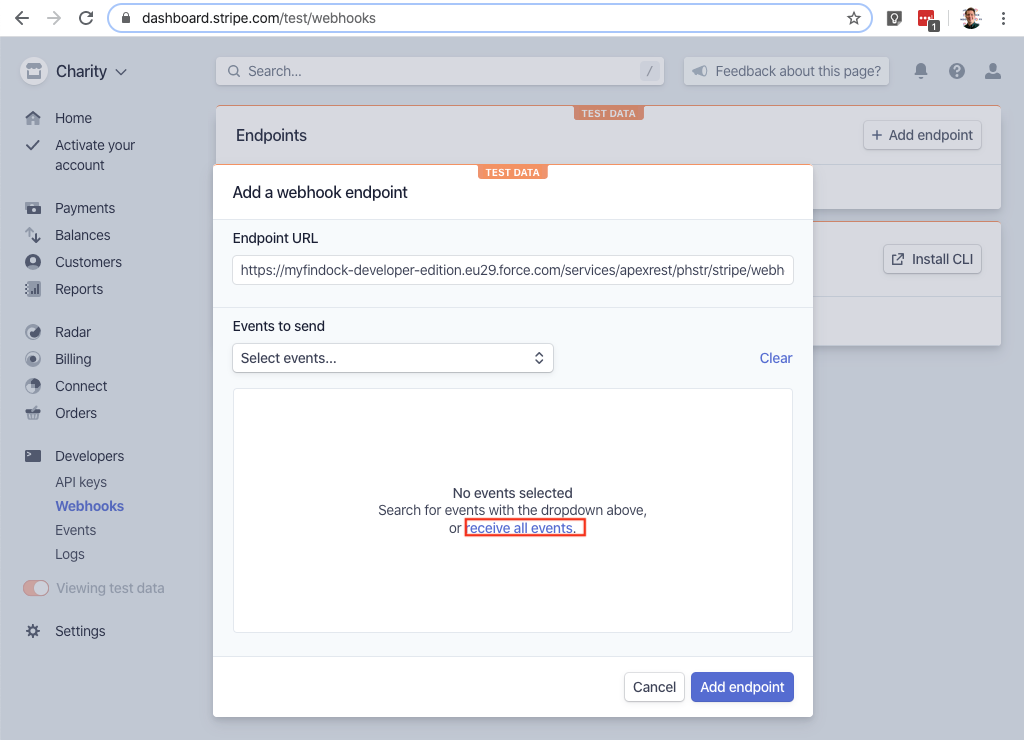
- Click Add endpoint.
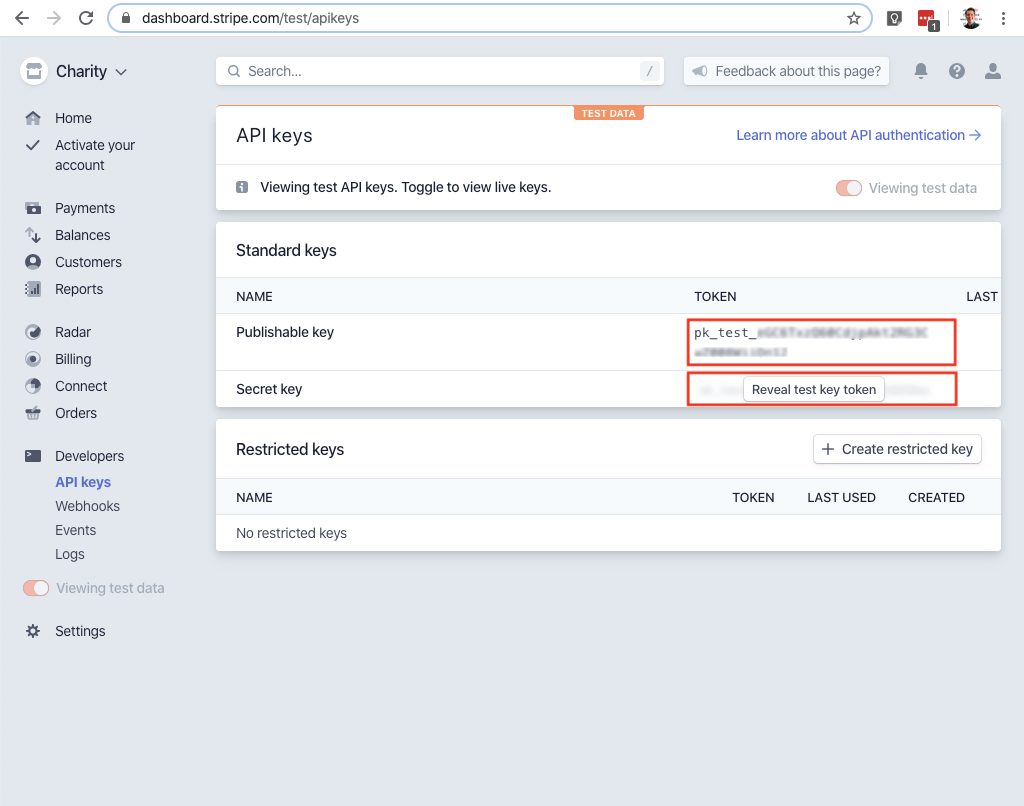
- Navigate to Developers > API keys.
- Click the Reveal test key token button, then copy and paste the Publishable key and Secret key values into the corresponding test fields of the Stripe-for-PaymentHub setup page.
- Select Is Test if you would like to use the test credentials.
- Select Log Requests if you want to log all interaction with Stripe in the PaymentHub Log object. Then click Save.
The above procedure presumes a test setup. Repeat the same steps using production values for Stripe and FinDock to go live with the Stripe for FinDock payment extension.
Special considerations
Stripe does not allow an initial payment and recurring payment in one request.
Nor is an initial payment required to get a token for a recurring payment.
However, in the request for a recurring payment, the requiresAuthorization
attribute is required to initialize tokenization. Refunds by customers are
handled automatically via the webhook.
Multi-merchant support for Stripe
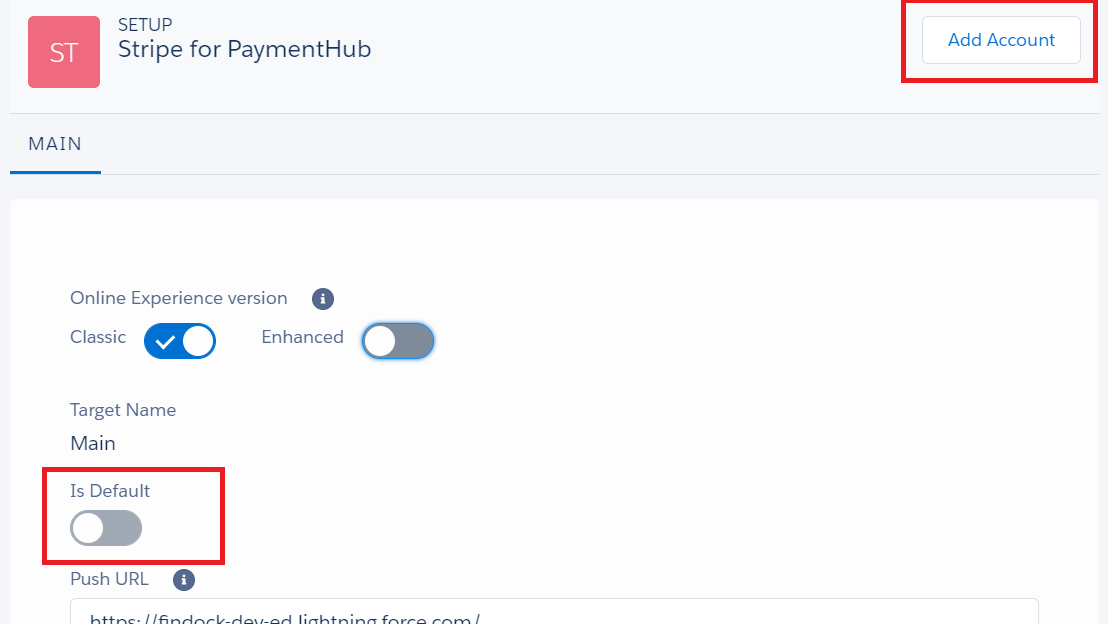
With the March 2021 release, we introduced multi-merchant support for Stripe. This is available when using v1 or v2 of the Payment API. To add merchent accounts to your existing v1 setup, just click the new Add Account button in the upper-right corner (with Classic toggle enabled) and follow the configuration steps as above as normal. The new Is Default toggle also needs to be enabled for the account that should be used by default for Stripe transactions.
Paying with Apple Pay and Google Pay
Stripe enables payments with an Apple Pay or Google Pay digital wallets. No extra configuration is required to enable this for FinDock.
To use Apple Pay and Google Pay:
- Create an Installment with Payment Method ‘CreditCard’ and Payment Processor ‘PaymentHub-Stripe’.
- Redirect the user to the Stripe (CreditCard) ‘checkout’ payment page on their Android or Apple device or in their Chrome browser logged in with their Google Account.
- If the Installment was created through the FinDock API, please use the RedirectURL provided in the response.
- If the user has a digital wallet installed, Stripe automatically recognizes the wallet and shows an Apple Pay or Google Pay button.

- If the payer clicks this button:
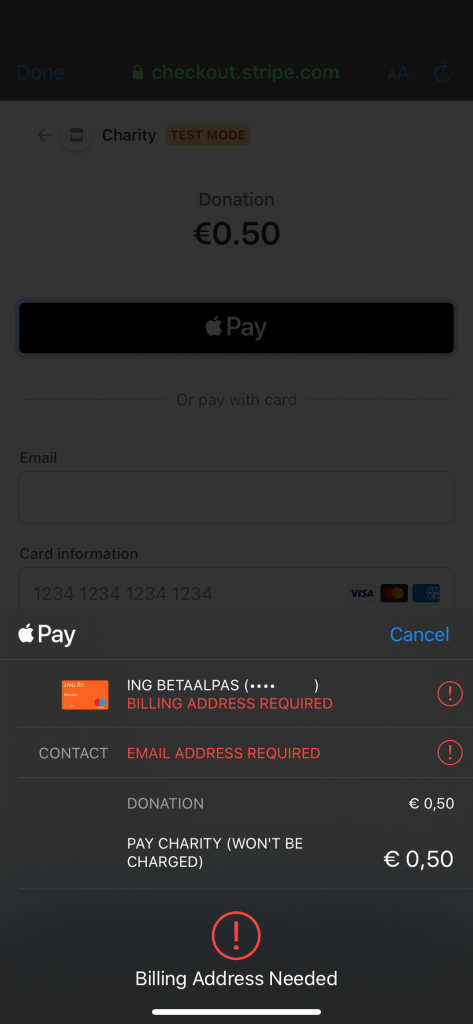
- If data like ‘Billing address’ and ‘email address’ is missing: prompted to add these from this screen:
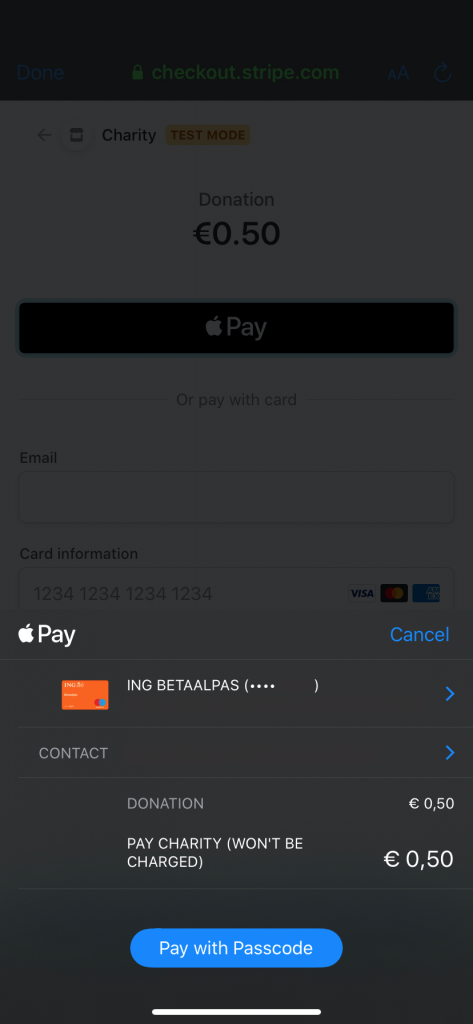
- Prompted to pay with Passcode
- If data like ‘Billing address’ and ‘email address’ is missing: prompted to add these from this screen:
- User is redirected to:
- SuccessURL if the payment is successful
- FailureULR if the payment was cancelled or unsuccessful
FinDock updates the original installment with the status of the payment and stores a payment attached to the original installment with a Payment Profile containing the wallet details from Stripe. Since both debit and credit cards can be used with wallets, the type of card is stored in the ‘Funding Type’ field.
Payment API messages
The following are example messages for single and recurrent payments using the Payment API.
One-time payment with credit card
    {
     "SuccessURL":"http://www.success.nl",
      "FailureURL":"http://www.failure.nl",
      "Payer":{
          "Contact":{
              "FirstName":"C9",
              "LastName":"card9"
          },
          "ContactUpdate":"Enrich",
          "AllowDeduplication":true,
          "PrimaryRelation":"Contact"
      },
      "Payment":{
          "Amount": 25.00
      },
      "PaymentMethod":{
          "Name":"Creditcard",
          "Processor":"PaymentHub-Stripe"
      },
      "SourceConnector":{
          "Name":"PaymentHub"
      }
    }
Recurring payment with credit card
    {
      "SuccessURL":"http://www.success.nl",
      "FailureURL":"http://www.fail.nl",
      "Payer":{
          "Contact":{
              "FirstName":"TESTRCURR",
              "LastName":"TESTRCURR",
              "Email":"testrcurr@xsforall.nl"
          },
          "AccountUpdate":"Enrich",
          "ContactUpdate":"Enrich",
          "AllowDeduplication":true,
          "PrimaryRelation":"Contact"
      },
      "Recurring":{
          "Amount": 17.16,
          "Frequency":"Monthly",
          "StartDate":"2019-03-31"
      },
      "PaymentMethod":{
          "Name":"Creditcard",
          "Processor":"PaymentHub-Stripe",
          "ParameterMap": {
               "RequiresAuthorization":"true"
           }
      },
      "SourceConnector":{
          "Name":"PaymentHub"
      }
    }