Stripe
FinDock integrates with Stripe, a well-known international Payment Service Provider (PSP). Please note that your contractual limitations with Stripe apply. If your contract doesn’t include a certain payment method, the FinDock extension cannot use it either.
| Multi-merchant | Multi-currency |
|---|---|
| Payment Method | One-time | Recurring | Refunds |
|---|---|---|---|
| Card | |||
| Bacs Direct Debit | |||
| SEPA Direct Debit | |||
| iDEAL | -- | ||
| Apple Pay | |||
| Google Pay | |||
| Bancontact | -- | ||
| ACH Direct Debit |
Pre-requisites
- FinDock is installed and configured.
- A source connector is installed and configured.
- FinDock WebHub is connected and Notification Gateway configured.
The FinDock integration supports pre-filling the Stripe Checkout hosted payment page. This requires precise Salesforce deduplication rules. Deduplicating a contact just based on name, for example, can lead to incorrect pre-filling which may raise concerns with payers. Also note that pre-filing the email address can only be done when the standard Email field on Contact or PersonEmail on Person Account is passed to the Payment API or used with Giving Pages.
Install and activate Stripe for FinDock
Follow the standard procedure for installing and activating the Stripe payment extension.
Check and assign the required permissions for FinDock and Stripe features. Ensure all package-specific permission sets are correctly assigned.
Configure the FinDock extension
After the Stripe payment extension is activated in FinDock, you need to link it to your Stripe account.
To link FinDock to Stripe:
- Launch the FinDock app and click Setup.
- Scroll down and click on the PaymentHub-Stripe tile to open the Stripe settings.
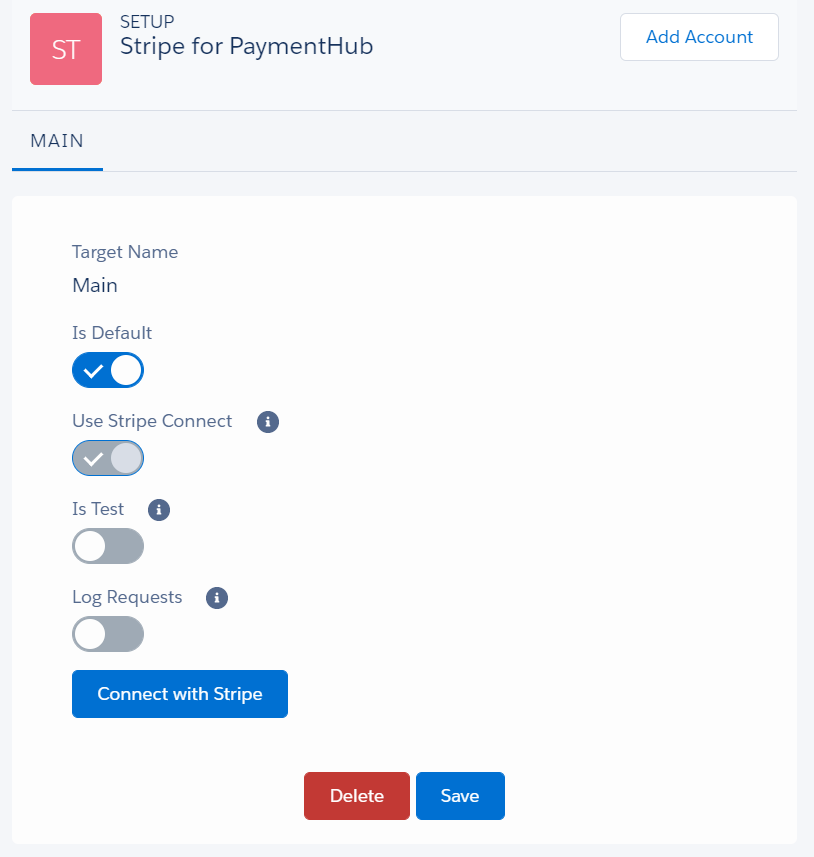
- Adjust the toggles as needed.
- Is Default: enable if this account should be used as the default account for Stripe payments.
- Use Stripe Connect: enabled automatically for API v2 connections.
- Is Test: enable if you are setting up a test configuration.
- Log Requests if you want to log all interaction with Stripe in the PaymentHub Log object.
- ACH Instant Verification Only if you collect ACH (USA) Direct Debits with Stripe, you can enable this when you only want to allow payers to verify their bank account by logging in to their bank, not by entering the bank details and receiving & verifying micro-deposits. More information on bank account validation for ACH can be found here
- Click Connect with Stripe. You are redirected to the Stripe Connect login page where you need to select your Stripe account that you want to use for this integration and enter your credentials. danger
Do not use the skip this form option!
- Wait to be redirected back to FinDock and click Save.
If you are using multi-merchant accounts, you can click the Add Account button and repeat the steps above to connect connect a second Stripe account.
Stripe has a policy that only one platform can be connected to a Stripe account at any one time. In the case you want to connect multiple platforms please see this Stripe article for details.
If you migrating your Stripe integration from FinDock Payment API v1 to v2, or otherwise had an existing Stripe integration with FinDock, you need to manually delete the webhooks used with FinDock in your Stripe account.
Paying with Apple Pay and Google Pay
Stripe enables payments with an Apple Pay or Google Pay digital wallets. No extra configuration is required to enable this for FinDock.
To use Apple Pay and Google Pay:
- Create an installment with payment method CreditCard and payment processor PaymentHub-Stripe.
- Redirect the user to the Stripe (CreditCard) checkout payment page on their Android or Apple device (or in their Chrome browser logged in with their Google Account).
- If the installment was created through the FinDock API, please use the RedirectURL provided in the response.
- If the user has a digital wallet installed, Stripe automatically recognizes the wallet and shows an Apple Pay or Google Pay button.
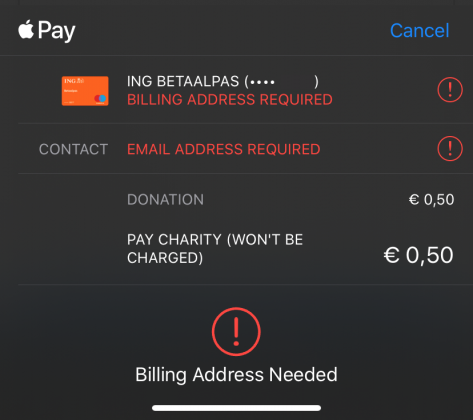
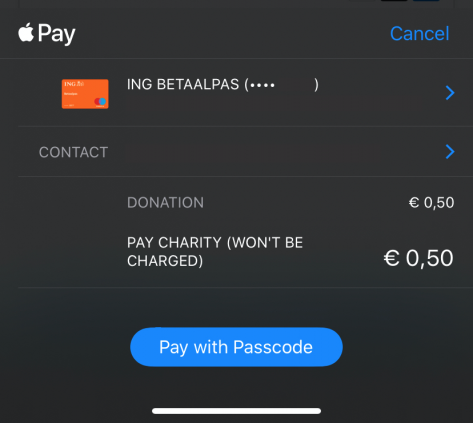
- When the payer clicks the button:
- If data like billing address and email address missing: prompted to add these from this screen:
- Prompted to pay with Passcode
- If data like billing address and email address missing: prompted to add these from this screen:
- The payer is redirected to:
- SuccessURL if the payment is successful
- FailureULR if the payment was cancelled or unsuccessful
FinDock updates the original installment with the status of the payment and stores a payment linked to the installment with a payment profile containing the wallet details from Stripe. Since both debit and credit cards can be used with wallets, the type of card is stored in the ‘Funding Type’ field.
Recurring Apple Pay and Google Pay payments
If a recurring payment is set up with Apply Pay or Google Pay, you collect future installments using payment schedules.
Installments with payment method Apple Pay or Google pay are automatically included in payment schedules with PaymentHub-Stripe as the payment process and CreditCard as the payment method.
Payment collection follows the the normally process with updates to installments coming automaticly through regular notifications from Stripe.
Setting up direct debits
You can use Stripe to process Bacs, ACH or SEPA Direct Debit payments. For these, you need the FinDock Payment API or Giving Pages, and payment schedules.
A Stripe Direct Debit can only be initiated through the FinDock Payment API, either by your own online payment or FinDock Giving Pages.
Once initiated and registered at Stripe, the Direct Debits can be collected in bulk through Payment schedules. Just use Payment Method ‘BACS Direct Debit’ and select PaymentHub-Stripe as Payment Processor (or ensure Stripe is set as the default processor for the Bacs or SEPA Direct Debit payment method).
The Stripe API payment flows are described in detail in the Stripe docs here.
ACH Direct Debit bank account validation
For ACH Direct Debit Stripe offers two options to verify the bank details and ownership of the bank account:
- Instant Verification: the payer logs into their bank account on Stripe's hosted payment page. This also means the payer doesn't have to manually enter their bank details.
- Micro-deposits: the payer chooses "Enter bank details manually" on the Stripe hosted payment page and is sent two micro-deposits to their bank account by Stripe. Stripe sends the payer an email with instructions and a link to a Stripe page on which the customer can enter the micro deposit amounts or code from the bank statement. The payer has 10 days to perform this action, or the validation will expire. You can disable this option by enabling "ACH Instant Verification Only" in the Stripe settings in your FinDock setup.
To test verifying bank details with micro-deposits:
- Set up a new payment through your webform or FinDock Giving Pages.
- Go to the Inbound Reports tab in your Salesforce environment.
- Find the Inbound Report with Report Type =
PaymentHub-Stripeand Report SubType =setup_intent.requires_action. - In the Raw Message field, find the
hosted_verification_urland click the link. - Follow the instructions on the Stripe page. You can find test values in the Stripe documentation on ACH Direct Debit.
It's not possible to receive the actual email your customer will receive from Stripe in test environments.
Payment API messages
The following are example messages for single and recurrent payments using the Payment API.
Dynamic parameters on checkout
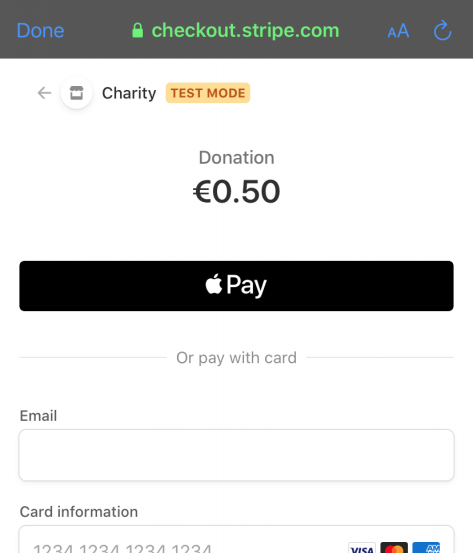
The FinDock integration with Stripe supports Stripe-specific parameters for line item name (line_item.name) and description (line_item.description).
Be careful using special characters, such as % $ #, in the description. Not all special characters are supported and may be rejected by Stripe.
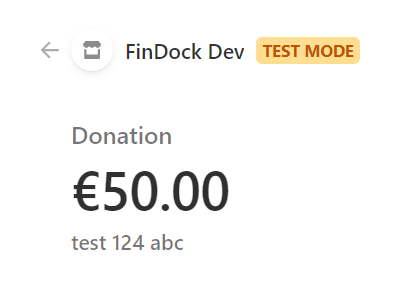
The name default is “Donation” if no name value is passed. The description value is dynamic and mapped to bank statement description (cpm__bank_statement_description__c). For example, in the following checkout page screenshot:
PaymentMethod.Parameters.itemName= “Donation”PaymentMethod.Parameters.description= “test 123 abc”oneTime.Amount= “50.00”
To dnymically set these Stripe-specific values in the API call, you would use this sort of message:
 "PaymentMethod": {
        "Name": "Creditcard",
        "Processor": "PaymentHub-Stripe",
        "Parameters": {
            "itemName": "Donation"
            "description": "test 123 abc"
           }
    },
One-time payment with credit card
{
    "SuccessURL": "https://www.example.com/success",
    "FailureURL": "https://www.example.com/error",
    "Payer": {
        "Contact": {
            "SalesforceFields": {
                "FirstName": "Eric",
                "LastName": "Johnson",
                "Email": "eric@johnson.com"
            }
        }
    },
    "OneTime": {
        "Amount": "36"
    },
    "PaymentMethod": {
        "Name": "Creditcard",
        "Processor": "PaymentHub-Stripe"
    },
    "Settings": {
        "SourceConnector": "PaymentHub"
    }
}
Recurring payment with credit card
The following callout is for a recurring payment that does not require an initial payment.
{
    "SuccessURL": "https://www.example.com/success",
    "FailureURL": "https://www.example.com/error",
    "Payer": {
        "Account": {
            "SalesforceFields": {
                "Name": "Eric Johnson account",
                "BillingStreet": "1234 Some Street",
                "BillingCity": "Some City"

            }
        }
    },
     "Recurring": {
          "Amount": "25",
          "Frequency": "Monthly",
          "StartDate": "2021-04-01"
     },
    "PaymentMethod": {
        "Name": "CreditCard",
        "Processor": "PaymentHub-Stripe"
    },
    "Settings": {
        "SourceConnector": "PaymentHub"
    }
}
Troubleshooting
Paying through FinDock Payment (MOTO)
Error From Stripe: Sending credit card numbers directly to the Stripe API is generally unsafe. [...]
This error appears if your Stripe merchant account is not fully configured to take MOTO payments. Please contact your Stripe representative and tell them you need to "Handle card information directly" for MOTO payments. You can also find this setting in your Stripe Dashboard. Stripe can guide you through everything that needs to be configured if you have further questions.