(Classic) Buckaroo for FinDock
This article describes Buckaroo integration with version 1 of the Payment API. The Classic Online Experience with Payment API version 1 will be decommissioned at the end of 2024. All Payment API integrations should migrate to version 2, the Enhanced Online Experience, by January 2025.
Buckaroo is a Dutch Payment Service Provider that provides processing of various payment methods. The Buckaroo for PaymentHub package provides integration with the Buckaroo service and supports a multitude of payment methods. Be aware that your contract with Buckaroo needs to support the Payment Methods you wish to activate.
| Multi-merchant | Multi-currency |
|---|---|
| Payment Method | One-time | Recurring | Refunds |
|---|---|---|---|
| Credit Card | |||
| Ideal | |||
| PayPal | |||
| SEPA Direct Debit | |||
| Sofort |
Installation and Activation of the Payment Extension
Follow the standard procedure for installing and activating the Buckaroo for Findock payment extension.
Configuration
After activation of the Payment Extension, you will need to do some configuration to connect it to your account.
Configuration for callbacks
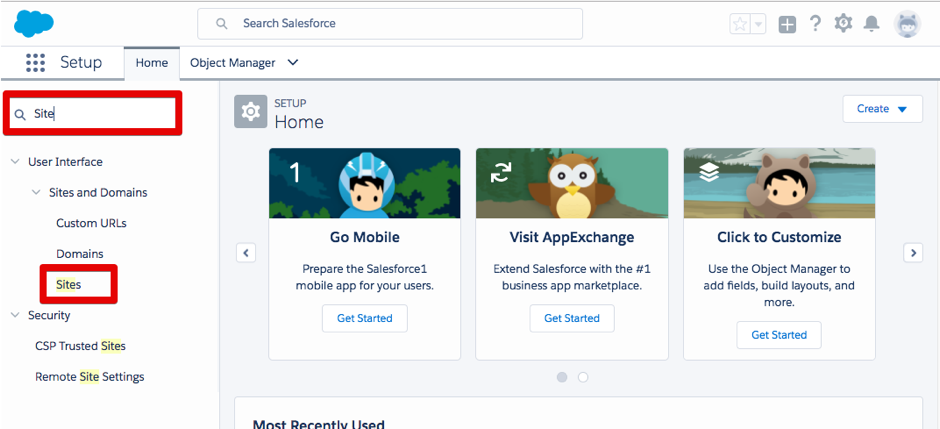
In order to correctly receive the callbacks from Buckaroo with regards to transactions, you will need to configure a Salesforce Site to receive these message. If you haven't already, Follow the steps outlined in the article Configuring a Salesforce Site to correctly configure the base site. next, we need to add the Buckaroo specific callback processor to the site. This callback processor will receive the updates from Buckaroo and register them as a message on the inbound message queue. Navigate to the Site's configuration page in the Salesforce setup screen.
In the list of sites, click the name of the site you wish to use to process callbacks. On the site detail page, scroll down to the Site Visualforce Pages related list, and click Edit to edit the enabled pages.
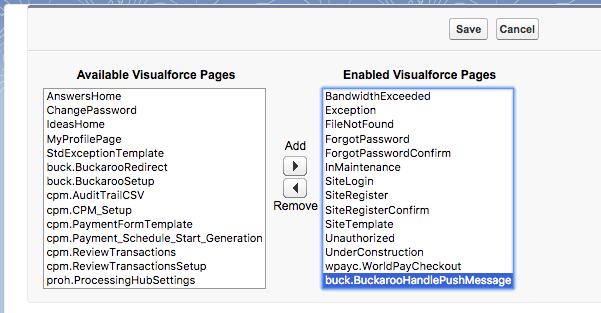
From the list of Available Visualforce Pages, select the buck.BuckaroohandlePushMessage page and click the add button to add it to the Enabled Visualforce Pages. Click Save to store the new configuration. Salesforce takes you back to the site detail page. Here, take note of the site url. Use the secure.force.com url whenever it's available to ensure an encrypted connection. Next, we need to configure the Buckaroo extension itself.
Buckaroo Extension configuration
Navigate to the FinDock setup screen and click the Buckaroo tile to open the configuration screen.

The Buckaroo configuration page has several options that need to be configured. You may also configure multi-merchant accounts.
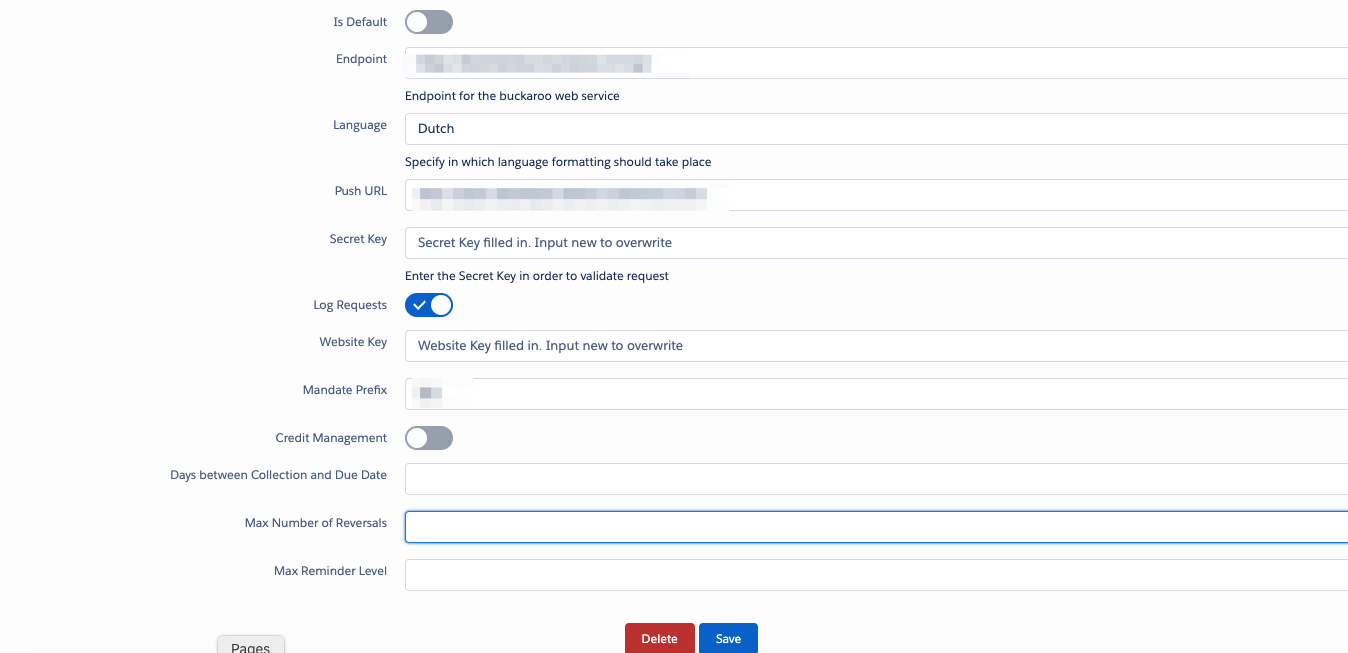
Endpoint : This is the Buckaroo server address the application will use to initiate transactions. By default Buckaroo offers two endpoints:
- Test: https://testcheckout.buckaroo.nl/nvp/
- Production: https://checkout.buckaroo.nl/nvp/
Language: The default language for any payment page hosted by Buckaroo
Push URL: Here you should put the Site URL for the site you have configured earlier. make sure to have a '/' at the end!
Secret Key: Used to sign the Transactions requests. You can create a Secrey Key in your Buckaroo account here.
Log Requests: When enabled, all requests to Buckaroo will be logged before being submitted. Use with care as this might be data-storage intensive.
Website Key: the identifier for the website in Buckaroo. This key can be found in the Buckaroo payment plaza at https://plaza.buckaroo.nl/. Click on 'My Buckaroo' in the bottom left of the screen -> websites -> {yourwebsite}. Here you can find the website key in the table in the first row. If you have multiple websites, use the filter option in the top right to switch between websites.
Mandate Prefix: If you intend you use Buckaroo to perform Direct Debits, you will need to enter the Mandate Prefix provided to you by Buckaroo.
When you have entered all the details, click Save to store the configuration.
Activating the Payment Methods
After you have configured the Buckaroo Payment Extension, you can activate the payment methods that it support. Navigate to the FinDock Setup screen, and click the Activate/Deactivate tab. Locate Buckaroo in the list of installed Extensions and click the Payment Methods button next to it. Clicking the button enables a dialog box that allows you to activate or deactivate the payment methods for this extension.
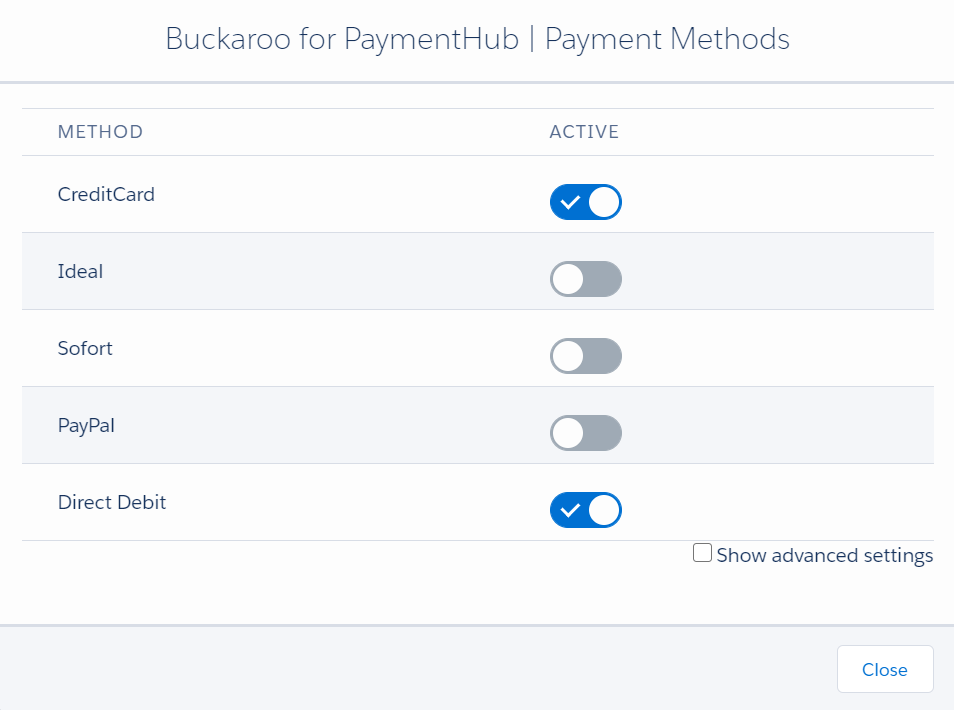
When you click activate, the activated payment method is enabled and made available throughout FinDock. If Buckaroo is your only, or your preferred Payment Service provider for this Payment Method, make sure to enable the Default toggle.
Testing and Go-live
To test your Buckaroo configuration, you can use the following request in combination with the API. This will initiate a one-off Ideal transaction with Buckaroo.
    {
      "FailureURL": "https://www.example.com/error",
      "Origin": "API Test",
      "Payer": {
        "AllowDeduplication": true,
        "Contact": {
          "Email": "test@demo.com",
          "FirstName": "Test",
          "LastName": "Tester"
        },
        "ContactUpdate": "replace"
      },
      "Payment": {
        "Amount": "25"
      },
      "PaymentMethod": {
        "Name": "Ideal",
        "ParameterMap": {
          "Issuer": "INGBNL2A"
        },
        "Processor": "Buckaroo"
      },
      "SourceConnector": {
        "Name": "PaymentHub"
      },
      "SuccessURL": "https://www.example.com/success"
    }
If your configuration is correct, you should be able to navigate to the RedirectURL provided in the response, and be able to pay (or simulate paying) the amount specified.