FinDock PayLinks is a paid add-on feature. Please contact us to get started.
With FinDock PayLinks, you can easily share a unique URL by email, messaging app, invoice, etc. for smooth and simple payment collection. PayLinks can be used to:
- Collect a one-time payment (one Installment record)
- Update an existing recurring payment (source-specific object records)
Prerequisites
- FinDock is installed and configured.
- FinDock WebHub is connected.
- Salesforce Content Deliveries is enabled.
In addition, if you are not using FinDock permission set groups, you need to assign the FinDock Core Base and Core Giving Pages and PayLinks permission sets to users who configure PayLinks.
To create and configure a PayLinks page:
- Launch the FinDock app click the FinDock Setup tab.
- Click PayLinks in left-hand menu. Wait for the page builder to load.
- Click through the guided introduction or skip.
- Adjust page settings, including tracking, and appearance (logo, font, color, etc.) as needed and click Save changes.
- Select the Payment Form component to open the payment settings.
- Adjust the form options for paying one-time payments and updating recurring payments as needed and click Save changes.
- When you are done, click Save and then click Publish.
KNOWN ISSUE - When navigating between settings sections, you are asked to cancel, discard, or save and continue. To clear the popup, click Save and Continue or click Cancel and refresh the browser tab.
As with other page elements, you can modify the basic appearance - font, background, padding and so forth - of the payment form. In addition, there are two key settings to consider: brand color and the due date label.
The brand color setting determines the color of buttons and checkboxes on the payment form.
The due date label setting is by default "Due," but you can change this or translate it as necessary.
In this part of the payment form configuration, you determine what payment processors and method are offered to the payer.
| Setting | Description |
|---|---|
| Select Payment Method Label | The text displayed above the dropdown list of payment method options. |
Click Configure Payment Methods to open the configuration details.
The main aspects to plan and configure are:
- Which payment methods you want to offer to payers
- The order in which the options are presented to payers
- The default method for each payment period (one-time and recurring)
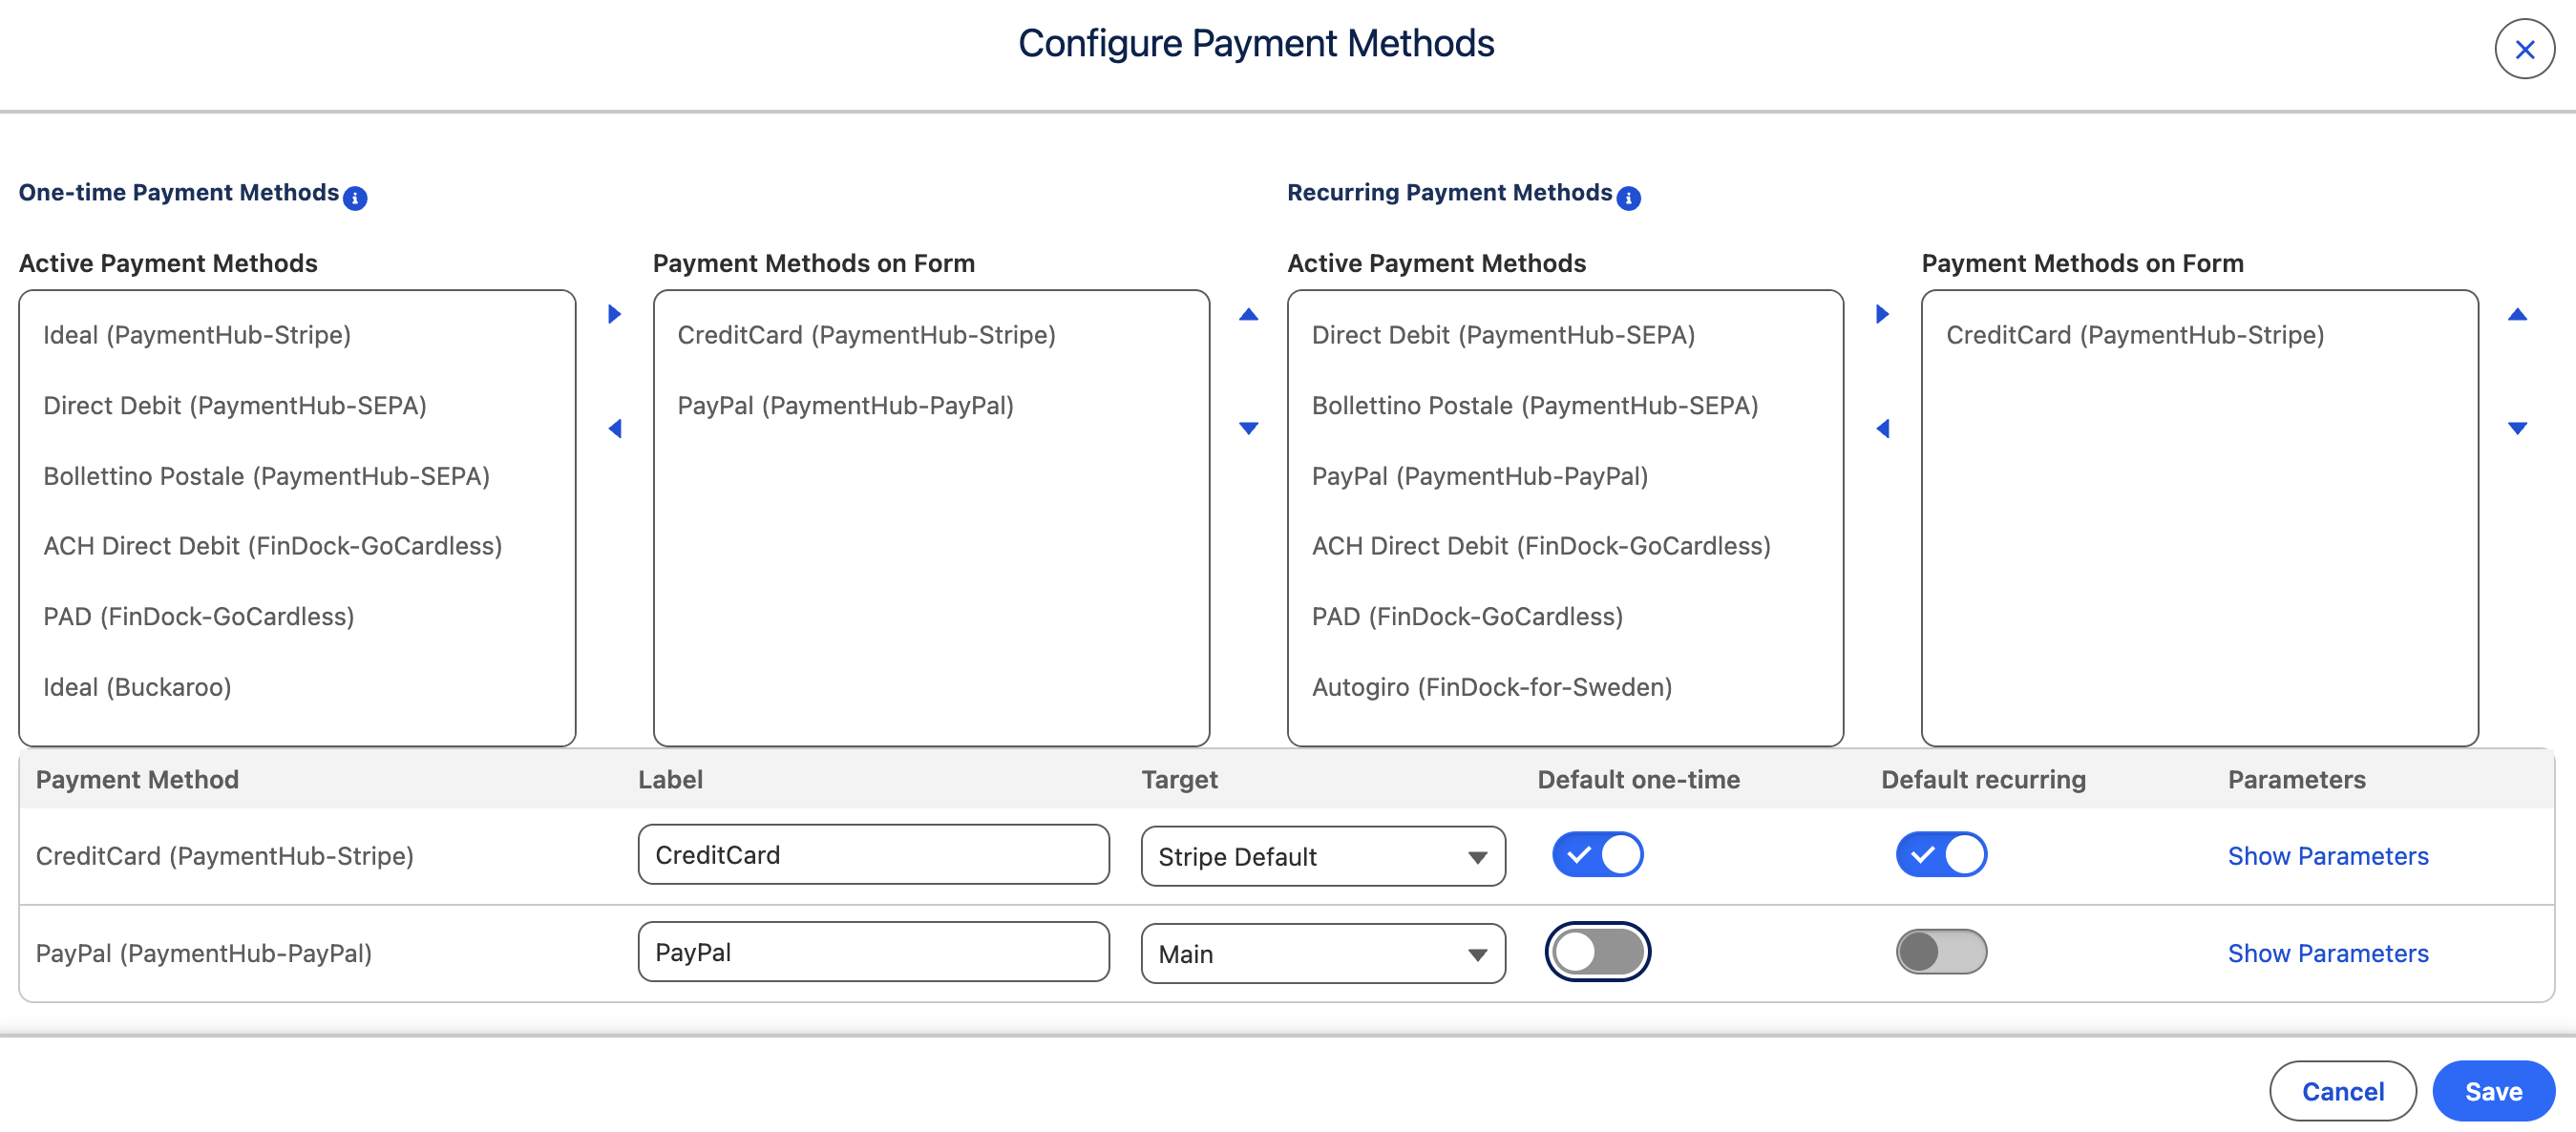
The configuration options depend on which processors and methods you have activated in FinDock. Only activated methods can be used in the payment form. Use the left-right and up-down arrows to add methods to the form and change the order.
For each payment method, you can enter a custom label (name shown to the payer) and use the toggles to define the defaults for one-time and recurring payments.
In addition, any parameters that are available for the given processor and method are available for configuration. You can view these by clicking Show Parameters. For each parameter you can define a label, a default value (if allowed), as well as set visible and required toggles.
For some methods, if the parameters are required by the payment method (e.g. account holder name and account number for Bacs Direct Debit), they are already set accordingly and made visible for payers.
If the payment method has a description parameter, by default FinDock sets the value for that parameter using the value from the Bank Statement Description field on the installment (which is also shown to the payer).
| Setting | Description |
|---|---|
| Button label pay | The text on the button that takes the payer to the recurring payment step |
| Due Date Label | Label for the due date detail of the recurring payment |
| Button label setup | Label for the option to save the new recurring payment details |
You can adjust the labels of the recurring payment frequency options shown to the payer on the PayLink, for example, to use translations.
Please note that while all options are in the builder, some may not be supported in a given org. Certain options are dependent a source, like NPSP or Fundraising (NPC). Custom picklist values are not supported as frequency options.
| Frequency | Default Label |
|---|---|
| One-time | One-time |
| Daily | Daily |
| Biweekly | Biweekly |
| Monthly | Monthly |
| Quarterly | Quarterly |
| Biannually | Biannually |
| Yearly | Yearly |
| Custom | Custom (Fundraising/NPC only, not configurable) |
When setting up new recurring payments, some PSPs require an initial payment as a form of authorization. By default FinDock uses 0.50 for the required initial payment amount.
The numerical value is the same regardless of currency (i.e. there is no conversion). If you adjust the Initial payment amount for recurring payments, check with your PSP before adjusting to ensure you stay above the minimum required amount.
Payers will see the initial payment amount on the hosted payment page of the PSP.
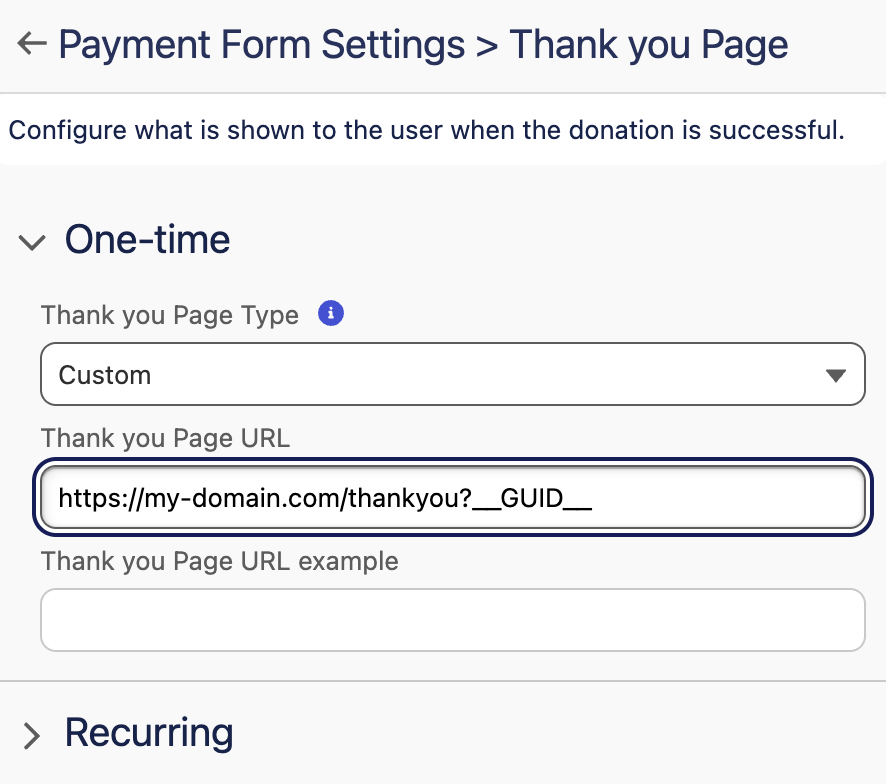
Here you configure the thank you message for successful payments.
| Setting | Description |
|---|---|
| Thank you type | Select Embedded to show the thank you content that you define here. Select Custom to use a separate thank you page. For this option, add the URL for your page in the Thank you URL field. You can include __GUID__ in the URL which FinDock automatically replaces with the GUID of the given one-time or recurring payment. |
| Thank you title | The main text at the top of the thank you message. |
| Title heading type | Sets the size of the title text. Heading 1 is largest, heading 5 smallest. |
| Title font color | Use the color picker to set the title text color. |
| Thank you text | Use the text editor to add a full thank you message. |
With the Thank you type option, you can direct payers to fully customized pages (the custom URL you enter in the setting) that not only reflect your brand, but also displays details unique to the payment (when you use __GUID__ in the URL). This way you can embed on the thank-you page, for example, the payer's name and amount, as well as information about a related campaign, subscription, membership, etc.
If you are using Salesforce Experience Cloud, create personal thank-you experiences by directing the payer to your Experience Cloud context with a custom thank-you URL with the __GUID__. You can then include details from the one-time or recurring payment on the Experience Could page alongside, for instance, follow up questions for the payer.
In addition to the error page that is displayed when something goes wrong with the payment process, you can define here the error messages that appear when a field value is missing or incorrect.
| Setting | Description |
|---|---|
| Required field missing message | If a required field is not filled in, this message is shown. In the message, __FIELD_LABEL__ is a variable that is replaced with the label of the field missing a value. |
| Invalid field message | If field contains an invalid value, this message is shown. In the message, __FIELD_LABEL__ is a variable that is replaced with the label of the field with an invalid value. |
Error page
Here you configure the error message when for some reason (e.g. lost internet connection) the payment could not be processed.
| Setting | Description |
|---|---|
| Error page type | Select Embedded to show the error content you that you define here. Select Custom to use a separate error page. For this option, add the URL for your page in the Error Page URL field. If you include in the URL the variable __GUID__, FinDock automatically modifies the URL with the GUID of the given installment. |
| Error page title | The main text at the top of the error message. |
| Title heading type | Sets the size of the title text. Heading 1 is largest, heading 5 smallest. |
| Title font color | Use the color picker to set the title text color. |
| Error page text | Use the text editor to add a full error message. |
Here you configure the message that is shown when a payment link is accessed for an installment that is already paid.
| Setting | Description |
|---|---|
| Already paid title | The main text at the top of the thank you message. |
| Title heading type | Sets the size of the title text. Heading 1 is largest, heading 5 smallest. |
| Title font color | Use the color picker to set the title text color. |
| Already paid text | Use the text editor to add a full error message. |
Here you configure the message that is shown when a payment link is accessed for an installment that cannot be found.
| Setting | Description |
|---|---|
| Not found title | The main text at the top of the thank you message. |
| Title heading type | Sets the size of the title text. Heading 1 is largest, heading 5 smallest. |
| Title font color | Use the color picker to set the title text color. |
| Not found text | Use the text editor to add a full error message. |
Here you can configure a webhook URL to inform other systems and applications about installment status changes.
| Setting | Description |
|---|---|
| Webhook URL | Add a webhook URL for your system or application to receive webhook notifications from FinDock. If you include in the URL the variable __GUID__, FinDock automatically modifies the URL with the GUID of the given installment. |
The PayLinks URL is stored in the Pay URL field on Installment, and for recurring PayLinks, the URL is stored in the Setup URL on the source-specific object: Recurring Payment, Recurring Donation and Gift Commitment.
These fields are available on default layouts managed by FinDock. However, please check that the fields are in place and visible. If you are using custom page layouts, add the fields to layouts as needed.
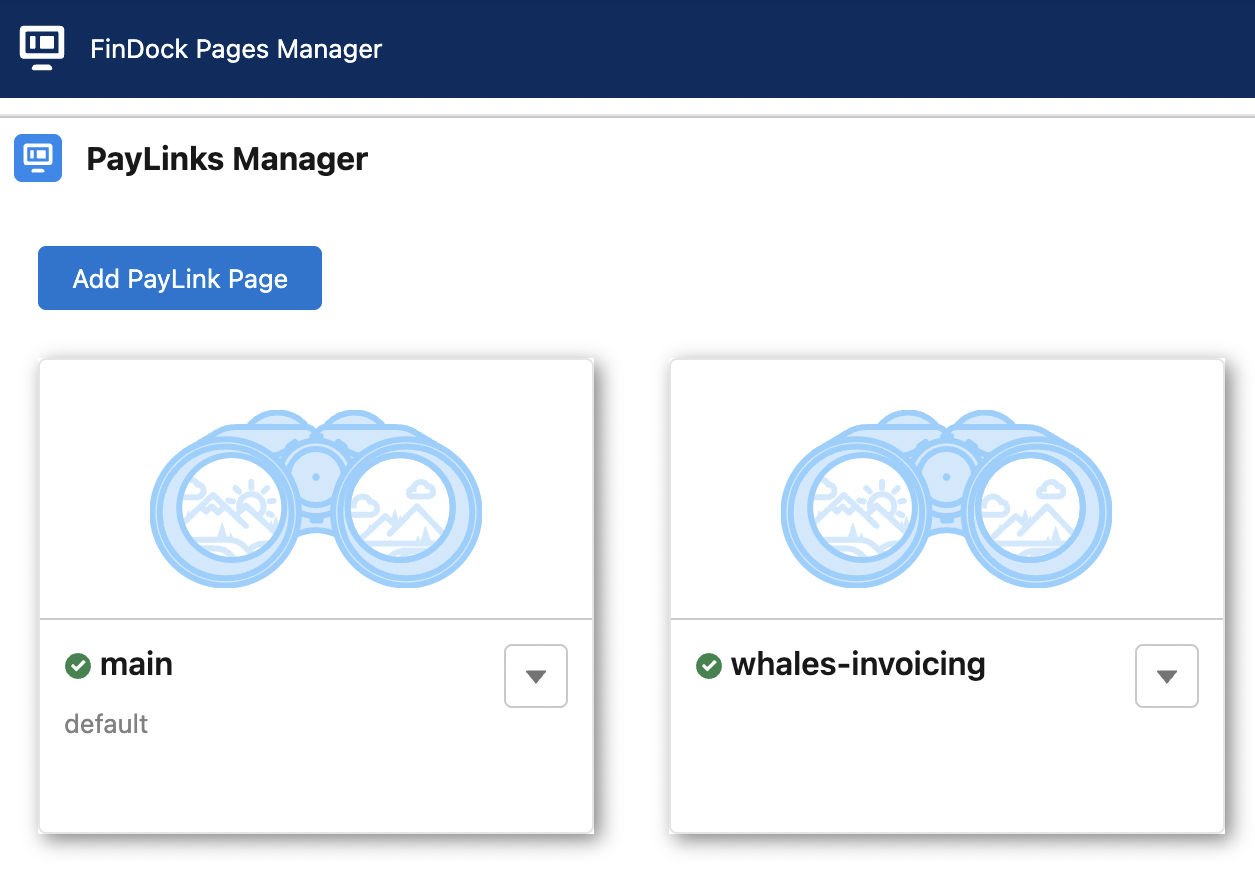
FinDock PayLinks supports multiple PayLinks pages. We recommend using just one PayLinks page for clarity and simplicity, but multiple pages are supported for case where, for example, you need to be able to share payment links that go to pages in different languages.
Multiple page support is activated by creating a second PayLinks page. Click the Pages button in the builder menu to get started.
Activating multi page support changes FinDock PayLinks configuration, so please ensure multiple PayLinks pages are necessary before proceeding.
Creating a new page permanently changes FinDock PayLinks by:
- Adding PayLinks Manager to PayLinks configuration
- Requiring the PayLinks Page field on Installment
The new page you set up and publish as normal (same procedure as above), but after the page is published, you need to use the PayLinks Manager to define which page is the default.
The default PayLinks page is used for the PayLinks Page value if you do not set the value yourself. Please ensure the PayLinks Page field on installments and recurring payments (any recurring payment object) uses the correct page by:
- Using Salesforce automation to populate the PayLinks Page field (
cpm__PayLinks_Page__c) with the 'Slug'-value from the PayLinks Manager - Manually setting the PayLinks Page field (
cpm__PayLinks_Page__c) with the 'Slug'-value from the PayLinks Manager
The slug is shown on the PayLinks Manager page thumbnail. The actual slug value does not, however, include special characters other than the dash (-). For example, whale_invoicing becomes whaleinvoicing, while whale-invoicing remains as is.
Through the PayLinks Manager, you can edit existing pages (Go to Builder) button, change the default page, as well as delete pages by clicking the drop-down arrow to the right in the page row.
FinDock helps you understand how visitors experience your PayLinks page using Google Analytics or Google Tag Manager. Both options are available, but only one should be used on a page according to Google recommendations.
For European Union markets, please keep in mind GDPR requirements.
Under the Pages settings, you have the following options:
- Google Tracking ID: To collect traffic data to your Google Account, copy your Tracking ID or tag ID from your account into this field.
- Google Tag ID: Add your Google Tag Manager in this field measure page performance. You should only use Google Tag Manager or Google Analytics. A page with both may result in faulty metrics.
For Google Analytics, you can use some or all of the following specific events for your pages:
Session_start: triggered when a payer lands on the PayLink webpageValidate_personal_details: triggered when the payer has filled in personal details and clicks NextMake_payment_intent: triggered when the payer clicks the pay buttonPayment_intent_succeeded: triggered when the visitor is redirected to a hosted payment page or thank you pagePayment_intent_failed: triggered by a failure in the payment intent process which prevented completion
For one-time PayLinks, you also have the following events available:
make_existing_installment_payment_intent_succeeded: triggered when the visitor is redirected to a hosted payment page or thank you page for one-time paymentmake_existing_installment_payment_intent_failed: triggered by a failure in the payment intent process which prevented completion of a one-time PayLink
For recurring PayLinks, the following additional events are available:
make_existing_recurring_payment_intent: triggered when the visitor clicks the pay button on a recurring PayLinkmake_existing_recurring_payment_intent_succeeded: triggered when the visitor is redirected to a hosted payment page or thank you page for recurring paymentmake_existing_recurring_payment_intent_failed: triggered by a failure in the payment intent process which prevented completion of a recurring setup