(Classic) Worldpay for FinDock
This article describes Worldpay integration with version 1 of the Payment API. The Classic Online Experience with Payment API version 1 will be decommissioned at the end of 2024. All Payment API integrations should migrate to version 2, the Enhanced Online Experience, by January 2025.
Worldpay is a credit card processing service of FIS Global. This service supports one-time payments as well as recurring bulk credit card transactions.
| Multi-merchant | Multi-currency |
|---|---|
| Payment Method | One-time | Recurring | Refunds |
|---|---|---|---|
| Credit Card |
Pre-requisites
- FinDock is installed and configured.
- A source connector is installed and configured.
- A Salesforce Site is configured.
Install and activate Worldpay extension
Follow the standard procedure for installing and activating the Worldpay for Findock payment extension.
Set up Worldpay account
Before configuring the Worldpay extension, you need to do some configuration in the Worldpay merchant portal. Your organization should have a corporate account with Worldpay. Use those account credentials here: Worldpay login.
After logging in, you need to select a merchant code and application if your organization has more than one. For further information about the Merchant Admin Interface, please visit the Worldpay support documentation.
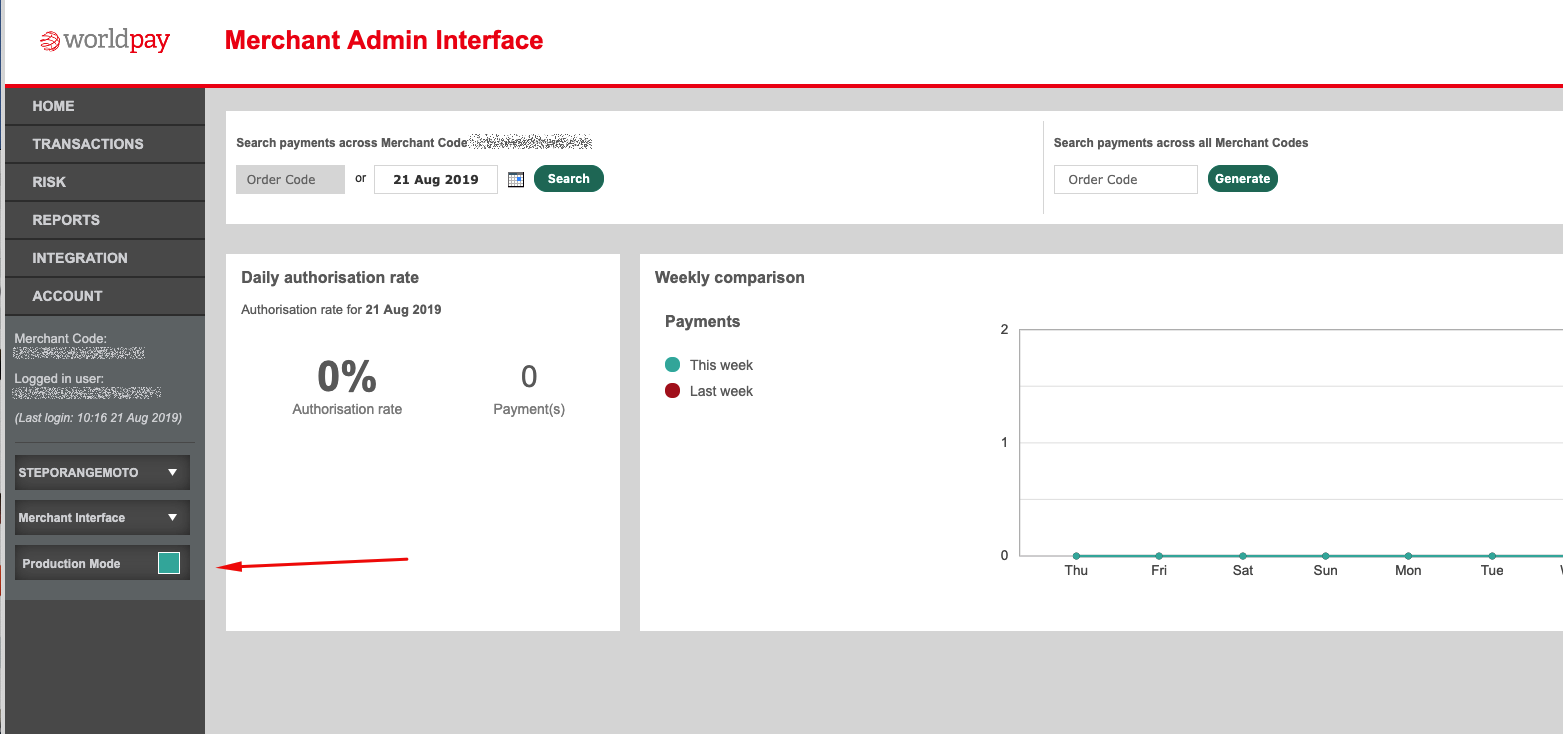
Testing of the Worldpay integration requires a test setup with Production Mode.
To set up Worldpay integration with FinDock:
- In the left-hand menu, enable Production Mode.
- Click INTEGRATION in the left-hand menu, and then select the Merchant Channel tab.
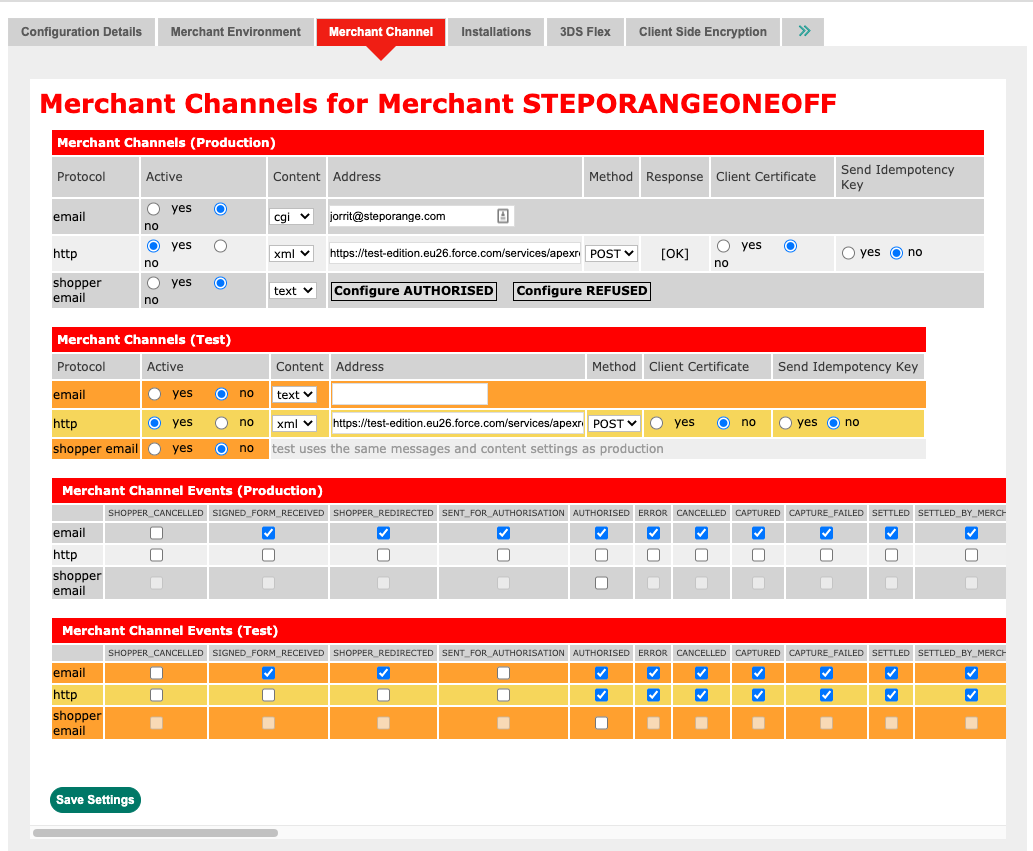
- Under Merchant Channels (test or production, depending on what phase of development you are in), set the http protocol to active, select xml as the content type, and then add the callback URL of your guest site that will use Worldpay in the address field. E.g.
https://<domain>/services/apexrest/wpayc/worldpaycallback - Click Save Settings when you are done.
- Keep the Merchant Admin Interface open while you configure FinDock. Some information from your Worldpay account is needed for the FinDock settings.
Configure callbacks
To receive the callbacks from Worldpay with regards to transactions, you will need to configure a Salesforce Site to receive these messages. If you haven't already, follow the steps outlined in Configuring a Salesforce Site to configure the base site.
To configure a Salesforce site for Worldpay callbacks:
- Open Salesforce Setup and use Quick Search to open Sites.
- In the list of sites, click on the Site Label of the site you want to configure.
- In the Site Detail page, click the Public Access Settings button.
- Click the Enabled Apex Class Access shortcut at the top to jump to the Apex Class settings and click the Edit button for those settings.
- From the Available Apex Classes list, select wpayc.WoldPayCallback and click the add button.
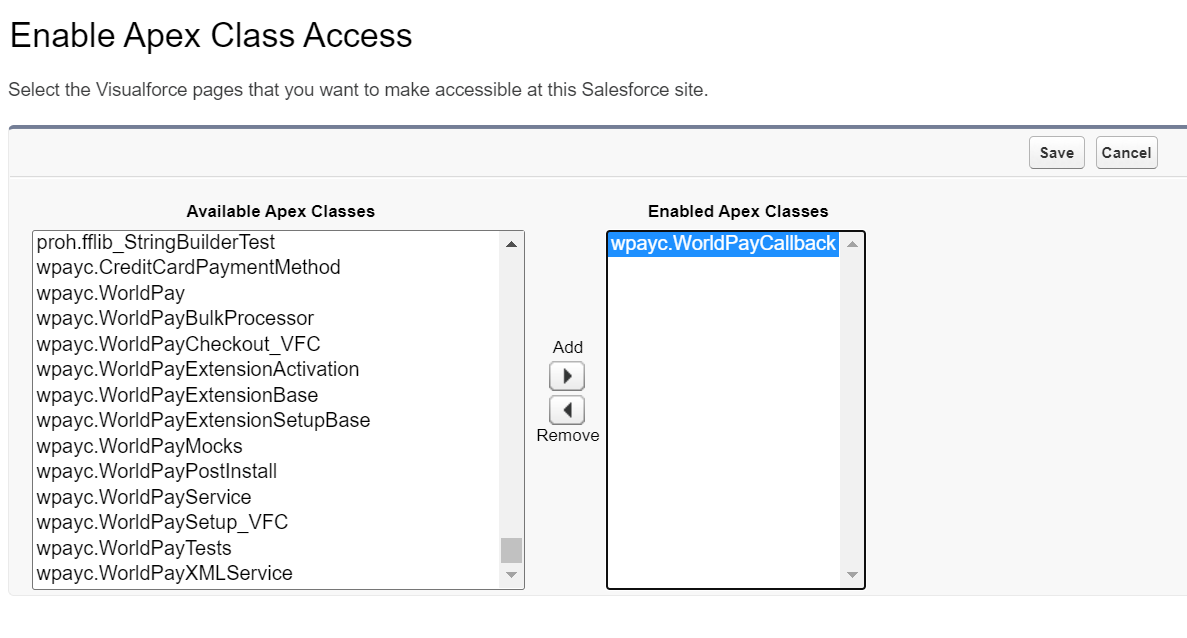
- Click Save.
- Copy the site URL so that you have it available for further Worldpay configuration. Use the secure.force.com URL to ensure an encrypted connection.
Configure Worldpay extension
After you have finished the Worldpay merchant account setup, you can configure the Worldpay extension in FinDock.
To configure the Worldpay extension:
- Launch the FinDock app and click Setup.
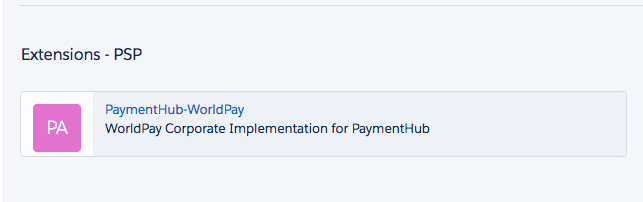
- Click on the PaymentHub-Worldpay tile under Extensions - PSP.
- Fill in the settings as described below.
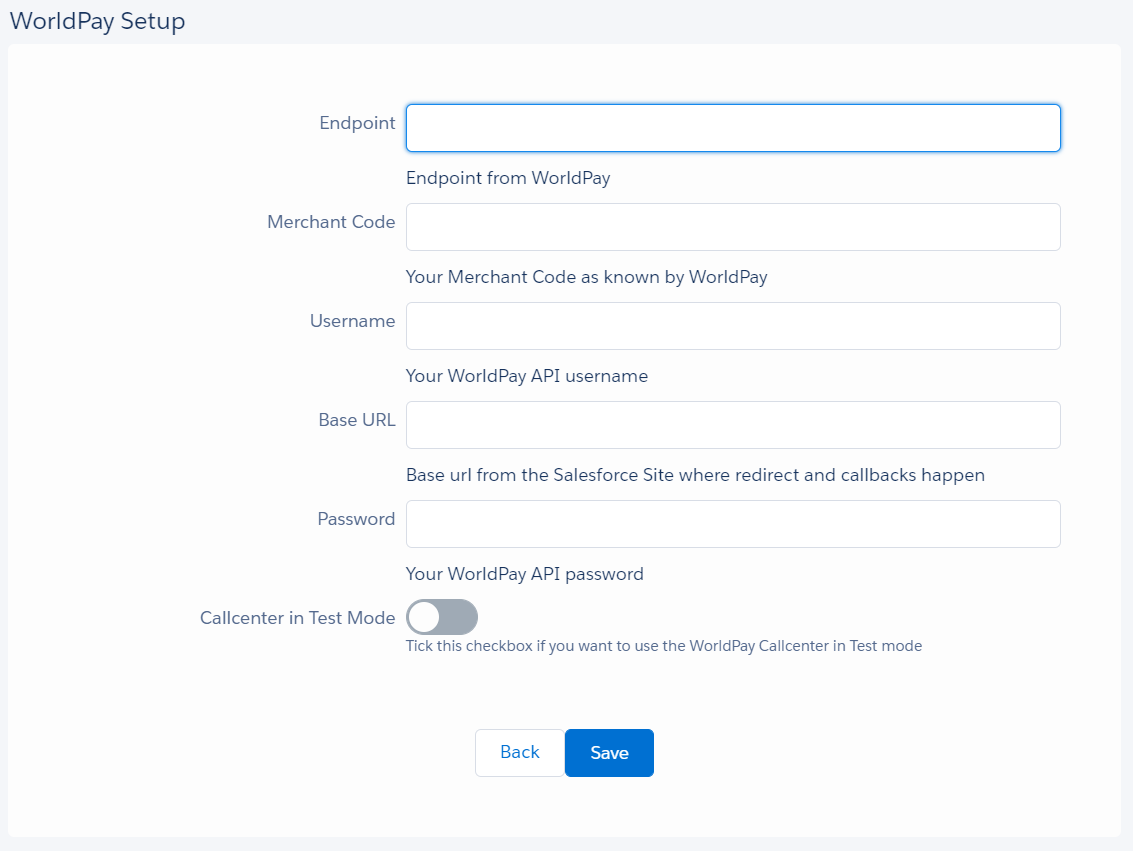
- Endpoint: the Worldpay service endpoint for authorizations and transactions. Enter the endpoint depending on whether you are configuring a sandbox (test) or production org.
- Test:
https://secure-test.worldpay.com/jsp/merchant/xml/paymentService.jsp - Production:
https://secure.worldpay.com/jsp/merchant/xml/paymentService.jsp
- Test:
- Merchant Code: enter here your code from the ACCOUNT page of the Worldpay Merchant Admin Interface.
- Username: enter here the Original XML Username from the ACCOUNT page of the Worldpay Merchant Admin Interface.
- Base URL: copy and paste the URL of your Salesforce site that is set up for Worldpay callbacks. Make sure to end the url with a slash '/'.
- Password: enter here the XML Password from the ACCOUNT page of the Worldpay Merchant Admin Interface
- Endpoint: the Worldpay service endpoint for authorizations and transactions. Enter the endpoint depending on whether you are configuring a sandbox (test) or production org.
- When you have entered all the details, click Save.
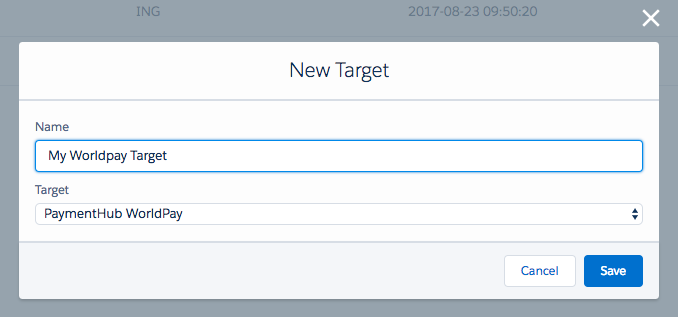
Create a Worldpay target
When using Worldpay to collect recurring credit card transactions in bulk, you need a Target that allows the bulk upload to be correctly routed to Worldpay.
To create a target for Worldpay:
- Launch the FinDock app and click Setup.
- Click on the ProcessingHub tile under Extensions - System.
- Click on the Targets tab.
- Click the Add Target button and on the New Target dialog, give a transparent name that indicates its purpose.
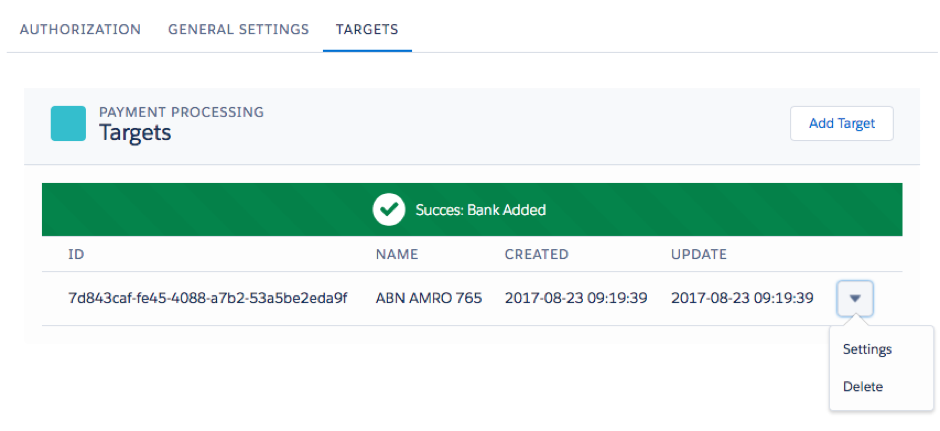
- Select the Target type PaymentHub Worldpay and click Save.
- You are automatically returned to the Targets tab. Click the button to the right of the target you just created and select Settings.
- Fill in the Worldpay target settings as described below.
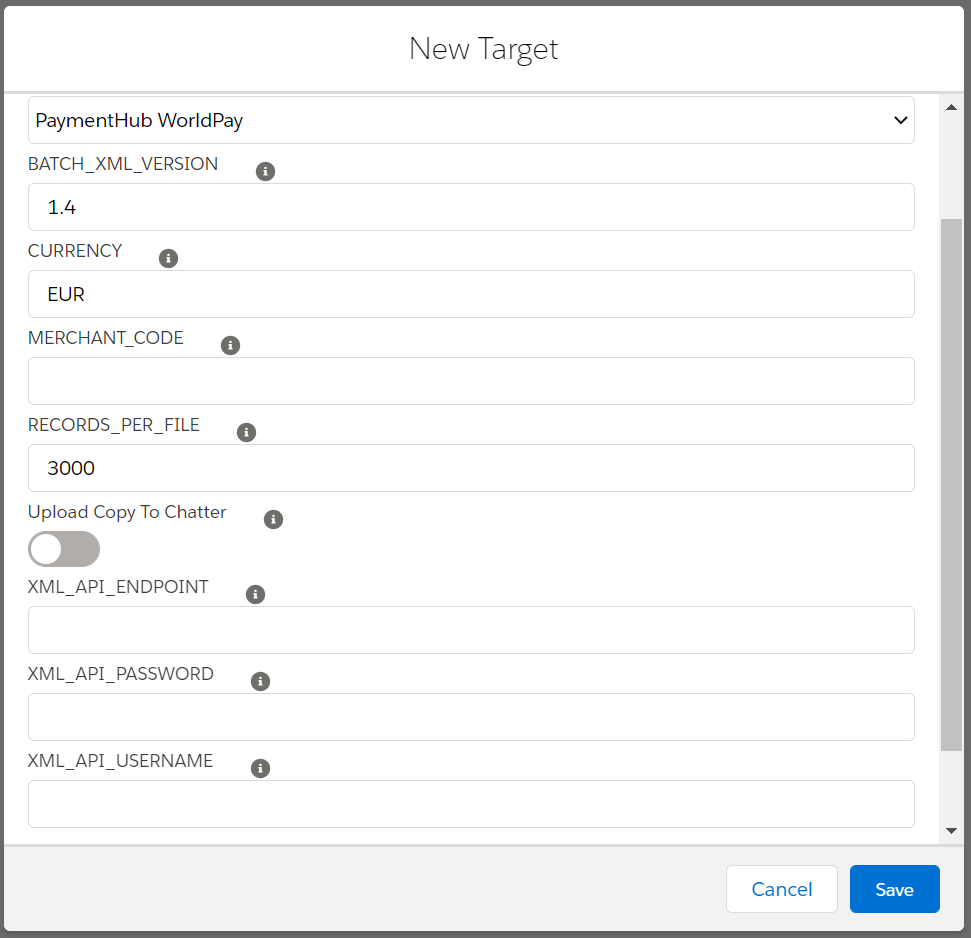
- BATCH_XML_VERSION: change the default version only if you have a specific reason for doing so
- CURRENCY: Enter your default currency. If your org has multi-currency support enabled, this setting is ignored, and the currency from the installment is used instead.
- MERCHANT_CODE: your code from the Merchant Admin Interface
- RECORDS_PER_FILE: unless otherwise decided, leave this at the default value. If the number of transactions exceeds this threshold, FinDock creates multiple files for bulk collection
- Upload Copy to Chatter: enable if you want the generated bulk payment file that is sent to Worldpay to also be uploaded to Chatter
- XML_API_ENDPOINT: use the same endpoint here as in the Worldpay extension settings
- XML_API_USERNAME: use the same username here as in the Worldpay extension settings
- XML_API_PASSWORD: use the same password here as in the Worldpay extension settings
- When you are done filling in the settings, click Save.
Refund handling
Worldpay for FinDock supports both partial and full refunds. The refund handling differs based on the refund type:
- Full refund: the status of the installment is set to ‘Reversed’ and a negative payment with the full rund amount is created.
- Partial refund: the status of installment is to ‘Partially paid’ and a negative payment with the amount of the partial refund is created.
Payment API
To test your Worldpay configuration for one-time payments, you can use the following API messages.
If your configuration is correct, you should be able to navigate to the RedirectURL provided in the response and pay the amount specified. When a redirect ends in an unexpected error, the error message is stored in the last status reason of the installment.
In production, recurring credit card tokens are created with an initial lifetime of four years. In testing , tokens are created with a lifetime of seven days.
This following request initiates a one-time credit card transaction with Worldpay.
    {
      "FailureURL": "https://www.example.com/error",
      "Origin": "API Test",
      "Payer": {
        "AllowDeduplication": true,
        "Contact": {
          "Email": "test@demo.com",
          "FirstName": "Test",
          "LastName": "Tester"
        },
        "ContactUpdate": "replace"
      },
      "Payment": {
        "Amount": "25"
      },
      "PaymentMethod": {
        "Name": "Creditcard",
        "Processor": "PaymentHub-WorldPay"
      },
      "SourceConnector": {
        "Name": "PaymentHub"
      },
      "SuccessURL": "https://www.example.com/success"
    }
The following request initiates a recurring payment.
{
    "SuccessURL":"http://www.success.nl",
    "FailureURL":"http://www.fail.nl",
    "Payer":{
        "Contact":{
            "FirstName":"Worldpay for FinDock",
            "LastName":"Recurring Worldpay",
            "Email":"T@Douwstra.com"
        },
        "Account":{
            "Name":"Famylje Douwstra"
        },
        "AccountUpdate":"Enrich",
        "ContactUpdate":"Enrich",
        "AllowDeduplication":true,
        "PrimaryRelation":"Contact"
    },
    "Recurring": {
        "Amount": "25",
        "Frequency": "Monthly",
        "StartDate": "2020-11-01"
    },
    "PaymentMethod": {
        "Name": "CreditCard",
        "Processor": "PaymentHub-WorldPay"
    },
    "Settings": {
        "SourceConnector": "PaymentHub"
    }
}