If you have payment data from 3rd party systems that is not included in existing bank statements and reports, you can add this data to Salesforce using FinDock Inbound Report records and Guided Matching.
This is a combined benefit of Salesforce and FinDock capabilities. Please proceed with caution and careful testing. Custom data import and matching is not covered by the FinDock standard support level.
To import your payment data, you need to use a format supported by the tool you will be using for the import. In our example, we will use Salesforce Data Loader, so we need a comma-separate value (CSV) file with each row representing an individual payment. The payment data must contain at least the following:
- Amount: payment value in the currency of the target org
- Date: the day the payment was collected using the format YYYY-MM-DD
- Identifier: a unique reference that FinDock can use to match the payment to an Installment or payer (Contact or Account) record
For the Guided Matching framework, each row in your file needs to include:
- Report Type: can be any value, but we will use
Demo - Report Sub Type: can be any value, but we will use
Demo1 - Status: Must be
Newto trigger matching
To reconcile the custom data import, you will need a Guided Matching execution plan. Before we can configure a rule set for that plan, we need to create a Guided Matching Setup record.
Every Guided Matching execution plan is stored as Salesforce data in the form of a Guided Matching Setup record. To create a new custom setup record (as well as get an overview of all setup records in your org), you need to create a tab for the Guided Matching Setup object:
- Open the Salesforce setup and go to the Tabs setup.
- Under Custom Tabs, click New.
- For object, select Guided Matching Setup.
- Give the tab a label and style to distinguish it from the Rule Editor (a Guided Matching Setup Lightning page tab).
- Click Next.
- Make the tab visible for user profiles as needed.
- Add the tab to custom apps if needed.
- Click Save.
Now you can create a setup record for your custom data import.
- From the Guided Matching Setup tab, click New.
- Fill in the record details as follows:
- Name:
Inbound Report: Demo/Demo1 - Object:
Inbound_Report - Active: checked (true)
- Target: enter a dash (“-”) to fill this required field
- Job Size: leave at default and increase later if needed
- Report Type: can be any value, but we use
Demo - Report Sub Type: can be any value, but we use
Demo1 - Currency: select an appropriate currency
- Rules: copy-paste the JSON below as text-only (e.g. without styled quotes)
- Name:
- Click Save.
Matching rules
[
    {
    "ruleType":"processInstallment",
    "name":"ProcessInstallment",
    "fieldName":"cpm__Installment__c",
    "fieldType":"reference",
    "id":"PROCINS",
    "iconName":"standard :partner_fund_allocation",
    "seqNr":"27",
    "jobNr":"1",
    "userGuidance":"Please attach a not already collected installment."
    }
]
Now you will be able to select the inbound report type for your custom data import in the Guided Matching Rule Editor for configuring matching rules.
When we created the Guided Matching Setup record in the previous section, we included two Guided Matching rules that are required in any execution plan: Process Installment and Manage Source. The latter is a managed rule that you don’t need to edit. The Process Installment, however, needs adjustment (see below).
In addition to these two rules, you will need to add other rules to match and update Salesforce data with your custom import data. For example, if the imported data includes new contacts or accounts, you need to ensure primary values such as first name and last name are included in the import file. Then you need to use a Create Record rule, as well as possibly a Find Duplicate rule, to add the new payers to Salesforce.
Refer to FinDock Labs to get ideas and examples for Guided Matching rules.
To configure Guided Matching:
- From the FinDock Setup, click Guided Matching in the left-hand menu.
- In the Rule Editor, select Inbound Report, and then the type and sub type as defined in the setup record
- Modify the Process Installment rule according to the guidance below.
- Add other rules as needed.
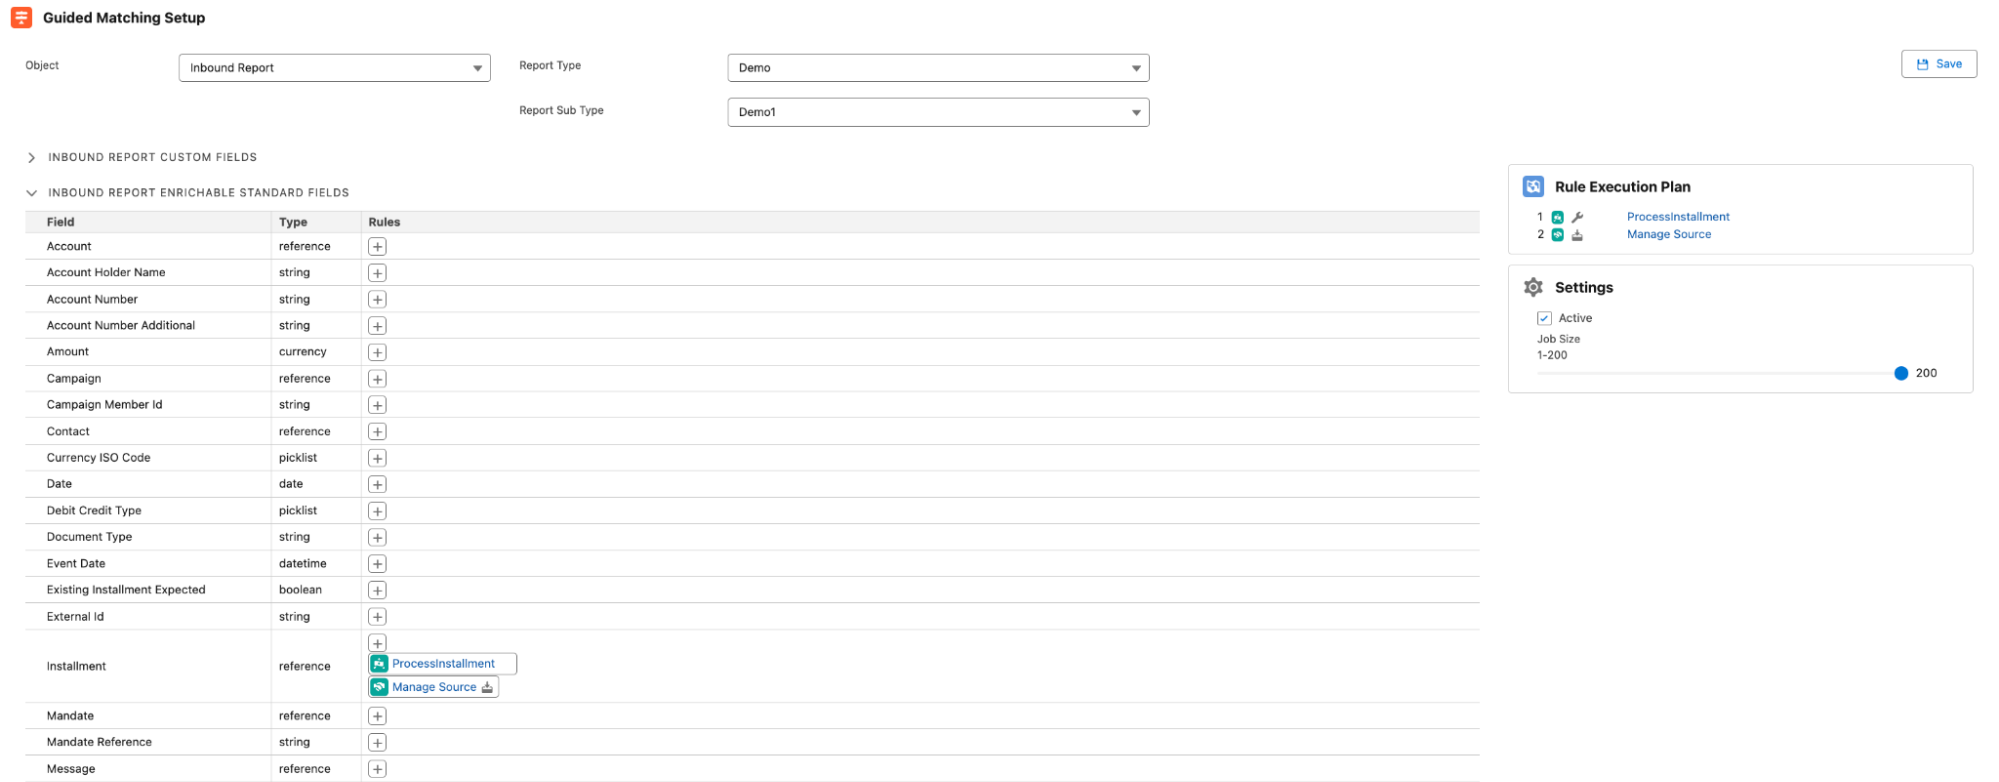
The Process Installment rule requires a value in the following Inbound Report fields (and doesn’t rely on any other fields):
- Debit Credit Type: use a Constant rule to the value to Credit if all the entries in your CSV file represent incoming money (credit transactions on a bank account).
- Amount: make sure this is equal to the final amount of the transaction.
- Date: this should be the date the transaction was completed.
- Installment: if the CSV file includes payments that may already be in Salesforce, try to find the correct Installment record using Query rules. If the imported data includes new payments, use a Create Installment rule to create new records. The Create Installment rule requires a contact or account for the incoming transaction, so use Query rules and Guided Review to find and match the correct payer.
Once you have a minimum rule set for Guided Matching, you can try your first data import. We strongly recommend iterating with small batches, checking results, and updating Guided Matching rules before moving to larger data volumes.
If you have defined values (columns) that do not match standard fields on Inbound Report, please first add custom fields to the Inbound Report object before importing your file. Also make sure that the Report Type and Report Sub Type values correspond to the values you used on the Guided Matching Setup record. In our example, those are Demo and Demo1 respectively, but they can be anything.
Once everything is confirmed, use Salesforce Data Loader to import your CSV files.