In this article we present a few hands-on examples of how to use the FinDock Payment API.
- To find out how our API works, please visit our How the Payment API works article.
- If you haven’t already, please check out Getting started with the Payment API before continuing.
- For detailed information about our API, please visit our API reference guide.
- To learn about and configure online reconciliation with Guided Matching, check our processing and reconciliation article.
- If you run into any issues, please visit our Troubleshooting the API article.
The examples here use credit card as the payment method and FinDock as the source. If these terms (method and source) are unfamiliar to you, please read our getting started article.
Before building a request body, check the target org configuration and requirements with GET /PaymentMethods, GET /SourceConnectors and GET /PackagesActions.
Payments are initiated by performing a POST to the FinDock /PaymentIntent endpoint. The request must have a body and an authorization header.
The Root of the request contains the success and failure URLs and the origin (e.g. what website or platform is making the request). The Root may also include a webhook URL, but this attribute is not required. If the transaction is successful, the customer is redirected to the success URL. If the customer cancels the transaction, the redirection is to the failure URL. The origin is logged in Salesforce as a text string to indicate what form was used for initiating the transaction.
{
"SuccessURL": "https://www.example.com/success",
"FailureURL": "https://www.example.com/error"
}
The Payer object contains the details of the payer, Test Payment, in this example. AllowDeduplication is set to true, so if Salesforce finds an existing Test Payment in the database (according to the deduplication rules), the existing contact shall be used.
Please note we put all the Contact and Account fields in a SalesforceFields object. In this object, you can pass any field - both standard Salesforce and custom - that is available on this object in your Salesforce environment.
    {
"SuccessURL": "https://www.example.com/success",
"FailureURL": "https://www.example.com/error",
 "Payer": {
   "Contact": {
     "SalesforceFields": {
        "FirstName":"Test",
        "LastName":"Payment",
        "Email":"testpayment@findock.com",
        "MailingStreet":"Rocket Rd",
        "MailingCity":"Hawthorne0",
        "MailingPostalCode":"CA 90250",
        "MobilePhone":"98989898"
     }
   },
    "Account":{
      "SalesforceFields": {
        "Name":"Payment Family",
        "Website":"www.spacex.com",
        "BillingStreet":"Rocket Rd",
        "BillingCity":"Hawthorne",
        "BillingPostalCode":"CA 90250"
    }
   }
 }
If you are using NPSP, we recommend adding AccountRecordTypeName to the Account declaration.
The Payment object indicates this request is a one-time transaction. The amount is 10, and since there is no CurrencyISOCode attributed, the default currency defined for the Salesforce org is used.
"OneTime": {
   "Amount": "36"
 },
The PaymentMethod object indicates the transaction uses the credit card payment method. Since this Salesforce org has several processors configured that can be used to perform credit card payments, we explicitly specify Stripe as the processor.
"PaymentMethod": {
   "Name": "CreditCard",
   "Processor": "PaymentHub-Stripe"
   }
}
If no processor is provided, FinDock uses the default payment processor configured for this payment method in the FinDock setup. To find out which processor is the default, perform a GET on the /PaymentMethods endpoint.
The Settings object explicitly defines FinDock as the source. This means we are using FinDock Standalone and there are no source apps, such as Nonprofit Success Pack, in the Salesforce org that would need the payment data. You can leave theSourceConnector parameter out if you always want to use the default source connector in the Salesforce environment.
    "Settings": {
        "SourceConnector": "PaymentHub"
    }
The full message sent to https://your-org-url.force.com/services/apexrest/cpm/v2/PaymentIntent should look something like this:
{
    "SuccessURL": "https://www.example.com/success",
    "FailureURL": "https://www.example.com/error",
    "Payer": {
        "Contact": {
            "SalesforceFields": {
                "FirstName": "Test",
                "LastName": "Payment",
                "Email": "testpayment@findock.com",
                "MailingStreet": "Rocket Rd",
                "MailingCity": "Hawthorne0",
                "MailingPostalCode": "CA 90250",
                "MobilePhone": "98989898"
            }
        },
        "Account": {
            "SalesforceFields": {
                "Name": "Payment Family",
                "Website": "www.spacex.com",
                "BillingStreet": "Rocket Rd",
                "BillingCity": "Hawthorne",
                "BillingPostalCode": "CA 90250"
            }
        }
    },
    "OneTime": {
        "Amount": "36"
    },
    "PaymentMethod": {
        "Name": "CreditCard",
        "Processor": "PaymentHub-Stripe"
    },
    "Settings": {
        "SourceConnector": "PaymentHub"
    }
}
For advanced use cases, you can also specify a custom Guided Matching setup in the Settings object. This requires that you first make a custom Inbound Report subtype for the PaymentIntent report type and configure a Guided Matching setup for that custom subtype. Once those are in place, you can override the default Guided Matching setup for payment intent processing like this:
    "Settings": {
        "ProcessingType": "CustomInboundReportSubTypeName"
}The response on the new one-time payment request has a similar structure to the request:
{
    "Settings": {
        "SourceConnector": "PaymentHub",
        "ProcessingType": "Default"
    },
    "RedirectURL": "https://redirect.test.findock.com/3xnllmuai2/PaymentHub-Stripe/checkout?publicKey=pk_test_eGC6TxzQ60CdjpAkt2RG3CwZ008WiiOn12&sessionId=cs_test_ifQhP4ggbSQrjJYoi3AEVrEmO3Agl5O6ihy4THgYtuswvW1yX9wjmA59",
    "PaymentMethod": {
        "Processor": "PaymentHub-Stripe",
        "Name": "CreditCard"
    },
    "Id": "pi_vqv330n7dvd9j8210"
}
The Settings object response indicates that the payment was created with FinDock Standalone (PaymentHub) as SourceConnector.
The PaymentMethod object response indicates that the transaction will be processed as a Credit Card payment through Stripe.
The Id is an Id that identifies this Payment Intent. This id is stable across all communication from and to FinDock, and can be found:
- on the created Inbound Report record in Salesforce. On this Inbound Report the API call is processed through Guided Matching.
- in Webhook notifications to the
WebhookURLyou can specify in the request body.
You can also retrieve the status of the Payment through a GET request on the /PaymentIntent endpoint.
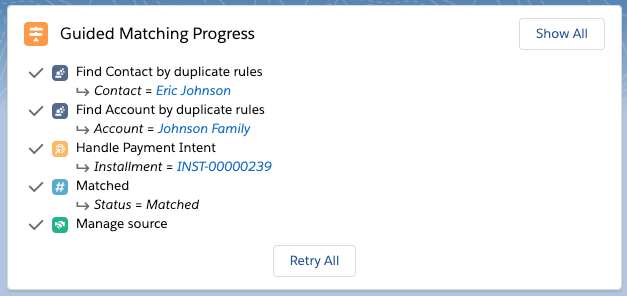
For more information on processing and reconciliation of online Payments through Guided Matching, please read our processing and reconciliation article.
Because this is a new payment for a new contact, the customer/donor needs to provide credit card details and should be forwarded to the RedirectURL in the response.
"RedirectURL": "https://redirect.test.findock.com/3xnllmuai2/PaymentHub-Stripe/checkout?publicKey=pk_test_eGC6TxzQ60CdjpAkt2RG3CwZ008WiiOn12&sessionId=cs_test_ifQhP4ggbSQrjJYoi3AEVrEmO3Agl5O6ihy4THgYtuswvW1yX9wjmA59"In our example, since Stripe is the processor, the payment form is a Stripe payment form.
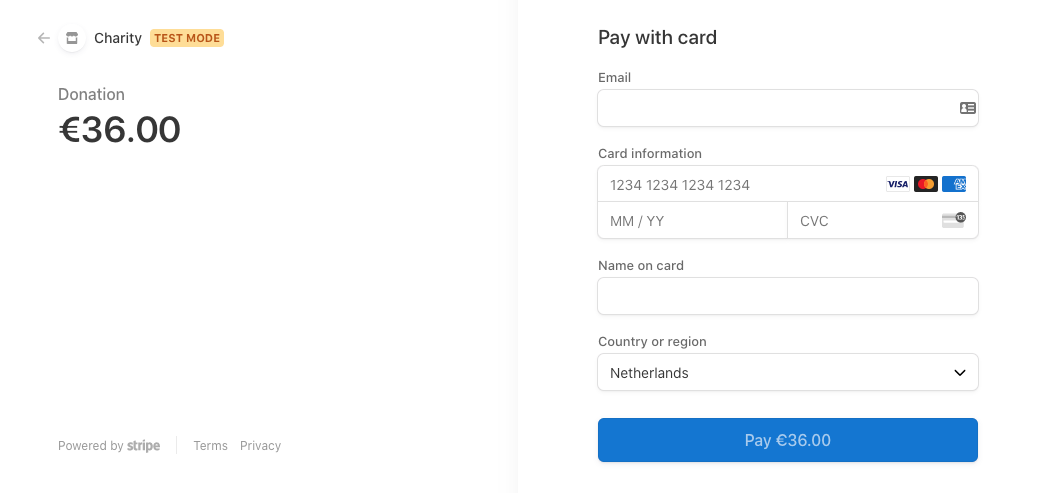
Although this Stripe payment page is close to the production version, many payment processors show different pages for testing. We strongly recommend performing a ‘penny test’ with a real, small payment amount in your production environment to account for these differences in the test setup.
Once the customer completes the transaction, the customer is redirected to the SuccessURL or FailureURL value from the initial PaymentIntent. In parallel, FinDock receives a callback from the PSP (Stripe) and the following actions are performed in Salesforce through Guided Matching:
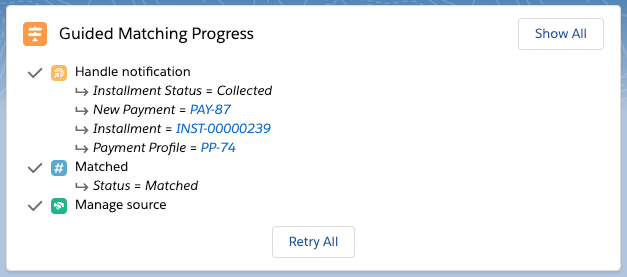
- The installment record is updated (status is set to ‘Collected’ and amount is reduced by the amount paid to 0).
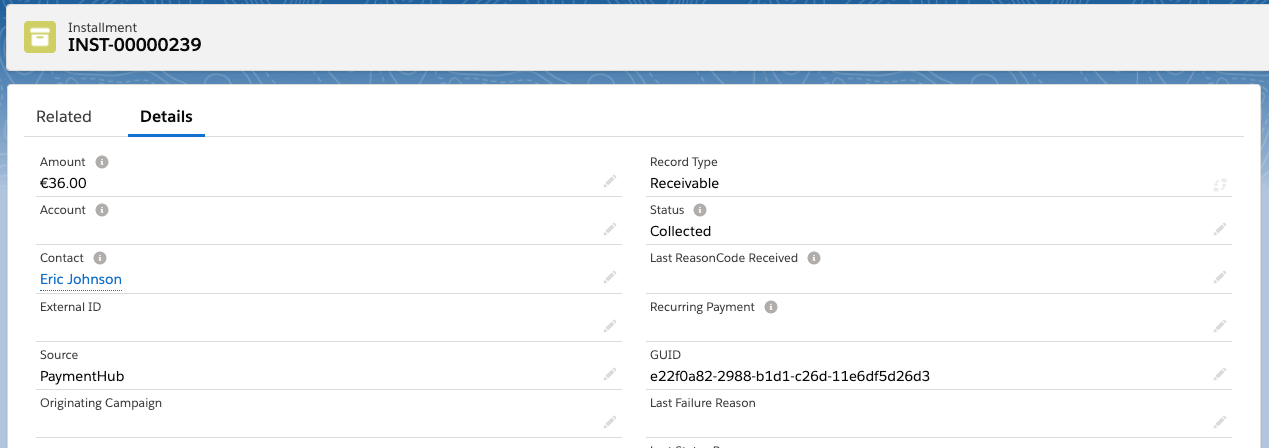
- A Payment record is created for the Installment.
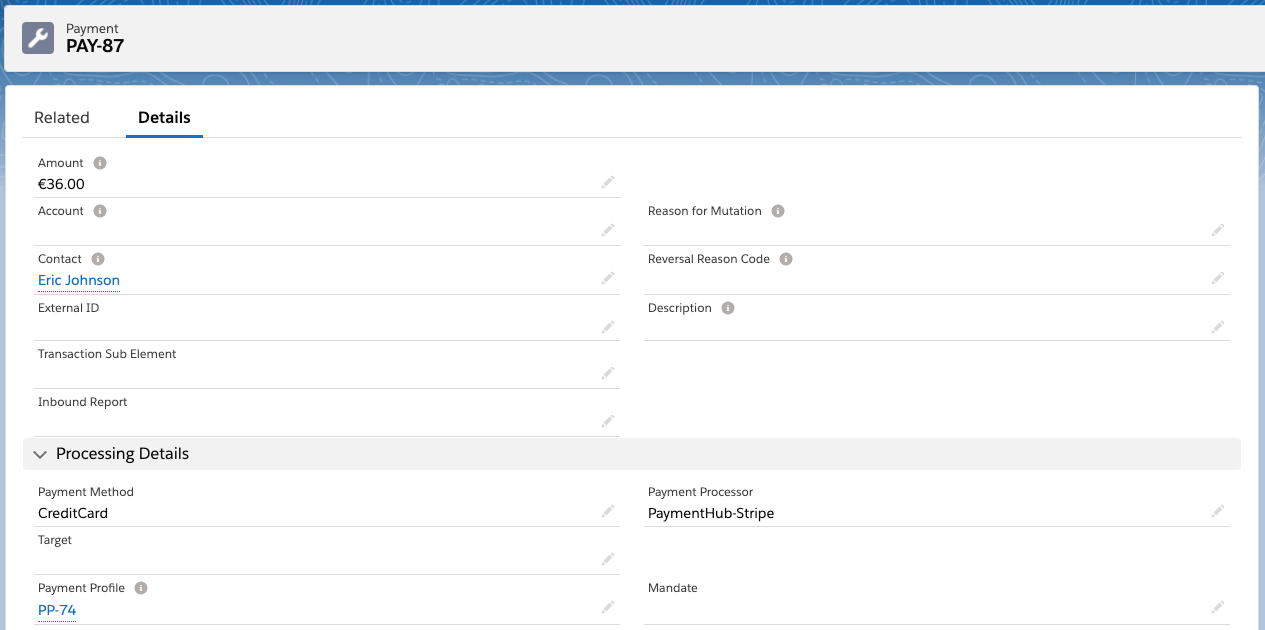
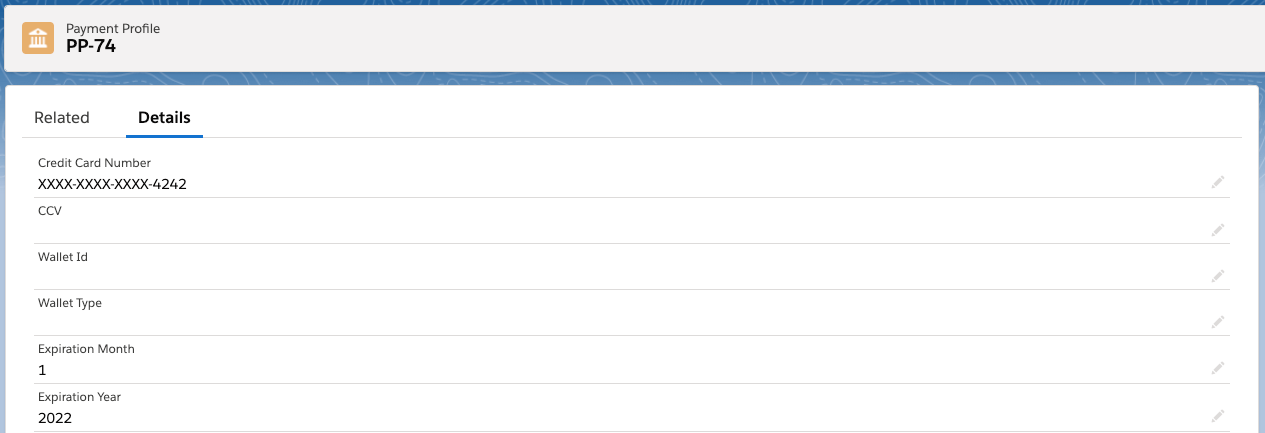
- A Payment Profile is created related to the Contact based on the data provided by the PSP, like the type of credit card. If the Payment Profile had already existed for this contact, it would have been updated instead. This data can be used to personalize (e.g. pre-fill forms) future payment requests for this customer. Payment profiles are deduplicated automatically by FinDock.
You can pay existing installments by performing a POST to the /PaymentIntent endpoint. The request must have a body and an authorization header. In addition, the installment you are paying must have an open amount not equal to zero.
The request body is the same as for a new one-time payment with one important exception: an installment Id is added in the OneTime object. No Payer object is required, since this customer data is already in Salesforce. A basic request looks like this:
{
    "SuccessURL": "https://www.example.com/success",
    "FailureURL": "https://www.example.com/error",
    "OneTime":{
      "Id":"a083X00001gpxeGQAQ"
    },
    "PaymentMethod": {
        "Name": "CreditCard",
        "Processor": "PaymentHub-Stripe"
    },
    "Settings": {
        "SourceConnector": "PaymentHub"
    }
}If additional actions are required from the customer, a redirectURL is returned in the response body. Once the transaction has been completed or cancelled, the PSP notifies FinDock through a callback, and FinDock updates the data in Salesforce accordingly.
   {
    "Settings": {
        "SourceConnector": "PaymentHub",
        "ProcessingType": "Default"
    },
    "RedirectURL": "https://redirect.test.findock.com/3xnllmuai2/PaymentHub-Stripe/checkout?publicKey=pk_test_eGC6TxzQ60CdjpAkt2RG3CwZ008WiiOn12&sessionId=cs_test_l5JXe6THfn7e99Ip3OoGDf1SsT19fZrrsBvAhrmARWx6jU0QYi2EKS1Z",
    "PaymentMethod": {
        "Processor": "PaymentHub-Stripe",
        "Name": "CreditCard"
    },
    "Id": "pi_2qha50n78o0qezuln"
}Payments are initiated by performing a POST to the /PaymentIntent endpoint. The request must have a body and an authorization header.
The request body is the same as for a new, one-time payment except that it uses a Recurring object that replaces the Payment object. Some PSPs require an ‘initial’ transaction for authentication. In those cases both a Payment and a Recurring object is passed. To find out if such an authorization is required, use GET /PaymentMethod fist to determine the requirements. For further information, see the relevant PSP-specific articles.
The Recurring object defines the amount and frequency of the recurring transaction, as well as the start date (when the first transaction can be billed).
    "Recurring": {
          "Amount": "25",
          "Frequency": "Monthly",
          "StartDate": "2023-04-01"
     }
Some PSPs may require an initial payment when setting up a new recurring payment. Some make it optional, while others disallow initial payment completely. This is part of the GET /PaymentMethod response which includes the InitialPaymentonRecurring parameter value. The options are:
- Required: The recurring payment setup must include a one-time payment block.
- Optional: The recurring payment setup may include a one-time payment block.
- No: The recurring payment setup must not include a one-time payment block.
For example, if the initial payment is required, the above Recurring object would need a OneTime block like below.
    "Recurring": {
          "Amount": "25",
          "Frequency": "Monthly",
          "StartDate": "2023-04-01"
     }
    "OneTime": {
        "Amount": 25
     },
The parameter RecurringRequiresInitialPayment [true | false] may be included in the GET /PaymentMethod response, but this parameter is deprecated and should not be used.
In the response, you get a similar response to a OneTime request, with - in this case - a RedirectURL to perform an authorization.
   {
    "Settings": {
        "SourceConnector": "PaymentHub",
        "ProcessingType": "Default"
    },
    "RedirectURL": "https://redirect.test.findock.com/3xnllmuai2/PaymentHub-Stripe/checkout?publicKey=pk_test_eGC6TxzQ60CdjpAkt2RG3CwZ008WiiOn12&sessionId=cs_test_FOnCWoRsNOVea8NBYMhOObAYvr7784jvKirv8mRkfxo0OxontIMduM6X",
    "PaymentMethod": {
        "Processor": "PaymentHub-Stripe",
        "Name": "CreditCard"
    },
    "Id": "pi_1v0c50n728ke1inuu"
}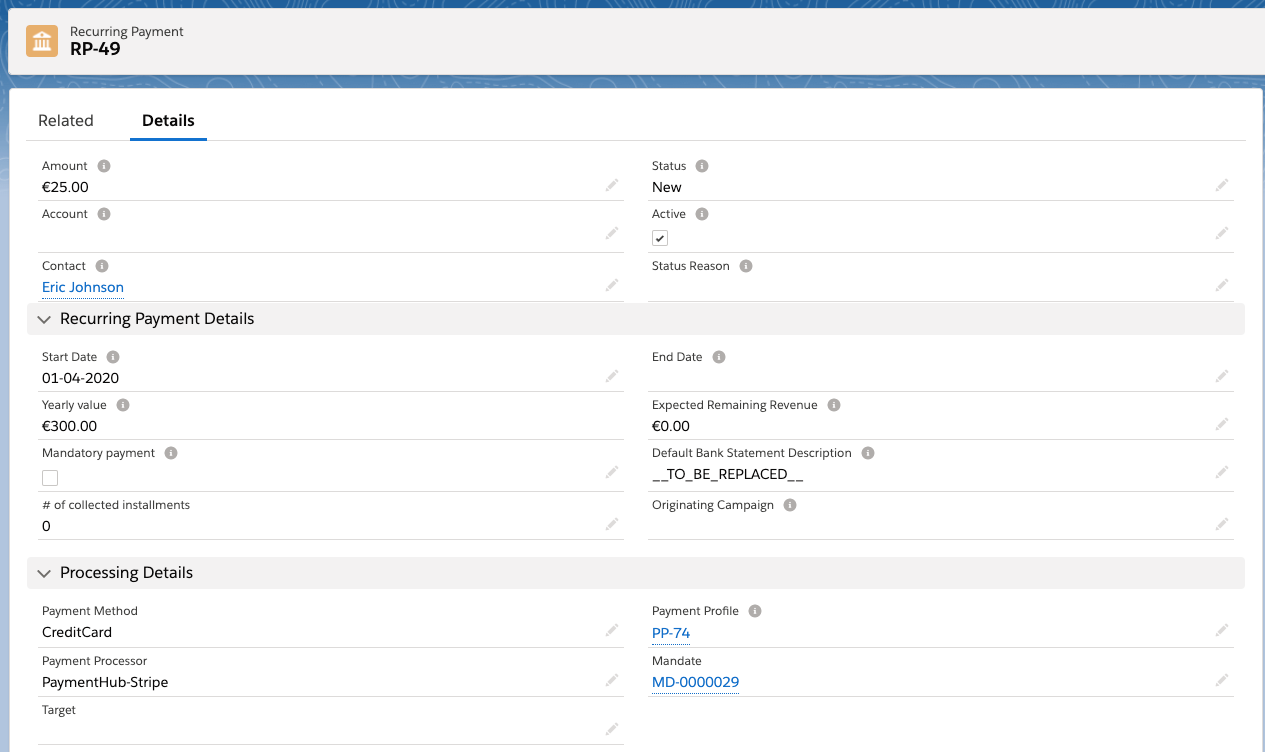
Related to the Recurring Payment, you can find:
- the first Installment that was created through the API request.
- the Mandate with data (in this case a Stripe Credit Card token) to collect further installments through the Payment Schedule.
- the Payment Profile with any Credit Card details that Stripe has returned.
Override the Default Bank Statement Description field with Salesforce automation or by passing a value to the Description parameter in the Parameters block in the PaymentMethod object in your API call, to show the Payer a friendly description on their bank statement.
You can change the payment method, payment process, target, as well as related mandate and payment profiles for existing recurring payments. You do this by posting to the /PaymentIntent endpoint using the record Id or GUID to identify the payment to be update.
You can use FinDock PayLinks as an out-of-the-box implementation for the update recurring payment capabilities of the Payment API.
Make sure that you use identifier from the source-specific object record for updates:
- FinDock Standalone: Recurring Payment object
- Salesforce Fundraising: Gift Commitment object
- Nonprofit Success Pack: Recurring Donation
Use GET on the /Recurring endpoint with your identifier to confirm you have the correct recurring record before posting an update. Below is a typical get response (if a field on the record is empty, it is not included in the response):
{
  "Id": "a083X00001gpxeGQAQ",
  "GUID": "abcdefg-abcdef-12345-abcdefg-54321",
  "Url": "/services/data/36.0/sobjects/a083X00001gpxeGQAQ",
  "Type": "cpm__Recurring_Payment__c",
  "CurrencyISOCode": "EUR",
  "Amount": 10,
  "Frequency": "Monthly",
  "StartDate": "01-01-2025",
  "EndDate": "01-01-2026",
  "RecordTypeName": "DefaultReceivable",
  "SetupUrl": "<https://link.findock.com/pay/xxxxxxxxx/xxxxxxxx-xxxx-xxxx-xxxx-xxxxxxxxxxxx>",
  "Description": "Donation for XYZ",
  "SourceConnector": "PaymentHub"
}
Also keep in mind that queries of recurring payments with Salesforce Fundraising get information from both Gift Commitment and related Gift Commitment Schedule records. If you try to fetch information for a gift commitment that does not yet have a schedule, the query throws an error.
The request body must always include the full details for method and processor. The target may be included but is not required. Additional parameters for updating the related mandate or payment profile are also optional.
A basic update request looks like this:
{
    "SuccessURL": "https://www.example.com/success",
    "FailureURL": "https://www.example.com/error",
    "Recurring":{
      "Id":"a083X00001gpxeGQAQ"
    },
    "PaymentMethod": {
        "Name": "CreditCard",
        "Processor": "PaymentHub-Adyen",
        "Target": "Main"
    }
}
You can rely on org defaults to simplify the request body, though it's a good idea to include all details. For example, in the above example you could leave out the processor line if Adyen is the default PSP for the credit card method in the org. The same is true for target - if you know the default target for the processor and method combination is the correct target, then the target line can be omitted.
If you are updating a recurring payment record that is NOT from the default source, you must include the source in the request body with the Settings block.
"Settings": {
    "SourceConnector": "PaymentHub",
}
If you are updating the recurring payment from a method like direct debit to credit card, and the processor requires an initial payment for the recurring payment, you need to include the initial payment in a OneTime block like this:
{
    "SuccessURL": "https://www.example.com/success",
    "FailureURL": "https://www.example.com/error",
    "Recurring":{
      "Id":"a083X00001gpxeGQAQ"
    },
    "OneTime": {
        "Amount": 10
    },
    "PaymentMethod": {
        "Name": "CreditCard",
        "Processor": "PaymentHub-Stripe",
        "Target": "Main"
    }
}
When you need to change the recurring payment to a direct debit, or update the payer's bank account, you use additional parameters block, like this:
{
    "SuccessURL": "https://www.example.com/success",
    "FailureURL": "https://www.example.com/error",
    "Recurring":{
      "Id":"a083X00001gpxeGQAQ"
    },
    "PaymentMethod": {
        "Processor": "PaymentHub-SEPA",
        "Name": "Direct Debit",
        "Target": "SEPA-Target",
        "Parameters": {
            "IBAN" : "NL13TEST0123456789",
            "holderName" : "T. Payment"
        }
}The response confirms the changes you make to the recurring payment, along with the source, the Guided Matching setup (ProcessingType) that will be used for the payment intent inbound report, and a payment intent Id. If additional authorization from the payer is needed, the response includes a redirect URL. For example, changing to Stripe credit card would include a URL that needs to be passed to the payer.
    "Settings": {
        "SourceConnector": "PaymentHub",
        "ProcessingType": "Default"
    },
    "RedirectURL": "https://redirect.test.findock.com/xxxxxxxxxx/PaymentHub-Stripe/checkout?...",
    "PaymentMethod": {
        "Target": "Stripe",
        "Processor": "PaymentHub-Stripe",
        "Name": "CreditCard"
    },
    "Id": "pi_xxxxxxxxxxxxxxxxx"
}
Otherwise, the response body just includes the scope of the changes.
{
    "Settings": {
        "SourceConnector": "PaymentHub",
        "ProcessingType": "Default"
    },
    "PaymentMethod": {
        "Target": "Target-SEPA",
        "Processor": "PaymentHub-SEPA",
        "Parameters": {
            "holderName": "T. Payment",
            "IBAN": "NL13TEST0123456789"
        },
        "Name": "Direct Debit"
    },
    "Id": "pi_xxxxxxxxxxxxxxxxx"
}Find more examples of payment intent scenarios that can be executed through the API.
Check out the Integration checklist for additional tips on how to get the maximum value from our API.