Configuring SmartDebit
FinDock integrates with SmartDebit, a Bacs service bureau that is now part of Access PaySuite.
The SmartDebit payment extension is part of the Bacs for FinDock package and supports collecting one-time and recurring Bacs Direct Debit payments.
| Multi-merchant | Multi-currency |
|---|---|
| Payment Method | One-time | Recurring | Refunds |
|---|---|---|---|
| Bacs Direct Debit | -- |
Prerequisites
- FinDock is installed and configured.
- The org is connected to ProcessingHub.
- You have a service contract with SmartDebit.
Before you start
SmartDebit offers a variety of services, and your specific contract terms impact how you should set up and use FinDock. We recommend you collect the following information about your SmartDebit contract:
- New payer lead time: this impacts your target settings and determines when you should run mandate schedules
- Collection lead time: this determines both run date and collection date for payment schedules
- Submission frequency: impacts setting up automated payment collection and mandate management
- Collection dates: if there are specific dates of the month you can collect, payment schedules need to be scheduled accordingly
Install and activate Bacs extension
Follow the standard procedure for installing and activating the Bacs for FinDock extension.
Add permissions for Bacs extension
Check and assign the required permissions for FinDock and Bacs/SmartDebit features. Ensure all package-specific permission sets are correctly assigned.
Adjust FinDock Core mandate settings
In the Bacs Direct Debit scheme, it is strongly recommended to maintain a one-to-one relationship between a donor (payer) and DDI (Payer and Recurring Donation or one-time Installment in FinDock). This helps avoid confusion and complexity, particularly for reconciliation and indemnity.
Therefore, we recommend that you disable the Reuse existing mandate option for FinDock under the Core mandate settings, but make sure the Autocreate mandate for Direct Debits option is enabled.
The Mandate Reference setting is not used for Bacs mandates.
Create a SmartDebit target
A target in FinDock defines the bank account that is credited in the Bacs Direct Debt collection process. In the case of SmartDebit, the target defines your customer account with SmartDebit and is used to connect to the SmartDebit API for file transfers between FinDock and SmartDebit.
| Setting | Description |
|---|---|
| Name | The name of the target should be something that is recognizable within your organization. This name is not shown outside of your organization, but it is used to distinguish different accounts. |
| Target | The payment extension to be used with this target. Select PaymentHub BACS. |
| Type | This is the Bacs implementation to be used with this target. The type affects which settings are needed for the target and how the target is used. Select SMARTDEBIT for the FinDock SmartDebit integration. |
| Collection file lead time | Deprecated. |
| DDI Lead time | This is used to adjust the Start Date of a new payer in Smart Debit. When a new mandate is created, the mandate record gets a signed date which is the creation date + 1 day. When the new mandate is picked up by a mandate schedule run, FinDock adds the DDI lead time number of days to the signed date and enters that as the Start Date for the new payer. |
| Endpoint | The URL (API endpoint) for SmartDebit; There are different endpoints for testing (sandbox) and production. For further information, please refer to the SmartDebit API docs. |
| Initial Report Date | Deprecated. |
| DDIs per payer file | Limits the number of DDIs in a single payer file. Leave at default unless otherwise instructed. |
| Transactions per Collection file | Limits the number of transactions (payment instructions) per collection file generated by payment schedules. Leave at default unless otherwise instructed |
| Password | The password provided by SmartDebit to authenticate connections to the SmartDebit API. |
| Service User | The PSLID value provided by SmartDebit to authenticate connections to the SmartDebit API. |
| Username | The username provided by SmartDebit to authenticate connections to the SmartDebit API. |
To create a SmartDebit target:
- Launch the FinDock app and click the Setup tab.
- Scroll down and click the PaymentHub-BACS tile.
- Click Create Target.
- Add the name for the new target, select ‘PaymentHub BACS’ for Target, and for type, select SMARTDEBIT.
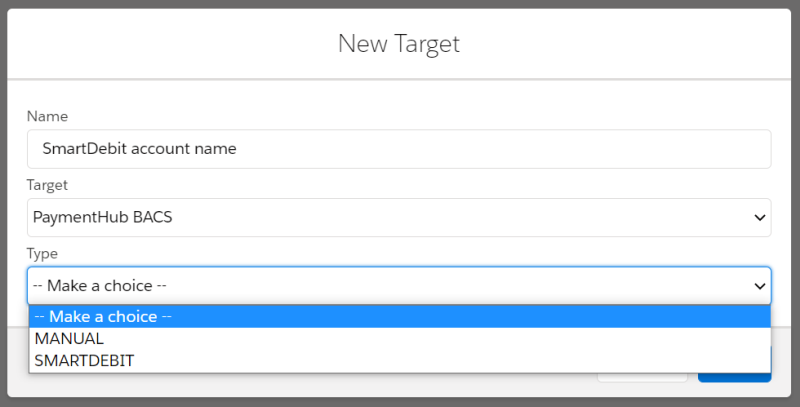
- Once you select Type, you are taken to the target settings window where you can fill in the rest of the settings and click Save.
Sort code and account check
For Bacs Direct Debit payments initiated through the FinDock Payment API, FinDock automatically performs a sort code & bank account check to avoid failed DDI registration due to incorrectly entered code or account values. The checking is done automatically, and the result is included in the synchronous response of the paymentIntent API call.
With FinDock Giving Pages, the checks are implemented by FinDock. If you are using your own payment form/page design, you need to ensure errors are handled gracefully if invalid information is entered.
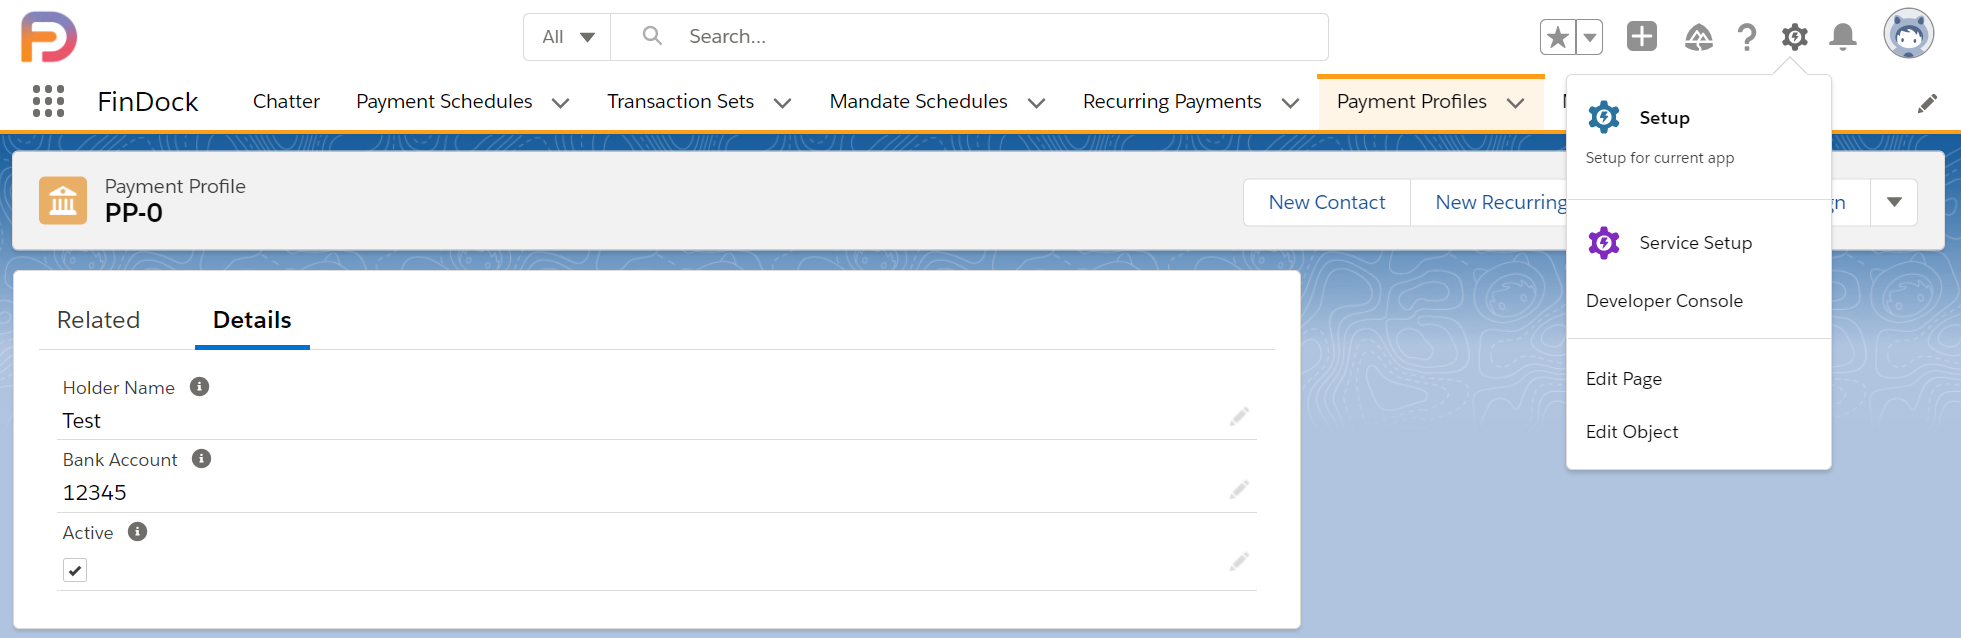
In addition to the automated API check, you can add the Lightning component Check Sort Code and Bank Account to your Payment Profile layout to do the same validation when manually entering payment information.
To set up manual sort code and bank account checking:
- Go to a Payment Profile record.
- Click the settings cog in the upper right and select Edit Page.
- Drag the Check Sort Code and Bank Account component to your page layout.
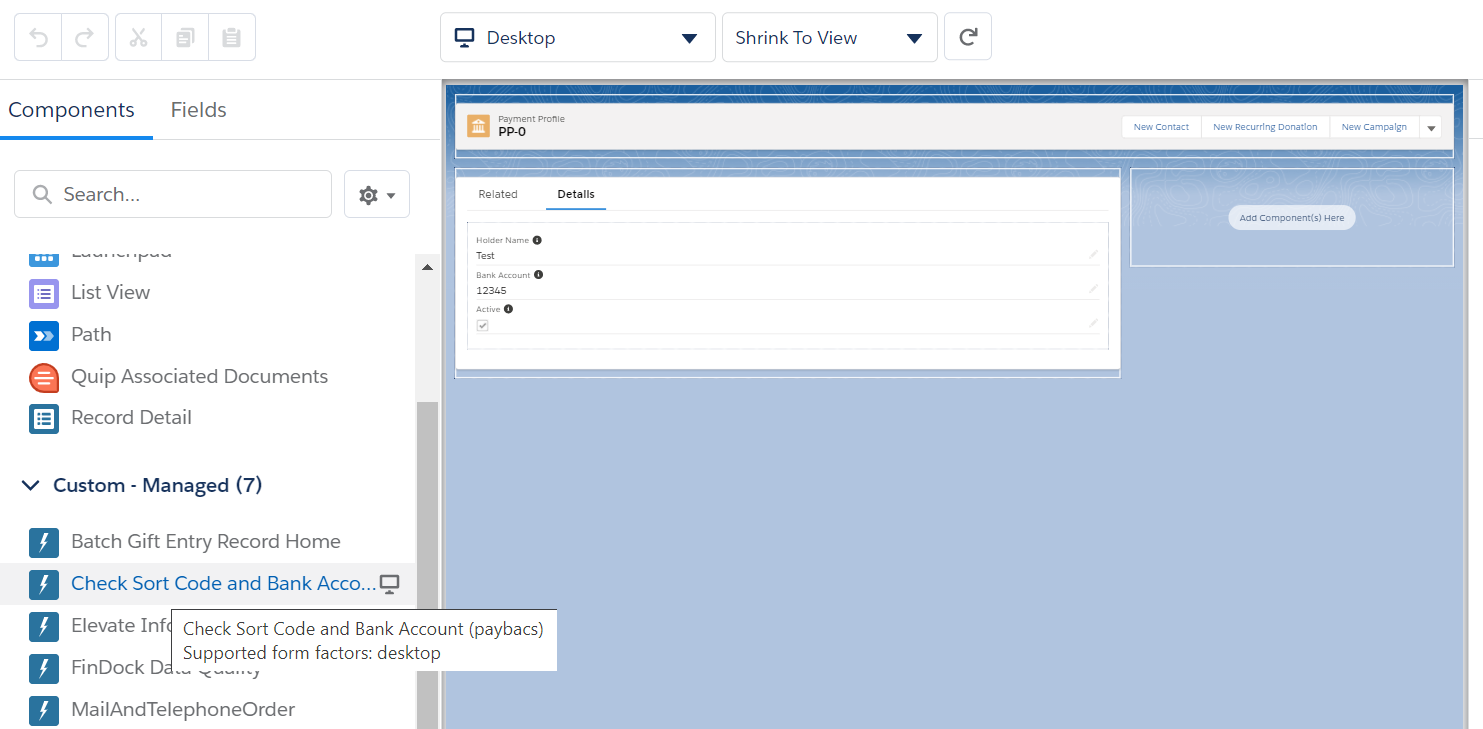
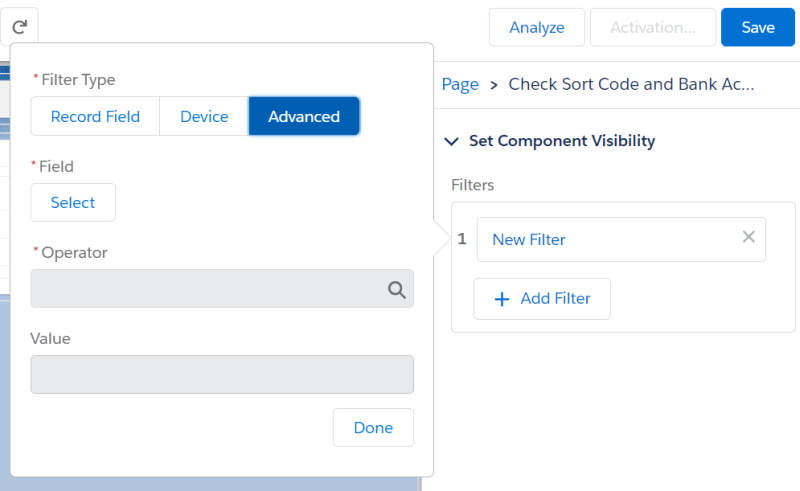
- Click Add Filter under Set Component Visibility to the right.
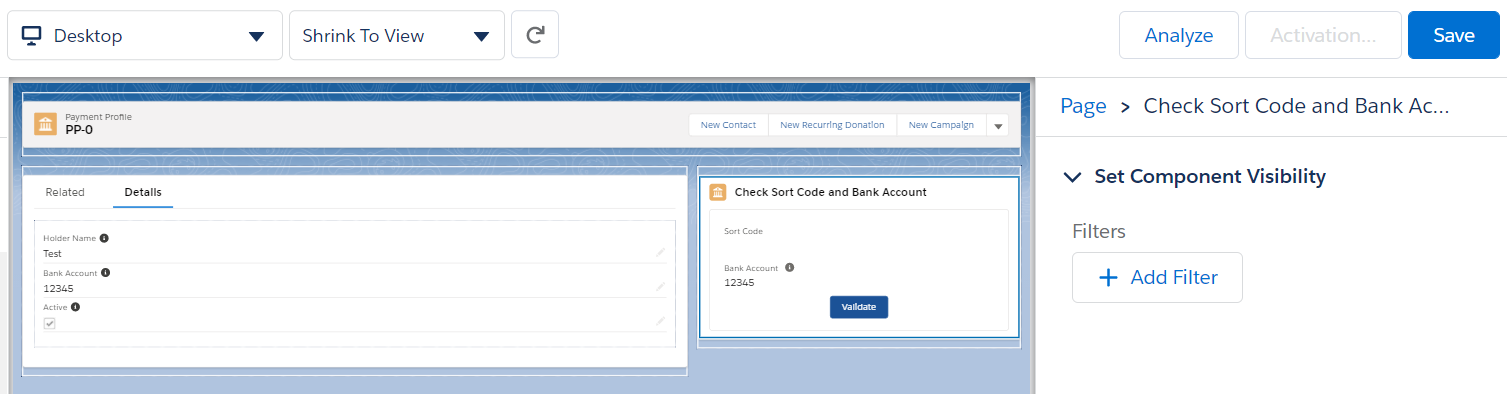
- Click Advanced and under Field, click Select.
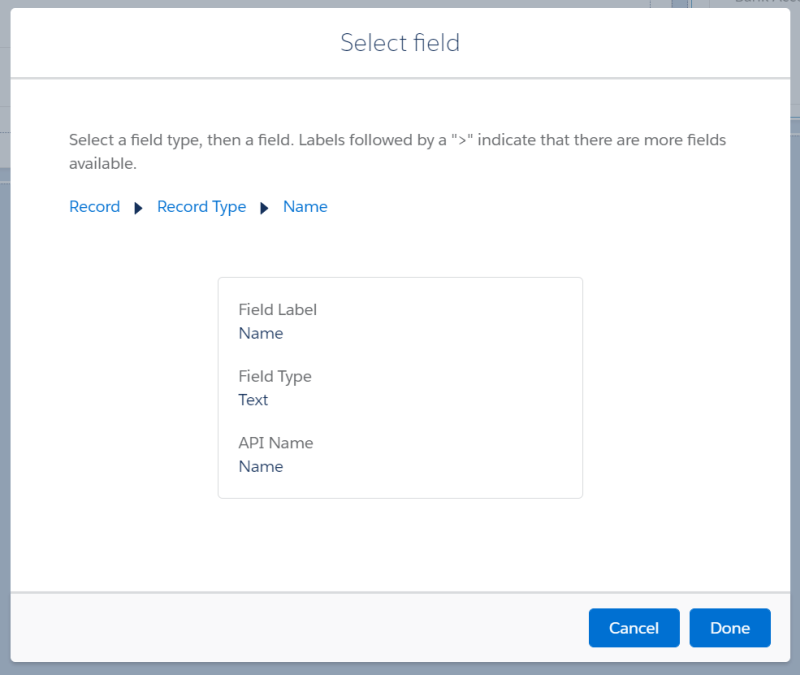
- In the pick lists, select Record, then Record Type, then Name, and click Done.
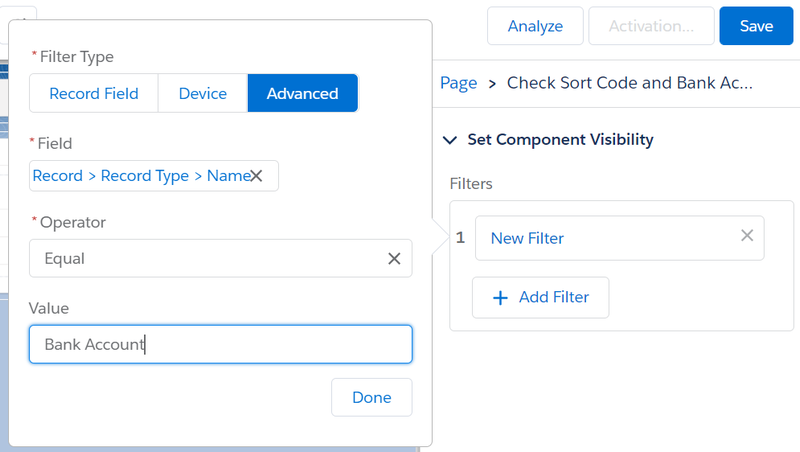
- Add an equal operation with "Bank Account" as the value, then click Done.
- Click Save in the upper right to save the layout change and component filter settings.
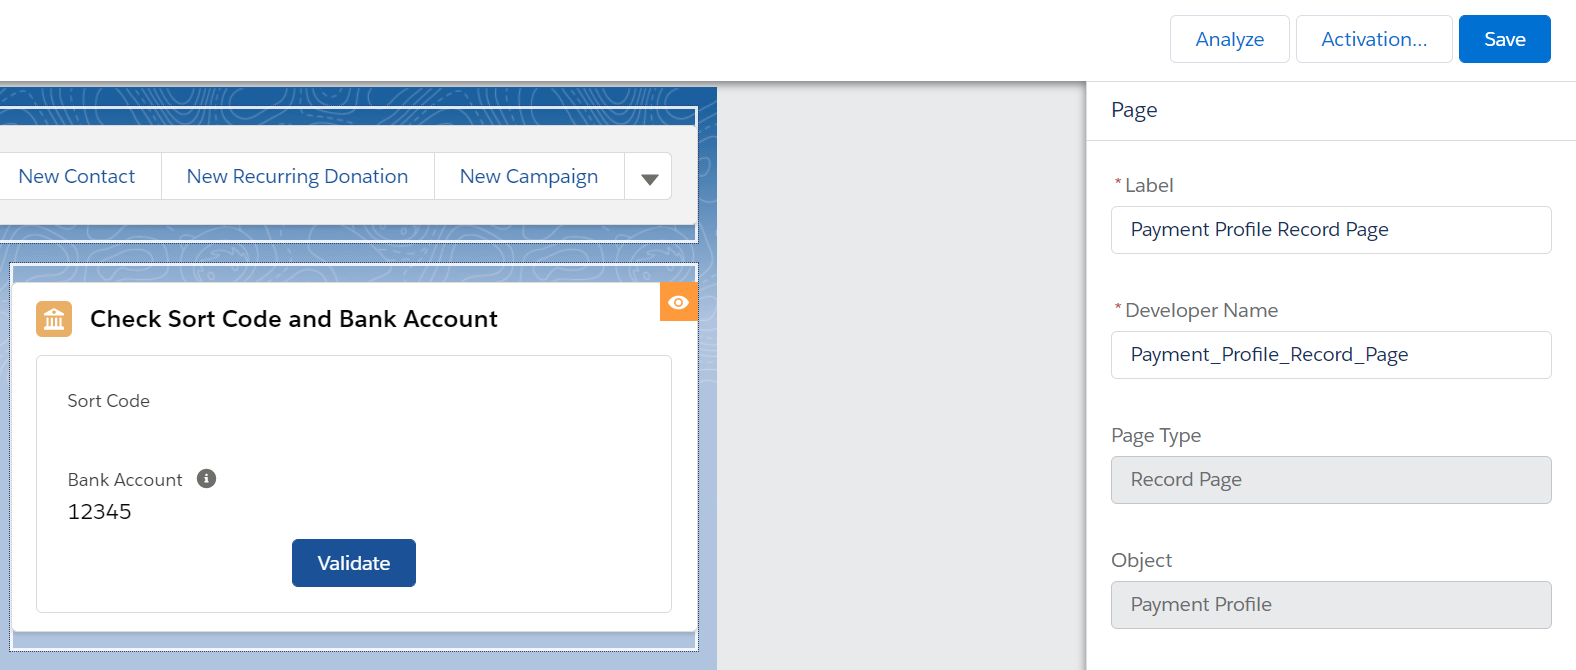
The component will now appear on payment profiles with UK bank accounts, but it is not visible for other payment profiles.
(DEPRECATED) SmartDebit scheduled Apex
If you are using automatic mandate management, this Apex job is redundant and not needed. We recommend using automated mandate management.
For SmartDebit, there is a scheduled job which automatically kicks off the DDI registration process. This automatic flow skips validation and registers any DDI directly with SmartDebit.
To enable this job:
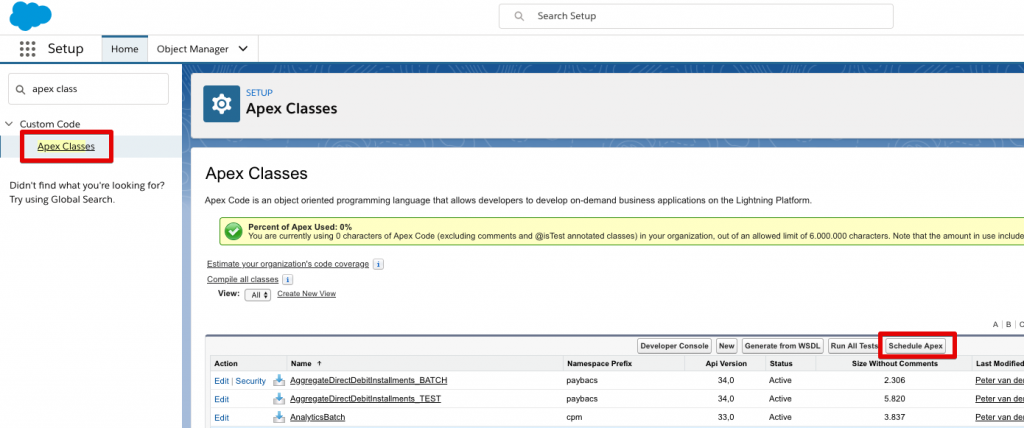
- Open Salesforce Setup, in the quick find box enter "Apex Classes" and click on "Apex Classes" in the search results.
- On that page click Schedule Apex.
- Next, give the job a recognizable name like “DDI Registration.”
- For the Apex Class, enter: "RegisterDDISchedule."
- Set the job to run every day of the week at a time of your choosing. It is recommended to do this in the evening as this ensures all new DDIs for that day will be included as soon as possible.
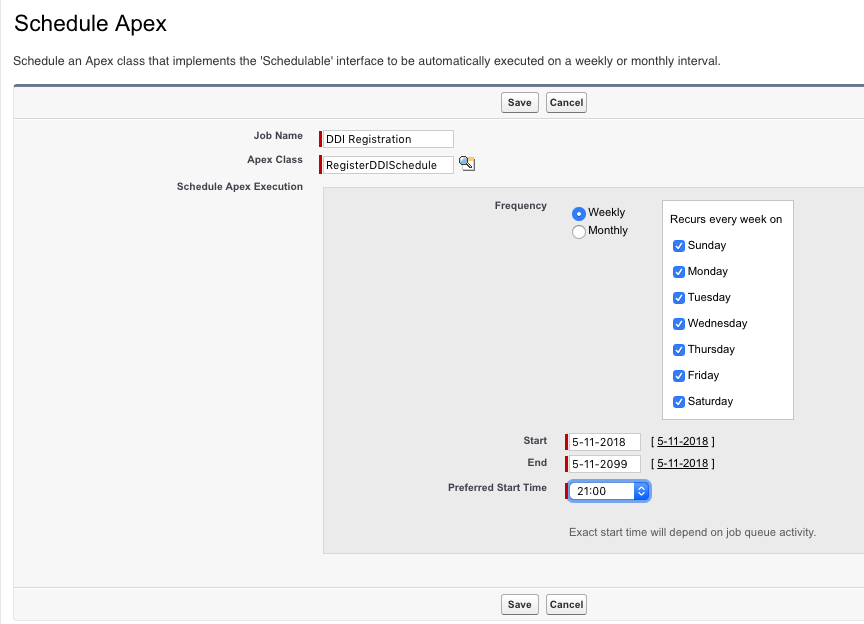
- Click Save to store the schedule.
Every day at the designated time, FinDock creates a mandate schedule, selects the relevant mandates, and registers them with SmartDebit. If any mandate fails, the individual mandate record is marked with status Failed. Make sure to review and fix these so they are not failing repeatedly.
Testing SmartDebit setup
When you test your SmartDebit extension, make sure the Endpoint and other relevant details in your target configuration are using the SmartDebit Sandbox. Your testing should cover at least the following:
- Test new payer creation: use own form on a webpage/app or use Giving Pages to create a new payer
- Test new payer file transmission: run a mandate schedule to create a new payer CSV file and confirm (using your Pulse account) that it is successfully transmitted to SmartDebit
- Test new collection file transmission: run a payment schedule to create a collection CSV file and confirm (using your Pulse account) that it is successfully transmitted to SmartDebit
Payment API sample messages
To test your SmartDebit configuration, you can use the following messages with the Payment API.
One-time Bacs Direct Debit payment
{
   "SuccessURL": "https://www.example.com/success",
   "FailureURL": "https://www.example.com/error",
   "Payer": {
       "Contact": {
           "SalesforceFields": {
               "FirstName": "Eric",
               "LastName": "Johnson",
               "Email": "eric@johnson.com"
           }
       }
   },
   "OneTime": {
       "Amount": "30"
   },
   "PaymentMethod": {
       "Name": "Direct Debit",
       "Processor": "PaymentHub-BACS",
       "Target" : "BACS-target",
       "Parameters" : {
           "bankAccount" : "13537846",
           "sortCode": "205132",
           "holderName" : "E. Johnson",
           "description": "test"
       }
   },
   "Settings": {
       "SourceConnector": "PaymentHub"
   }
}
Recurring Bacs Direct Debit payment
{
   "SuccessURL": "https://www.example.com/success",
   "FailureURL": "https://www.example.com/error",
   "Payer": {
       "Contact": {
           "SalesforceFields": {
               "FirstName": "Eric",
               "LastName": "Johnson",
               "Email": "eric@johnson.com"
           }
       }
   },
    "Recurring": {
         "Amount": "25",
         "Frequency": "Monthly",
         "StartDate": "2020-11-01"
    },
   "PaymentMethod": {
       "Name": "Direct Debit",
       "Processor": "PaymentHub-BACS",
       "Target" : "BACS-target",
       "Parameters" : {
           "bankAccount" : "13537846",
           "sortCode": "205132",
           "holderName" : "E. Johnson",
           "description": "test"
       }
   },
   "Settings": {
       "SourceConnector": "PaymentHub"
   }
}