FinDock supports collecting one-time and recurring direct debit payments in the UK using the Bacs Direct Debit scheme through Access PaySuite (formerly SmartDebit). The role of FinDock is limited to creating payer and collection files and processing Bacs reports. Files and reports are transferred automatically between FinDock and the Direct Debit and Credit Management System (DDCMS) of Access PaySuite.
The following table highlights some key differences between Access PaySuite and FinDock terminology.
| Access PaySuite | FinDock | Explanation |
|---|---|---|
| New payer | Mandate | FinDock stores the new payer authorization to collect direct debits as a Mandate record. |
| Due date | Collection date | The pay date communicated to the payer during the DDI sign up and/or in the advance notice. While the due date is not required to be the same as the collection date, in practice FinDock treats them as equal. |
| New payer file | Mandate schedule | FinDock uses mandate schedules to generate and send new payer files to Access PaySuite. |
| Collection file | Payment schedule | FinDock uses payment schedules to generate and send collection files to Access PaySuite. |
| Collection | Installment | The payment instruction is handled as a DDI transaction in the Bacs scheme. Each individual direct debit payment instruction is an Installment record in FinDock. |
| N/A | Due date | Installment records have a due date that is populated through different means depending on the context (e.g. recurring opportunity, one-time direct debit, etc.). This field is only used by FinDock internally in the installment selection process when running payment schedules. |
| Start date | Signed date | The date a mandate record becomes active. FinDock adds 1 day when the mandate is created and then adds the DDI lead time value to that when a mandate schedule picks up the mandate record for registration. |
Whether you are running a mandate schedule to register new payers or a payment schedule to collect payments, the overall flow is the same, as illustrated below.
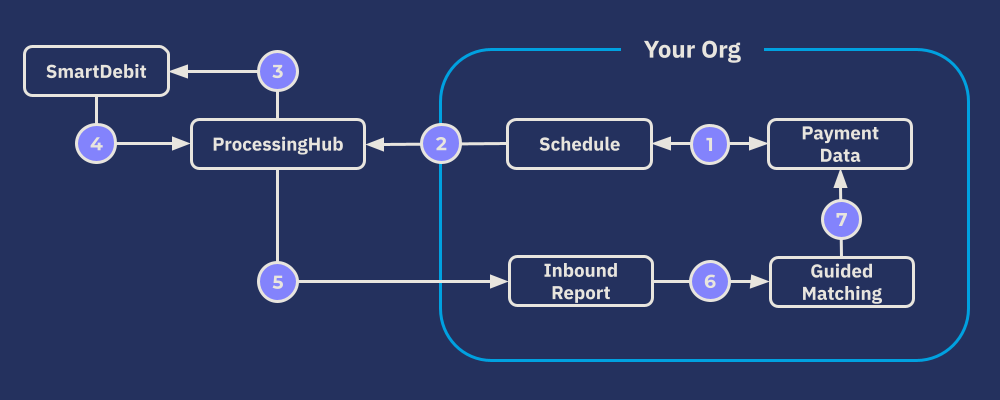
- Payment or mandate schedule run collects and modifies payment data.
- Payment data is sent to ProcessingHub.
- ProcessingHub transforms data into a CSV file and sends it to Access PaySuite.
- ProcessingHub regularly polls Access PaySuite for Bacs reports.
- ProcessingHub parses Bacs reports and creates Inbound Report records.
- Inbound reports are matched and unmatched are put into Guided Matching.
- Guided Matching reconciles and enriches payment data.
A new payer is defined by a unique Contact and Payment Profile record combination. When a new payer is added to Salesforce, FinDock automatically creates a mandate record with a 7-character Id. The new record is assigned the status Pending Registration.
For Bacs Direct Debit payments initiated through the FinDock Payment API, FinDock performs a sort code & bank account check to avoid failed payments due to incorrect code or account values. The checking is done automatically, and the result is included in the synchronous response of the paymentIntent API call. If you are using your own payment form/page design, your need to ensure errors are handled gracefully invalid information is entered.
In addition to the automated API check, you can use the FinDock Lightning component Check Sort Code and Bank Account to your Payment Profile layout to do the same validation when manually entering payment information.
The component appears on payment profiles with UK bank accounts, but it is not visible for other payment profiles. To validate a sort code and bank account, just click the Validate button on the component.
The new payer creation process is fulfilled using mandate schedules. The mandate schedule process creates the appropriate file and automatically sends the file to Access PaySuite. Mandate records with Pending Cancellation or Pending Update are picked up by the mandate schedule for processing in addition to records with status Pending Registration.
Before you create and run a mandate schedule, you need to plan how to handle Access PaySuite lead times. Mandate schedule run dates need to account for the lead time for submitting files. The lead time may be in Working Days or Calendar Days.
To create a new payer file:
- Create a mandate schedule as normal.
- Select your SmartDebit target.
- Leave the Processing date empty and click Start Generation.
- After the mandate schedule changes to ‘Generated,’ you can open the related list of the mandate schedule to check the selected records.
- Use the Mandate Schedule Path to finish processing the schedule.
When the schedule reaches Generated, the automatic mandate validation starts. FinDock checks if the selected mandates are complete according to the criteria outlined in the following table.
| Field | Criteria | Error message |
|---|---|---|
| Mandate Id | Must be > 6 and < 18 alphanumerical characters. | Mandate Id must be between 6 and 18 characters |
| Mandate Id | Non-alphanumeric characters must not be the same | Mandate Id must not contain only the same characters. |
| Mandate Id | Should not contain “/” | Mandate ID contains / |
| Contact > Last name | Contains at least 3 characters. | Lastname must contain at least 3 characters |
| Contact > First Name | Not empty, not spaces only | First name cannot be empty |
| Contact > Address Line | Not empty, not spaces only | Address line cannot be empty |
| Contact > City | Not empty, not spaces only | City cannot be empty |
| Contact > Post code | Not empty, not spaces only | Post code cannot be empty |
| Payment Profile > Sort code | Length 6 | Sort code must be 6 digits (and thus may not be empty) |
| Payment Profile > Sort code | Only digits | Sort code can only contain digits 0:9 |
| Payment Profile > Account number | Length 8 | Account number must be 8 digits |
| Payment Profile > Account number | Only digits | Account number can only contain digits 0:9 |
| Target | Must have a Bacs target | Mandate does not contain a valid target |
| Status | Allowed values are Pending Registration, Pending Cancellation and Pending Update | Invalid mandate state |
| Payment Profile > Holdername | not empty, not spaces only | Holdername cannot be empty |
If a mandate fails validation, the status of the mandate is set to Failed and the error(s) is added to the Last Status Reason field on the mandate.
You can check and fix failed mandates as follows:
- Go to the Related tab of the mandate schedule and check for mandates with status Failed.
- Fix issues on the mandates (like add address line to Contact) based on the information in the Last Status Reason field.
- Put status of fixed mandates from status Failed to their previous status (e.g. Pending Registration).
- Go back to the mandate schedule.
- Click the Back to Generated button.
- Click the Start Validate & Processing button again.
If no errors are found, FinDock automatically progresses to the file creation stage.
After you have completed the validation stage, use the mandate schedule path to move to the processing stage. This initiates a process which creates the new payer file and automatically sends it to Access PaySuite. ProcessingHub also creates a PaymentHub File record to track the status of the generated file.
The mandate schedule, in turn, is updated to Pending Verification. When Access PaySuite accepts the file, the mandate schedule is updated to Verified.
Please refer to Processing Bacs reports for a complete overview of reports that you may receive confirming or rejecting new payer records. ProcessingHub automatically polls Access PaySuite for new reports and carries out certain actions. Some actions may require manual intervention.
Once all actions are taken and the mandate records are active (or cancelled), you can go back to the associated mandate schedule and click Closing next to the schedule path. This moves the schedule to Done, and FinDock sets the related mandates to active.
FinDock uses payment schedules to create and automatically send collection files to Access PaySuite. Setting up payment schedules requires careful attention to dates. Whether you are running individual schedules manually or setting up recurring schedules and automated collection, each individual payment schedule has dates that you need to define in a way that fits your Access PaySuite contract in terms of lead times and collection file submission frequency.
| Payment Schedule field | Description |
|---|---|
| Processing date | Leave empty. This is not used in the collection files sent to Access PaySuite. |
| Collection date | The collection date needs to take into account your Access PaySuite collection file lead time. You can do this be adding the lead time (working days or calendar days) to the schedule rule date to determine the collection date, i.e. Collection date = run date + collection lead time |
| Selection date | The selection date tells FinDock which installments should be included in the payment schedule. Open installments with a due date on or before the selection date are included. For Access PaySuite, the selection date can, for example, be equal to the collection date. |
| Run date | This is the date the schedule process runs and is also the day that the collection file is submitted to Access PaySuite. |
The Access PaySuite collection file combines multiple payments (installments) for the same payer DDI. If you have collections like this in a given payment schedule run, FinDock automatically aggregates them into a single, aggregated direct debit installment that is then added to the collection file.
After a payment schedule run has generated and/or selected installments that meet the schedule’s criteria, FinDock checks if there are installments with the same mandate-date combination.
If such installments are found:
- An aggregated installment is created with an open amount equal to the sum of the open amounts of the individual installments.
- The payment method of the individual installments is set to Grouped Installment.
- The individual installments are linked to the aggregated installment.
- The original installments are removed from the payment schedule.
If a payment is received for the aggregated installment, it is split and distributed to the original individual installment. Both the aggregated installment and linked individual installments are set to Collected, and all open amounts are set to zero. In addition, a corresponding negative payment is created for the aggregated installment to keep the sum of all payments equal to the actual direct debit payment amount.
If an aggregated installment is reversed, a negative payment is created and distributed across the original individual installments. The status of these installments is set to Reversed, and the open amount is set to the original value.
The payment method of the original installments is set back to direct debit, allowing them to be recollected. The positive payment for the Aggregated Installment is created in order to keep the sum of all payments equal to the actual money flow.
- Keep in mind when confirming the direct debit to the payer that you mention the total amount rather than the amount of the single transaction.
- In order to keep your reports in line with actual expected and/or realized cash flow, exclude aggregated installments from your reports. Use the field
paybacs__IsAggregated__cto filter out installments that are aggregated installments. - For the same reporting reasons, NPSP Opportunities are not created for an aggregated installment.
- If you want to avoid aggregated installments, disable Reuse existing mandate in the FinDock settings.
As with new payer files, once a collection file is sent, you may receive Bacs reports that need to be handled. Please refer to Processing Bacs reports for details. ProcessingHub automatically polls Access PaySuite for new reports and carries out certain actions.
Check ProcessingHub Manager on a regular basis. You should see a fairly steady flow of AutomatedReporting entries. If there is a break or other irregularity, check the reports from your SmartDebit Pulse account to see if something was missed.
Refunds are not part of the technical transactions of the Bacs scheme. However, payer indemnity is permanent, so a refund can be requested at any time. This happens between the payer and the paying PSP (the payer’s bank).
If an indemnity claim process results in refunded payments, the paying PSP will issue you a Direct Debit Indemnity Claim (DDIC) advice report which FinDock automatically processes as explained in Processing Bacs reports.
If a payer requests a refund from you directly and you choose to refund the payer outside the Bacs process, you should manually update the associated record(s) in FinDock accordingly.
Criteria
- Notification period (first payment collection lead time): 10 days
- New payer lead time: 3 working days
- Collection lead time: 5 working days
- Target configuration, DDI Lead Time = 0
Recurring donations
- Build customization to add 10 days to Start Date on new recurring donations
One-time donation
- Build customization to add 10 days to Due Date
Mandate schedule
- Recommend running daily
- Use auto-create to automate mandate schedule runs
Payment schedule
- Selection date = Collection date
- Processing date = null
- Run date: 5 working days before collection date
- Frequency/automation: depends on Access PaySuite contract, but run as frequently as possible (at least twice a month)
FinDock automatically fetches and processes Bacs reports from Access PaySuite. The SmartDebit target setting Initial Report Date tells FinDock from which day forward reports need to be fetched. If the setting is empty, FinDock fetches all available reports for the given Access PaySuite account.
Changes to targets or the ProcessingHub connection impact Bacs report fetching!
When you edit an existing target, FinDock initiates a new sync with Access PaySuite. Please check and update the Initial Report Date for the modified target. For example, set the date (format YYYY-MM-DD) to the current or at least more recent date, to ensure FinDock does not fetch too many reports.
Disconnecting ProcessingHub does not immediately close the integration with Access PaySuite. Bacs reports may still arrive. If you need to disconnect ProcessingHub, please contact FinDock Support so we can ensure the connection is promptly shut down.