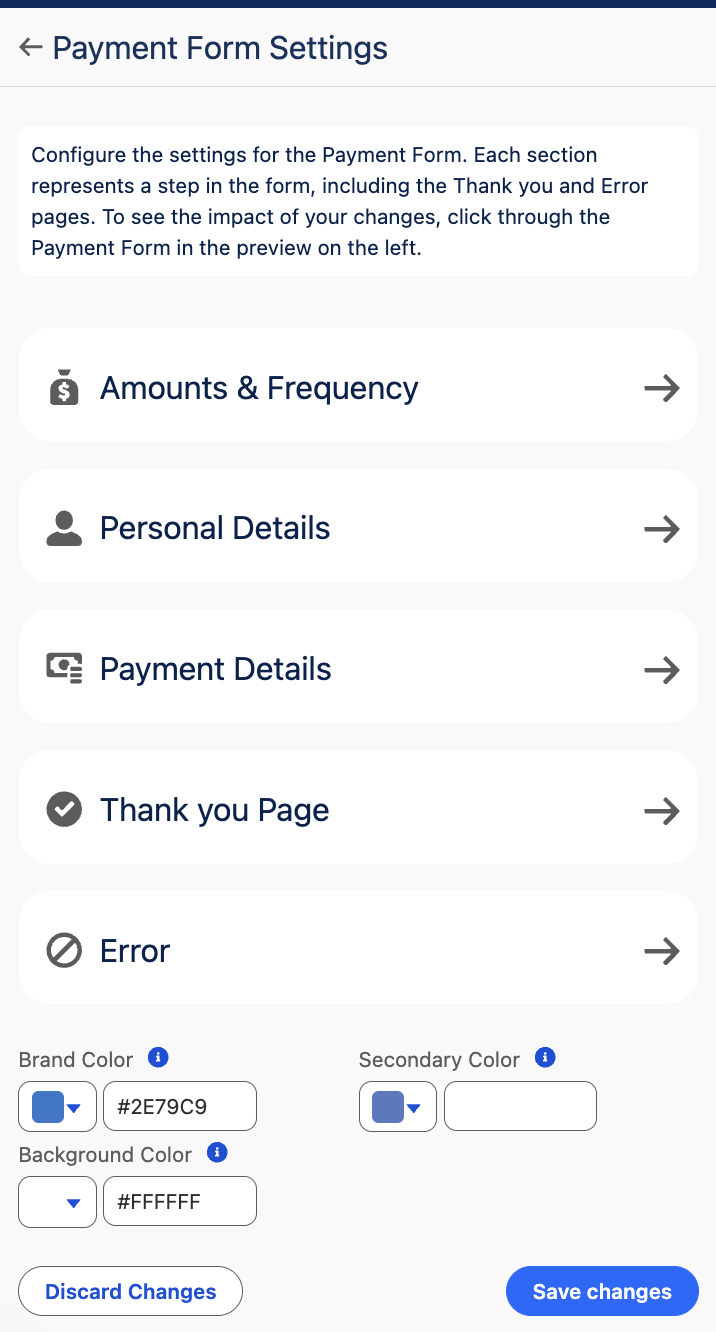
Payment Form configuration options
The embedded Payment Form for Giving Pages (and PayLinks, with some variation) is fully integrated with your payment processor and method setup in FinDock.
Wherever possible, we use default values in the form settings to help you to create and publish pages quickly. The range of settings give you many ways to customize and optimize the payment experience.
Common settings
The form settings are structured according to the steps payers take to fill out the form.
- Select payment details. - Amounts & Frequency
- Enter personal details. - Personal Details
- Enter payment details. - Payment Details
- Complete payment. - Thank you Page and Error
Color settings
The Payment Form has its own color settings that you can customize according to your brand palette.
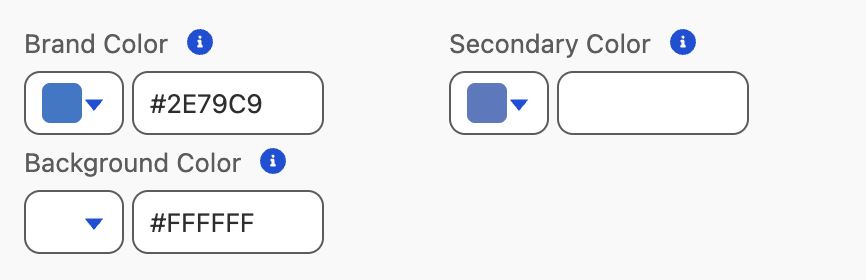
The background color can also be adjusted, but we recommend keeping this white or a light color to keep the form readable.
Page label settings
For each step of the form, there are page labels to help guide the payer through the process. These labels include the title of the form page and buttons to allow the payer to proceed or move back through the payment steps.
| Setting | Description |
|---|---|
| Title | The main heading displayed at the top of the form. |
| Button label next | The text that appears on the button that advances the payer to the next step of the donation form. |
| Button label back | The text that appears on the button that returns the payer to previous step of the donation form. |
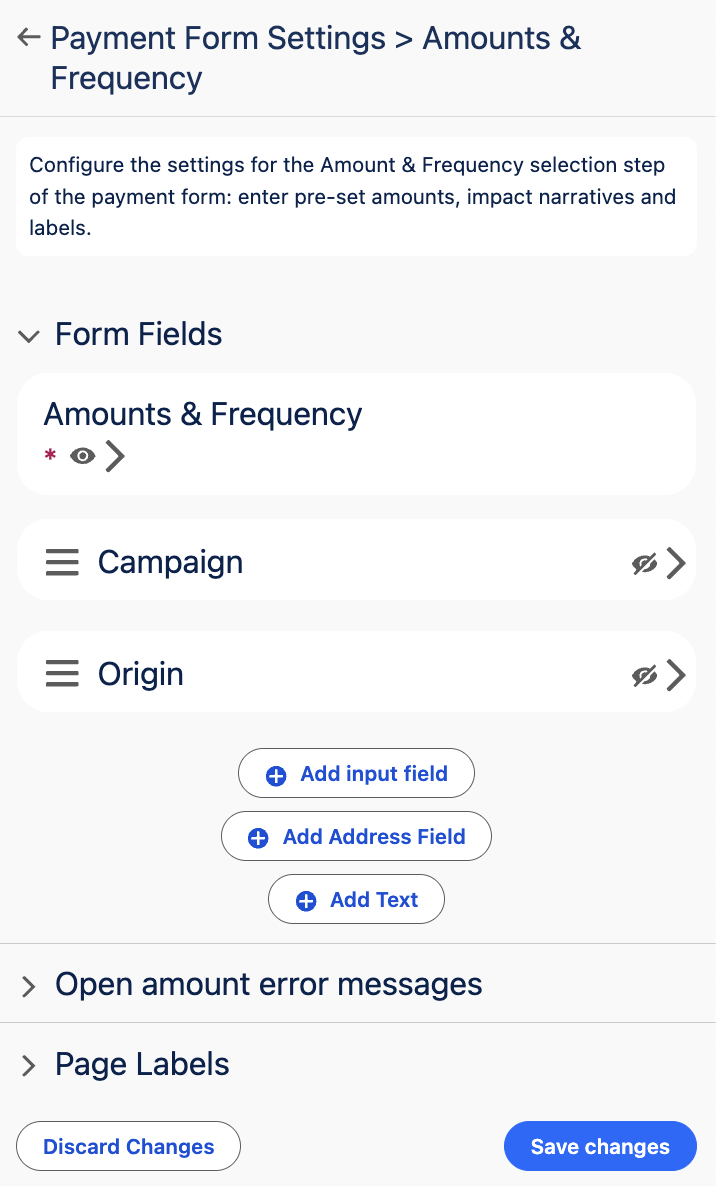
Amounts and Frequency
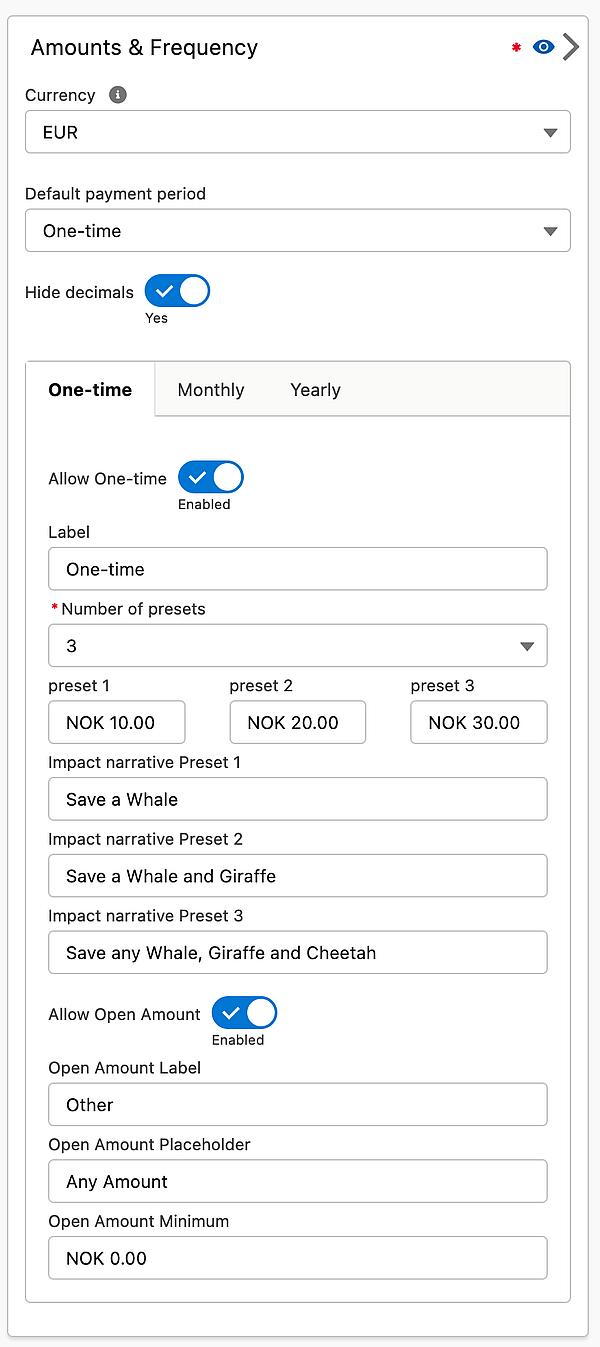
The amount and frequency settings define the donation options presented to page visitors. This includes basic payment parameters like donation amounts as well as key texts like the narratives for preset donation levels, campaign and origin.
Amounts and frequency settings
Here you define amounts, currency, frequencies, etc.
| Setting | Description |
|---|---|
| Currency | Currency of the payment amounts. If your org does not have multi-currency enabled, this setting is disabled (and shows your org currency). If you have multi-currency enabled, the dropdown list shows all currencies in your org. When making the selection for the payment form, however, keep in mind which payment processor you are using. Not all processors support multi-currency. |
| Default payment period | The payment period that is pre-selected when a payer visits the page. |
| Hide decimals | Enable to hide decimals from amount fields so that only whole numbers can be entered. |
If FinDock for Fundraising is installed, you also have the Tributes available.
For each payment frequency, you have a range of customizable settings.
| Setting | Description |
|---|---|
| Label | Name of the payment period option (radio button). |
| Presets | You can define up to six preset amounts. Each preset has its own narrative. |
| Impact narratives | For each preset amount, write a short, inspirational text that communicates what you can do with the donation amount (i.e. why the payer should give that amount). |
| Allow open amount | Enable this option if you would like to allow payers to give an amount different from your presets. |
| Open amount label | Name of the open amount option (text shown instead of a number). |
| Open amount placeholder | When the payer selects the open amount option, this text is shown in the field where the payer should enter their donation amount. |
| Open amount minimum | If you would like to set a minimum donation for open amounts, you can add the limit here. Default is 0.00. |
Campaign and Origin settings
You can use Campaign and Origin mappings as hidden or visible fields on the payment form.

Picklists on Giving Pages only support a single selection. So, if you would like to give payers the opportunity to contribute to multiple campaigns or project, you have a couple of options.
One option is to simply create campaign or project-specific Giving Pages. However, if the number of contribution options is small, you could add each as a checkbox on a single Giving Page and use custom Guided Matching rules to implement your contribution business logic.
Add additional form fields
Next to the standard form fields for campaign and origin, you can add your own fields to the form. Additional form fields are also available or Personal Details.
Three types of fields can be added.
| Field Type | Description |
|---|---|
| Input field | General field that you can manually add to the payment form, for instance, to ask the payer to enter details that you want stored in Salesforce |
| Address input fields | A special compound field that can be mapped to an address field group on Contact (Mailing or Other address) or Account (Billing or Mailing address). Custom address fields are not supported. If Country is enabled in the org, this is presented as a picklist. The State field is hidden by default. If made visible, it is a picklist with values dependent on the org country and state settings. If not defined, the Country and Sate fields are rendered as a free-text input fields. |
| Text fields | Field that can be used to display a specific text; supports rich text and URLs. |
Fields can be added to the following pages of the Payment Form by pressing the +Add button in the Fields section of their respective Payment Form setting pages:
- Amounts & Frequency
- Personal Details
- Payment Method (selection)
You can also re-order the fields by pressing and holding while dragging the hamburger icon in front the field label.
If you add an input field that is a picklist and later change the picklist values, you need to remove and re-add the field to get the new picklist values on the page. This also changes the generated custom field name for the input field.
Input fields
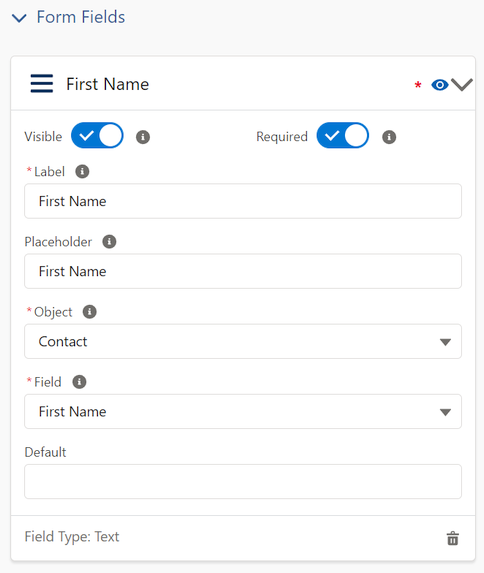
Input fields have the following settings or attributes:
| Setting | Description |
|---|---|
| Visible | If visible is toggled on, the field is visible to the user as an input field. If visible is toggled off, the field is not visible on the form, but the Default value will be sent to Salesforce. |
| Required | If toggled on, the field is a required input field. |
| Label | Label shown on the form if Visible is toggled on. Can be customized / translated. |
| Placeholder | Value shown in the input field box until the user enters a value. This can be used to indicate how to use the field. |
| Default | Default value used if no other value is entered. Can also be used to send additional data to Salesforce to be used for further processing by toggling Visible off. |
| Object | Object in Salesforce to map the field value to. |
| Field | Field on the object in Salesforce to map the field value to. |
Input fields are mapped to Salesforce fields to store update snd store the data in your org. You can map input fields to fields on payment-related objects: Contact, Account, Installment, Recurring (depending on your default source connector), and Inbound Report. The type of input field - text, phone, email, checkbox, picklist, date - is determined by the Salesforce field the input field is mapped to.
Do not map input fields to fields like Payment Method and Payment Processor on Installment or the Raw Message field on Inbound Report that are used by FinDock to process payments. This might lead to unexpected behavior.
Special input fields
Date fields: To make it easy to enter date fields on the payment form, there is a specific user interaction for the Birthday field on Contact. This field is shown as a date picker with a separate input step for day, month and year. By changing the placeholder values, the date picker can be translated. However, the order of the fields cannot be changed.
Date fields other than the Birthday field use a calendar selection pop-out to make it easy to select a certain date.
Open amount error settings
| Setting | Description |
|---|---|
| Required | The text displayed when the open amount is selected but no value is entered before moving to the next step of the form. |
| Invalid format | The text displayed when the donation amount as too many decimals |
| Amount below 0.00 | The text displayed when the donation amount is below 0.00 (usually a typo by the payer). |
| Amount too high | The text displayed when the donation amount is too high (beyond 99,999.00) |
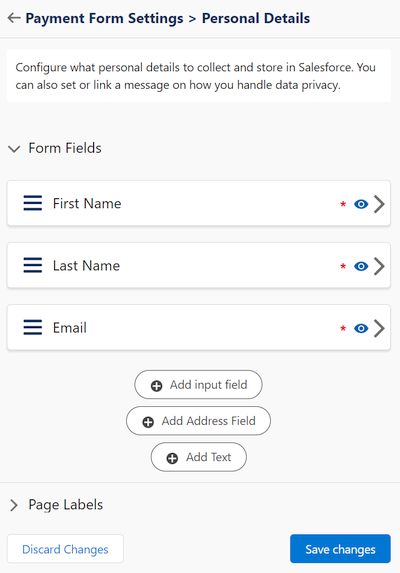
Personal details
The personal details settings are an important part of the payment form, both in terms of privacy and personalization of future payer follow-up journeys. The European GDPR rules apply here, so you need to inform payers what information is being collected and for what purposes. Use the privacy text editor to create a privacy statement (and/or link to your full statement on your website).
The next step is to click the Personal Details button to set which details will be collected. By default, only the minimum amount of information is collected that is required for payment processing. For each detail, you can define the field label (displayed in the form), a placeholder value, Salesforce mapping, as well as whether or not the detail is visible and required. Learn more about input fields and how to add your own here
Make sure the personal details on the form take into account your org's deduplication rules. What data can be included to improve deduplication accuracy, handle fuzzy edge cases, and so forth.
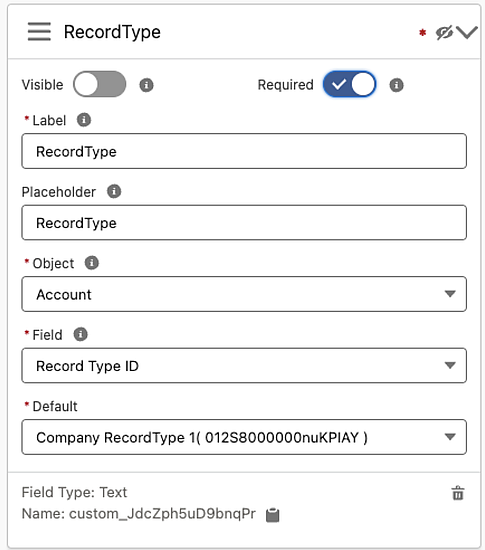
Required field for Person Account
If your org is using person accounts, you need to map personal details fields to Account rather than Contact.
In addition, you need to explicitly map a record type on Account to a Person Account record type using an additional input field. Define thee field as required for the page, but not visible.
Payment details
In this part of the payment form configuration, you need to decide what payment method(s) will be offered and how those methods are configured.
| Setting | Description |
|---|---|
| Select Payment Method Label | The text displayed above the dropdown list of payment method options. |
If Gift Aid is installed, you also have the following options.
| Setting | Description |
|---|---|
| Ask for Gift Aid | Enable to allow UK payers to contribute their Gift Aid tax relief. |
| Gift Aid text | Statement explaining Gift Aid qualification. The default text is the officially recommended text from HMRC. |
| Claim Gift Aid label | Confirmation statement when a payer agrees to Gift Aid contribution. The default text is the officially recommended text from HMRC. |
Payment Methods
Click the Payment Methods button to open the configuration details (pictured below).
The main aspects to plan and configure are:
- Which payment methods you want to offer
- The order in which the method options should be lists for payers
- The default method for each payment period (one-time and recurring)
- Require initial payment for recurring payments (if applicable and optional for the given PSP and method).

The payment methods available in the configuration popup depend on which processors and methods you have activated in FinDock. Only activated methods can be used in the payment form. Use the left-right and up-down arrows to add methods to the form and change the order.
For each payment method, you can enter a custom label (name shown to the payer) and use the toggles to define the defaults for one-time and recurring options.
In addition, any parameters that are available for the given processor and method are available for configuration. You can see these by clicking the Show Parameters button. For each parameter you can define a label, a default value (if allowed), as well as set visible and required toggles.
For some methods, if the parameters are required by the payment method (e.g. account holder name and account number for Bacs DD), they are already set accordingly and made visible for payers. However, required description parameters (typically used for internal purposes) have visible turned off by default.
Cover Transaction Fees
Here you can present the payer with an optional additional amount to add to the payment. This cover fee can be used, for example, to help pay for operational costs, such as processing fees or surcharges for special payment methods. FinDock treats the cover fee as an increase to the payment amount. If you claim Gift Aid, for instance, the claim includes the cover fee increase.
Clearly indicate to the payer the total amount of the payment by using __AMOUNT__ as a merge field in the title or next button Page Labels.
| Setting | Description |
|---|---|
| Visible | Enable to show the cover fee option to the payer. |
| Title | The text next to the opt-in checkbox. Include the merge field __FEE_AMOUNT__ to show the payer the calculated amount that will be added to the payment. |
| Percentage increase | Set here the percentage FinDock uses to calculate the cover fee amount. |
| Cover fee explanation | Add here an additional text if you want to explain the extra benefit of the cover fee. |
| Pre-select to cover fee | Enable to make the cover fee opt-in checkbox true (checked) by default. |
| Store cover fee on Installment | If you want to save the cover fee amount as a separate value on Installment, select here the field FinDock should use. This mapping is for reporting purposes only, so only map to a field that has no other use. |
| Store cover fee on recurring | If you want to save the cover fee amount as a separate value for a recurring payment, select here the field FinDock should use. As with the Installment mapping, this mapping is intended for reporting purposes only. |
Thank you page
Here you configure the thank you message that you would like to show visitors who have made a donation.
| Setting | Description |
|---|---|
| Thank you type | Select Embedded to show the thank you content that you define here. Select Custom to use a separate thank you page. For this option, you need to enter the URL for your page in the Thank you URL field. |
| Thank you title | The main text at the top of the thank you message. |
| Title heading type | Sets the size of the title text. Heading 1 is largest, heading 5 smallest. |
| Title font color | Use the color picker to set the title text color. |
| Thank you text | Use the text editor to add a full thank you message for the payer. |
| Select image | If you would like to use an image on the embedded thank you page, you can upload it here. |
Error
In addition to the error page that is displayed when something goes wrong with the payment process, you can define here the error messages that appear when a field value is missing or incorrect.
| Setting | Description |
|---|---|
| Required field missing message | If a required field is not filled in, this message is shown. In the message, __FIELD_LABEL__ is a variable that is replaced with the label of the field missing a value. |
| Invalid field message | If field contains an invalid value, this message is shown. In the message, __FIELD_LABEL__ is a variable that is replaced with the label of the field with an invalid value. |
Error page
Here you configure the error message that is shown visitors who have made a donation, but for some reason (e.g. lost internet connection) the payment could not be processed.
| Setting | Description |
|---|---|
| Error page type | Select Embedded to show the error content you that you define here. Select Custom to use a separate error page. For this option, you need to enter the URL for your page in the Error Page URL field. |
| Error page title | The main text at the top of the thank you message. |
| Title heading type | Sets the size of the title text. Heading 1 is largest, heading 5 smallest. |
| Title font color | Use the color picker to set the title text color. |
| Error page text | Use the text editor to add a full error message for the payer. |
| Select image | If you would like to use an image on the embedded error page, you can upload it here. |
Merge fields
You can use merge fields with input fields and payment method parameters (text fields) to generate unique default values. Merge field definitions must follow the standard Salesforce notation: default-text{!fieldname}
For an input field, you would enter your default-text{!fieldname} in the Default field of the input field definition. For payment method parameters, you can do the same with default values in the payment method configuration.
A good use case is the description parameter of the payment method, like Stripe credit card. There you can add a personalized thank-you message, as pictured below.

In this example, if the payer enters "John" for First Name in the payer details, the description would return the value "Thank you for contributing to our whale conservation effort, John."
When using merge fields, keep in mind:
- If the field to be merged is not populated, an empty value is returned (in the example, it would be just “Thank you for contributing to our whale conservation effort,.”)
- If the merge field does not actually exist (or, for instance, it is mistyped), a non-blocking warning is triggered indicating you are trying to use a merge field which does not exist.
URL query parameters
Custom field parameters
The URL query parameters based on custom fields can be used for:
- Pre-filling fields on the donation form
- Sending additional (hidden) data to Salesforce
You can use any field as a URL parameter from the Contact, Account, Recurring Donation, Installment and Inbound Report objects. The only exception is birthday, which cannot be pre-filled by query.
Custom form fields that you define in the Page Builder are also available for URL queries. When you have defined a custom field, use the field Id as the parameter name. For instance, in the custom field below the URL parameter would be https://your-domain.com/page-name?custom_JXOxz8n1Wnityju=somevalue.

Preset parameters
The following parameters can be added to URLs to override configured values for amount and frequency presets.
| Action | Parameter | Examples |
|---|---|---|
| Set one-time amounts | opa | https://url?opa=10;20;30;40;50;60https://url?opa=10;20;;40;;60 |
| Set one-time narrative labels | onl | https://url?onl=narrative%201;narrative%202;narrative%203;narrative%204;narrative%205;narrative%206 |
| Set monthly amounts | mpa | https://url?mpa=10;20;30;40;50;60https://url?mpa=10;20;;40;;60 |
| Set monthly narrative labels | mnl | https://url?mnl=narrative%201;narrative%202;narrative%203;narrative%204;narrative%205;narrative%206 |
| Set yearly amounts | ypa | https://url?ypa=10;20;30;40;50;60https://url?ypa=10;20;;40;;60 |
| Set yearly narrative labels | ynl | https://url?ynl=narrative%201;narrative%202;narrative%203;narrative%204;narrative%205;narrative%206 |
| Set default frequency | df | https://url?df=onetimehttps://url?df=recurring (deprecated)https://url?df=monthlyhttps://url?df=yearly |
You can only override presets that are configured for the page. If you have, for example, 4 presets for one-time but pass https://url?opa=10;20;;40;;, FinDock overrides presets 1, 2 and 4.
The follow parameters are deprecated. Use instead the monthly parameters defined above.
| Action | Parameter name | Examples |
|---|---|---|
| Set recurring amounts | rpa | https://url?rpa=5;10;15;20;35;30https://url?rpa=10;20;30;;; |
| Set recurring narrative labels | rnl | narrative%201;narrative%202;narrative%203;narrative%204;narrative%205;narrative%206 |
Payment method parameters
Payment method parameters, such as Description, can also be used as URL query parameters. These use the following construction:
Generic payment method parameter:
https://url? + pmp + [payment-method-parameter] + =value
For example: https://url?pmp[description]=mydescription
Specific payment method parameter:
https://url? + pmp + [payment-method] + [payment-method-parameter] + =value
For example: For example: https://url?pmp[ideal][description]=mydescription
All query parameters that you add to the URL are first evaluated by FinDock to check for validity.