Axerve
FinDock integrates with the Italian Payment Service Provider Axerve (formerly Gestpay). The payment extension supports one-time and recurring card payments as well as refreshing tokens for expired cards.
| Multi-merchant | Multi-currency |
|---|---|
| Payment Method | Online Payment Flow | Integration Patterns | Data Entry | One-time | Recurring | Refunds |
|---|---|---|---|---|---|---|
| Card | Online Redirect | API | No |
Prerequisites
- FinDock is installed and configured.
- WebHub is connected.
The Axerve for FinDock package is not pushable, so we cannot update your org with the normal release process. To receive updates, enhancements and fixes, please manually install the latest package version using the FinDock Installer.
Set up Axerve test account
When you integrate FinDock with Axerve, you use a test Axerve account for test orgs, and a production account for production orgs. In both cases, you need to adjust several settings in the Axerve BackOffice dashboard.
- Axerve production BackOffice login: dashboard.gestpay.net
- Axerve test BackOffice login:sandbox.gestpay.net
Here we go through the Axerve test account setup and the corresponding FinDock setup for a text merchant account integration. The same needs to be done for production accounts.
To set up an Axerve test account:
- Register a test account at Axerve.
- In the Test Account BackOffice, go to Configuration > Environment.
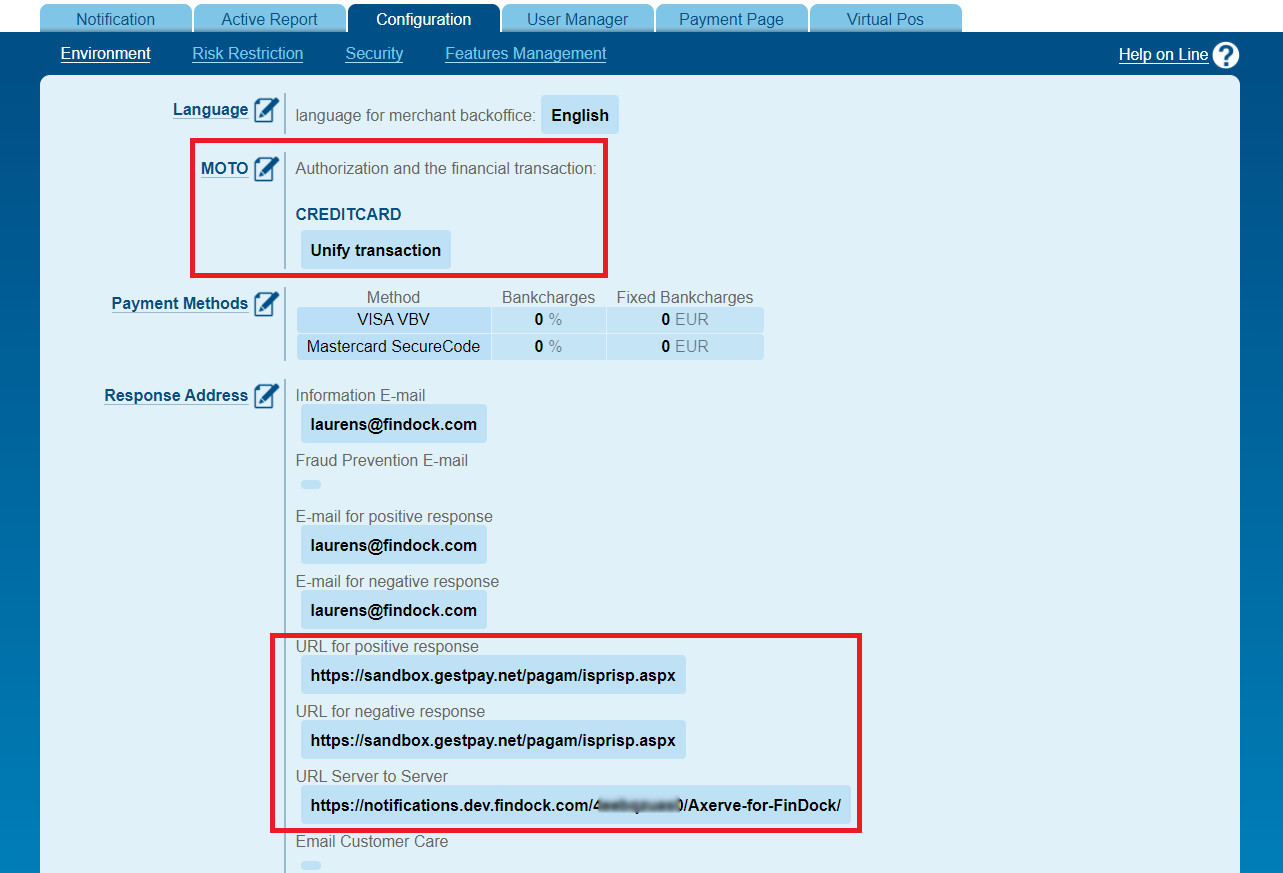
- Edit 'Response Address' information.
- URL for positive response:
http://sandbox.gestpay.net/pagam/isprisp.aspx - URL for negative response:
http://sandbox.gestpay.net/pagam/isprisp.aspx - URL Server to Server: copy here the Notification URL for Axerve from the FinDock Notification Gateway. Note that if you have multi-merchant enabled, this URL is target-specific.
- URL for positive response:
- Under the 'M.O.T.O' settings, select Unify transaction and click Save.
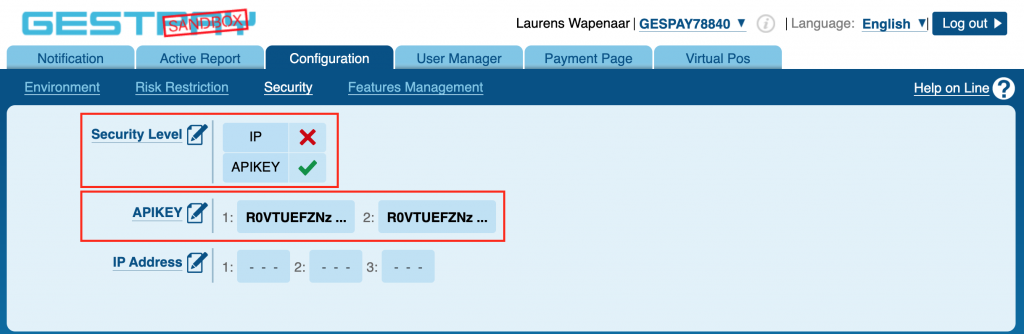
- In the Test Account BackOffice go to Configuration > Security.
- Under 'Api Key' add a new key by pressing 'Add Key' and click Save.
- Under 'Security Level' set 'Api Key' as a default Security Level and click Save.
When you are done with the initial test account configuration, you can move on to Payment Page settings.
Payment Page settings
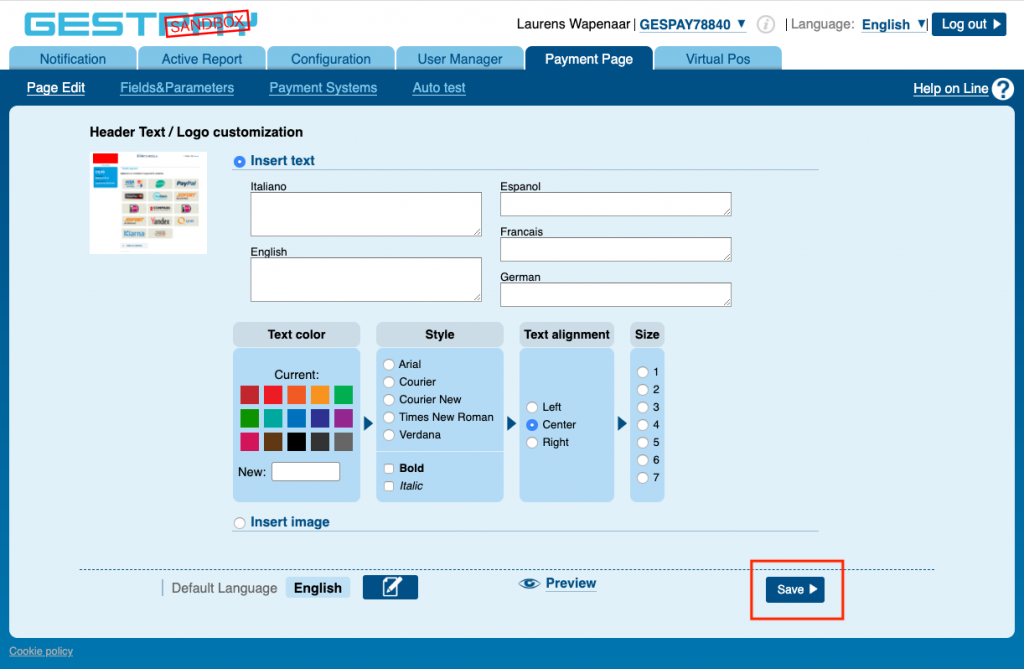
- In the Test Account BackOffice, go to Payment Page > Page Edit.
- Select a language (English or Italian) and press Save on the pop-up, and press Save (again) on the bottom right of the 'Page Edit' page.
NOTE: Even if you do not change the language, you still need to press Save at the bottom of the 'Page Edit' page for Axerve to work!
- Go to Payment Page > Fields&Parameters. Note there is help info available from the upper left corner. Check if the box at the top left says 'Payment Page'. If not, go back to step 2.

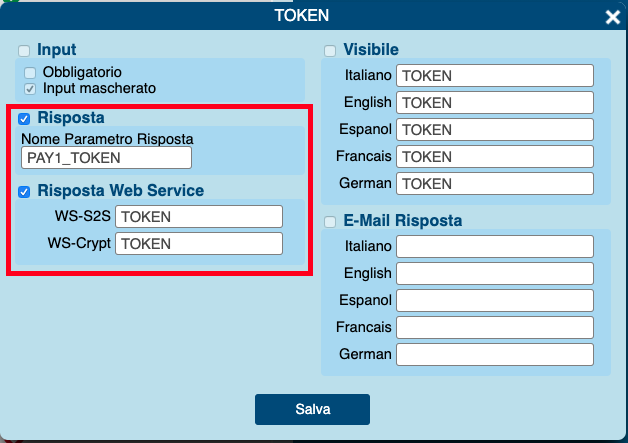
- Click TOKEN , check 'Risposta' and 'Risposta Web service' and click Salva (Save).
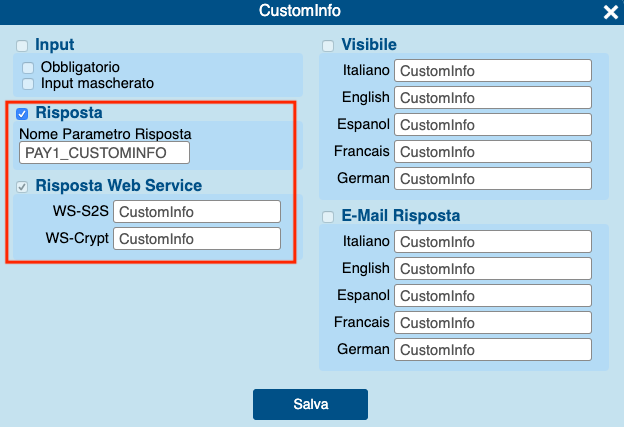
- Click CustomInfo , check 'Risposta' and 'Risposta Web service' and click Save.
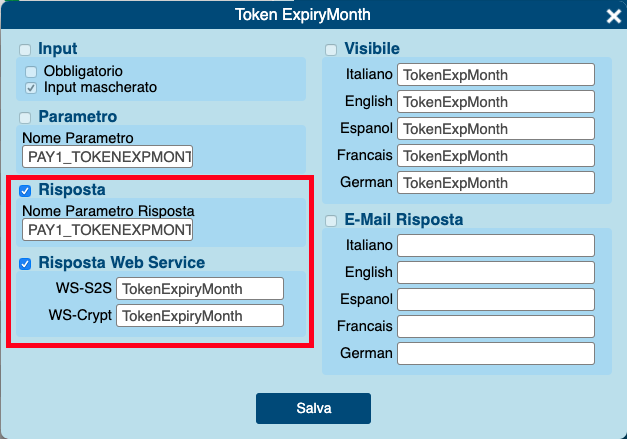
- Click Token ExpiryMonth , check 'Risposta' and click Save.
- Click Token ExpiryYear , check 'Risposta' and click Save.

- Click PaymentMethod , check 'Risposta' and 'Risposta Web service' and click Save.

- Add RECURRINGID by clicking the Add Parameter button at the bottom of the parameters list.
- Fill in RECURRINGID information as shown below and click Save.
NOTE: Make sure you fill in the ‘Nome’ at the top of the pop-up screen, otherwise you will get an error.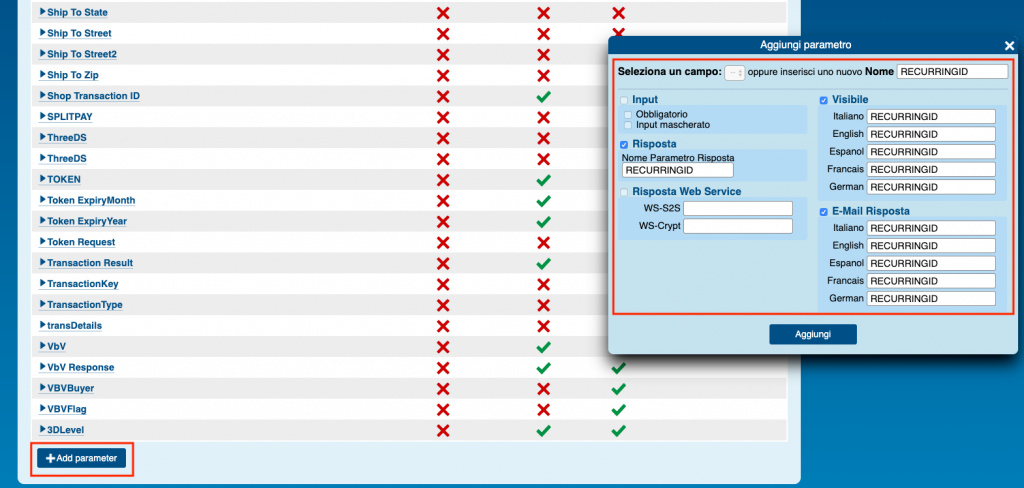
Install Axerve extension
Follow the standard procedure for installing payment processors to add the Axerve payment extension and activate payment methods.
Check and assign the required permissions. If you are using custom permission set groups, ensure the package-specific permission sets are assigned.
Configure Axerve for FinDock
To configure the Axerve payment extension:
- Launch the FinDock app and click the FinDock Setup tab.
- Click Processors & Methods in the left-hand menu.
- On the Installed tab, click the Axerve processor entry.
- On the Accounts tab, click Add account.
- For the merchant account you want to integrate, add the following details:
- Merchant Account Name: Enter a name for your Mollie target (merchant account)
- Default Account: Enable on the account you want used when no account is specified in a payment intent call to the Payment API
- Test Account: Enable to set up a test environment with Axerve. This tells FinDock which Axerve endpoint to use.
- Shop Login: Enter your Shop Login Id. This is visible on the top right corner in your Axerve BackOffice dashboard.
- Api Key: Enter the generated API key from the Axerve BackOffice dashboard under the Security settings. Make sure to use test keys for test accounts and production keys for production accounts
- Custom Checkout URL: If you have your own checkout page, you can enter the URL here to redirect online payers to your page. This custom page needs to include the Axerve hidden iframe.
- Log Requests: Activate if you want to log all Axerve connection events, e.g. for testing and troubleshooting.
- Click Save.
Custom redirect options
With Axerve you can choose to either redirect customers to Axerve's default checkout page, or you can create your own custom page that includes a hidden Axerve iframe. This is the Custom Checkout URL setting noted above.
As part of the custom page option, you can choose to use the Custom Checkout URL setting or you can parse the redirect URL that FinDock sends when your page calls the FinDock Payment API on certain Axerve variables.
The customized redirect flow is:
- You call the FinDock Payment API.
- The payment data is created in Salesforce and the API responds with a RedirectURL.
- From this RedirectURL you parse the values for parameters ‘a’ (ShopLogin) and ‘b’ (encrypted transaction result).
- You pass values ‘a’ and ‘b’ into the Axerve GestPay.CreatePaymentPage method for your custom payment page where a =
shopLoginand b =encryptedString. - From here on you follow the instructions for the Axerve custom payment page (with ‘a’ and ‘b’ in the hidden iframe).
- Once the payment is completed, FinDock receives notifications based on the values for ‘a’ and ‘b’ and can reconcile the payment.
For further information, please refer to the Axerve documentation.
Test credit cards
For testing your Axerve setup, you can use test credit cards from here.
Refresh expired credit cards
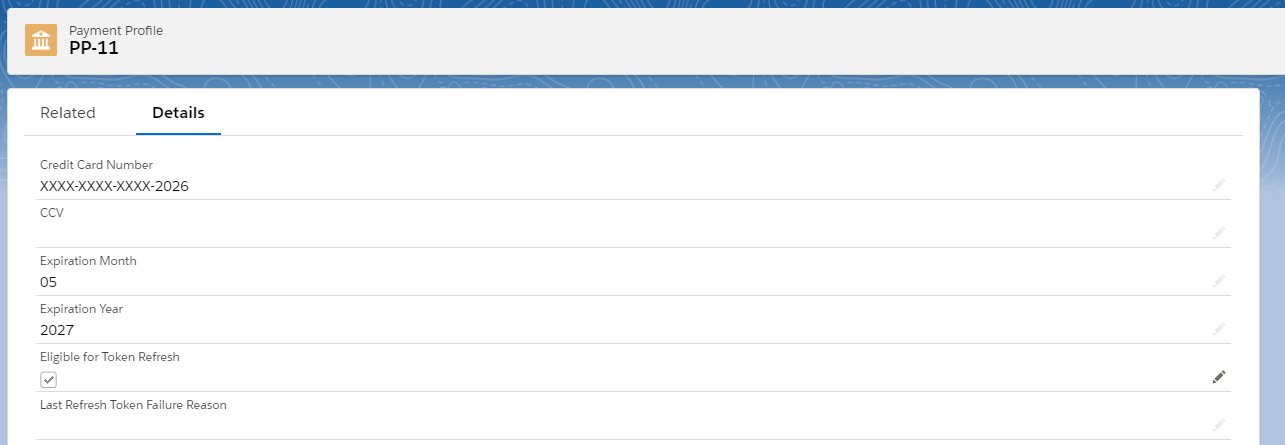
When a credit card expires, FinDock users can enter the new expiration date and check the Eligible for Token Refresh field to automatically refresh the token.
The Eligible for Token Refresh and Last Refresh Token Failure Reason fields need to be added to the Payment Profile layout manually.
The PaymentProfileTokenRefreshJob batch job processes all payment profiles eligible for Token Refresh and sends the token update request to Axerve SOAP API. The batch can be scheduled using the PaymentProfileTokenRefreshSchedule class.
Bank Transaction ID
Recurring payments initiated after September 2020 include a new mandatory field, BankTransactionId which FinDock stores in the BankTransactionId field on the Mandate object. The ID code is sent from Axerve with the first transaction and must be included with all following transactions of the recurring payment in previousTransDetails.BankTransactionId.
Axerve MOTO
If you want to capture payments through Payment Schedules, with tokens acquired via MOTO channels, there are additional options on Mandate and Installment objects that you need to set to be able to process Axerve payments correctly through Payment Schedules. These include:
- MOTO checkbox on Mandate object: if the Installment is a MOTO payment, this checkbox must be marked
- Initial Payment checkbox on Installment object: if the installment is the first payment of a recurring payment, this checkbox must be marked
There is a Transaction Type formula field on the Installment object that determines the Axerve transaction type value as follows:
- Null (empty): if the installment is a one-time payment, not recurring
- Recurring First: if installment.initialpayment = true & mandate.moto = false
- Recurring Next: if mandate.moto = false
- MOTO: if mandate.moto = true
For handling the Axerve Transaction ID requirement, the formula field is not included in the call to Axerve if the MOTO checkbox is marked on the mandate for the installment.
Payment API messages
The following are example messages for one-time and recurring payments using the Payment API.
When initiating payments through the API, additional processor-specific parameters can and/or need to be included for a particular payment method. You can check these parameters by calling the /PaymentMethods endpoint. For more information, please check out our API Reference Guide.
Axerve uses the SuccessURL and FailureURL from the Axerve setup for redirection, not from the API call. However, since this parameter is mandatory for all other PSPs, a value has to be passed in the API message.
One-time card payment
{
    "SuccessURL": "https://www.example.com/success",
    "FailureURL": "https://www.example.com/error",
    "Payer": {
        "Contact": {
            "SalesforceFields": {
                "FirstName": "Test",
                "LastName": "Payment",
                "Email": "testpayment@findock.com"
            }
        }
    },
    "OneTime": {
        "Amount": "30"
    },
    "PaymentMethod": {
        "Name": "Creditcard",
        "Processor": "Axerve-for-findock"
    },
    "Settings": {
        "SourceConnector": "PaymentHub"
    }
}
Recurring card payment
{
    "SuccessURL": "https://www.example.com/success",
    "FailureURL": "https://www.example.com/error",
    "Payer": {
        "Contact": {
            "SalesforceFields": {
                "FirstName": "Test",
                "LastName": "Payment",
                "Email": "testpayment@findock.com"

            }
        }
    },
    "OneTime" : {
        "Amount" : "0.01"
    },
    "Recurring": {
        "Amount": "25",
        "Frequency": "Monthly",
        "StartDate": "2020-11-01"
    },
    "PaymentMethod": {
        "Name": "CreditCard",
        "Processor": "Axerve-for-findock"
    },
    "Settings": {
        "SourceConnector": "PaymentHub"
    }
}