Worldpay is a global payment service provider headquartered in the United States.
If you have a Worldpay Business Gateway 350 account, please use the BG350 instructions.
| Payment Method | Currency | One-time | Recurring | Initial Recurring | Refunds |
|---|---|---|---|---|---|
| Apple Pay | Multi | Optional | |||
| Card | Multi | Optional | |||
| Google Pay | Multi | Optional |
| Payment Method | Online Flow | API | MOTO | Data Entry | Initiate Refund |
|---|---|---|---|---|---|
| Apple Pay | Redirect | ||||
| Card | Redirect | ||||
| Google Pay | Redirect |
- FinDock is installed and configured.
- WebHub is connected.
- You have a contract for Corporate Gateway (now known as Payment Gateway) with one or more merchant codes.
Follow the standard procedure for installing payment processors to add the Worldpay payment extension and activate the card payment method.
Check and assign the required permissions. If you are using custom permission set groups, ensure the package-specific permission sets are assigned.
Configuring the Worldpay extension requires actions in FinDock and in the Worldpay merchant portal. You will need to keep both open in separate types so you can copy-paste information between the two.
Worldpay installations after the May '24 release include multi-merchant support. This can be activated for older installations through the Worldpay payment extension settings. Once enabled, FinDock automatically migrates existing targets to the new configuration. Zero authorization and a default target need to be manually set.
To configure the Worldpay extension, you first need to do a few things in the Worldpay merchant portal. Use your corporate account credentials for the Worldpay login.
After logging in, select the merchant code and application you want to integrate with FinDock. For further information about the Merchant Admin Interface, please visit the Worldpay support documentation.
Testing the Worldpay integration requires a test setup with Production Mode.
To prepare a Worldpay merchant code for FinDock:
- In the left-hand menu, enable Production Mode.
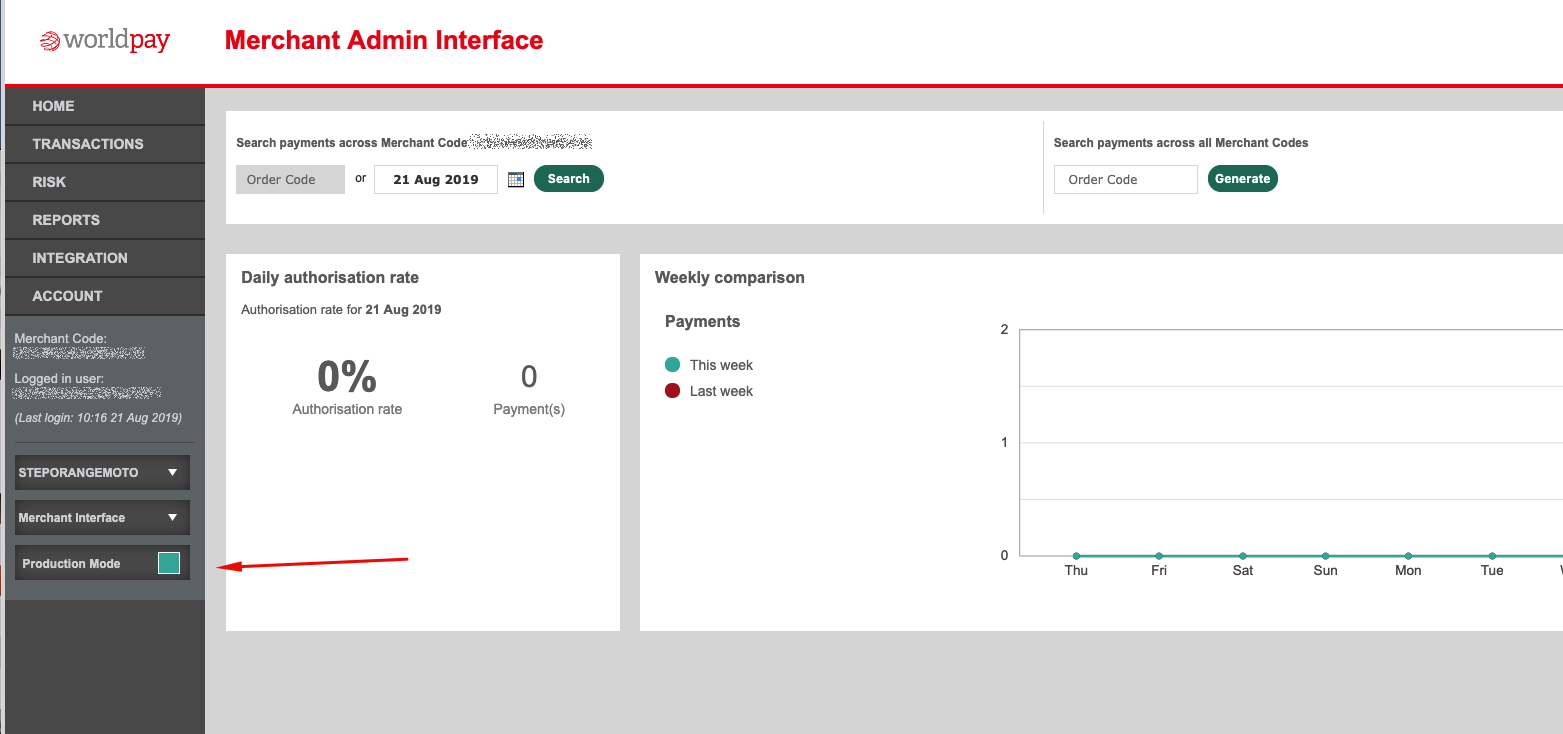
- Click INTEGRATION in the left-hand menu, and then select the Merchant Channel tab.

- Under Merchant Channels (test or production, depending on what phase of development you are in), set the http protocol to active, select xml as the content type.
- Pause here. Keep the admin interface open and in another tab, go to the FinDock setup.
Keep the Merchant Admin Interface open while you configure FinDock. Some information from your Worldpay account is needed for the FinDock settings.
When using Worldpay to collect recurring credit card transactions in bulk, you need a Target that allows the bulk upload to be correctly routed to Worldpay.
To create a target for Worldpay:
- Launch the FinDock app and click the FinDock Setup tab.
- Click Processors & Methods in the left-hand menu.
- On the Installed tab, click the Worldpay processor entry.
- On the Accounts tab, click Add account.
- Fill in the Worldpay target settings as described below.
- Name: Add a name for the Worldpay account (distinguishable from other targets).
- Notification URL: this is automatically filled by the Notification Gateway and shown on the target once you save the target.
- Merchant Code: enter here your code from the ACCOUNT page of the Worldpay Merchant Admin Interface.
- XML API Username: copy-paste here the Original XML Username from the ACCOUNT page of the Worldpay Merchant Admin Interface
- XML API Password: copy-paste here the XML Password from the ACCOUNT page of the Worldpay Merchant Admin Interface.
- XML API Endpoint: the Worldpay service endpoint for authorizations and transactions. Enter the endpoint depending on whether you are configuring a sandbox (test) or production org.
- Test:
https://secure-test.worldpay.com/jsp/merchant/xml/paymentService.jsp - Production:
https://secure.worldpay.com/jsp/merchant/xml/paymentService.jsp
- Test:
- Currency: Enter your default currency. If your org has multi-currency support enabled, this setting is ignored, and the currency of the installment is used instead.
- Records Per File: unless otherwise instructed, leave this at the default value. If the number of transactions exceeds this threshold, FinDock creates multiple files for bulk collection.
- Batch XML Version: change the default version only if you have a specific reason for doing so
- Upload Copy to Chatter: enable if you want the generated bulk payment file that is sent to Worldpay to also be uploaded to Chatter. NOTE: If uploading is disabled, FinDock does not store the file anywhere in Salesforce.
- Use 0-authorization: Enable zero authorization for setting up recurring payment is set up. Do not enable until this feature is activated for you. See below for details.
- Worldpay Account Group Name: If you have multiple merchant codes configured as targets, and these are related to different Worldpay merchant accounts, enter a group name to tie together targets from the same account. This enables card reuse for MOTO payments across merchant codes from the same account group. The name can be your Worldpay admin code or a unique value of your own. Leave this field empty if you have only one target (one merchant code) configured or if all targets are from one Worldpay account.
- Click Save.
Now you need to complete the integration by adding the generated Notification URL for your new target into the Worldpay Admin Interface.
- Go back to the admin interface where you left off earlier.
- Copy-paste the notification URL from your target setup into the address field. If you are setting up a test org, the URL should look like this:
https://notifications.test.findock.com/xxxxxxx/PaymentHub-WorldPay/<target-name>/ - Click Save Settings when you are done.
Repeat the above procedures for each Worldpay merchant code you want to integrate with FinDock. When you are done, go to the Worldpay extension setup and set one of the targets as your default target. You need to save a default even if you have only one target configured.
The Worldpay-FinDock integration is unique when it comes to collection recurring payments. Recurring card payments are collected through Worldpay using payment schedules. However, the Worldpay integration is a hybrid of filed-based and API-based collection processes.
When you run a payment schedule for Worldpay, FinDock generates a file that is automatically sent to Worldpay. The file starts the payment collection process, but the follow-up, the reconciliation, is handled through notifications from Worldpay. In other words, the initiation happens in bulk, while the collection of each installment in that file is confirmed one by one through notifications.
Worldpay for FinDock supports both partial and full refunds. The refund handling differs based on the refund type:
- Full refund: the status of the installment is set to Reversed and a negative payment with the full refund amount is created.
- Partial refund: the status of installment is set to Partially paid and a negative payment with the amount of the partial refund is created.
The following table contains the full range of status mappings between Worldpay and FinDock.
| Worldpay status | FinDock status |
|---|---|
| SENT_FOR_AUTHORISATION | Pending Processing |
| AUTHORISED | Collected |
| CAPTURED | Collected |
| SETTLED | Collected |
| CHARGED_BACK | Reversed* |
| REFUSED | Failed |
| ERROR | Failed |
| CANCELLED | Failed |
| EXPIRED | Failed |
| REFUNDED | Reversed* |
| REFUNDED_BY_MERCHANT | Reversed* |
* Or the status is set to Partially paid if amount is less than installment amount.
These Worldpay wallet methods are treated as alternative payment methods for card payments. No additional configuration is needed in the FinDock extensions (no separate payment methods to enable). The payment profile associated with Apple Pay or Google Pay uses the credit card record type. The Wallet Type field indicates which digital wallet is used.
For recurring payments with Apply Pay or Google Pay, you collect future installments using payment schedules. These installments are automatically included in payment schedules when CreditCard is the payment method.
When creating a new recurring card payments through Worldpay, you normally need to include a nominal initial one-time payment. The initial payment is used to verify the cardholder details.
For online payments via the Payment API, if the payer entered incorrect information, that initial payment fails. The payer learns this immediately from the Worldpay hosted payment page.
For MOTO payments, the recurring payment setup separates the verification (shopper tokenization) from the payment request, bypassing the need for an initial payment. This process ensures the recurring payment authorization, but if something is incorrect with the cardholder information, the actual payment collection fails. This is difficult to rectify as the payer is no longer present to correct the information.
ACTION REQUIRED You need to contact Worldpay to have them enable zero authorization for your account (per merchant code) before you can use it with FinDock.
The zero authorization (0-authorization) flow offers immediate cardholder verification without requiring an initial nominal amount for a new recurring payment. In other words, 0-authorization is a method of validating cardholder details by using a payment with an amount of 0.
With this flow, FinDock uses a different callout to Worldpay that combines the shopper token setup with the recurring payment request. For MOTO payments, for example, this allows immediate verification of the cardholder details with the card issuer. If there is a problem, agents will see the errors in the FinDock Payment component so they can be fixed while the payer is still present.
For MOTO payments, 0-authorization is automatically used to set up recurring payments when this 0-authorization is enabled on the selected target. For payments via the FinDock Payment API, 0-authorization is optional even when enabled for the given target. To use 0-authorization via the API, you simply leave out the otherwise mandatory OneTime object from the recurring payment API request.
To test your Worldpay configuration, you can use the following API messages.
If your configuration is correct, you should be able to navigate to the RedirectURL provided in the response and pay the amount specified. When a redirect ends in an unexpected error, the error message is stored in the last status reason of the installment.
In production, recurring credit card tokens are created with an initial lifetime of four years. In testing, tokens are created with a lifetime of seven days.
{
    "SuccessURL": "https://www.example.com/success",
    "FailureURL": "https://www.example.com/error",
    "Payer": {
        "Contact": {
            "SalesforceFields": {
                "FirstName": "Test",
                "LastName": "Payment",
                "Email": "testpayment@findock.com"
            }
        }
    },
    "OneTime": {
        "Amount": "15"
    },
    "PaymentMethod": {
        "Name": "CreditCard",
        "Processor": "PaymentHub-WorldPay"
        "Target": "WorldPay2"
    },
    "Settings": {
        "SourceConnector": "PaymentHub"
    }
}{
"SuccessURL": "https://www.example.com/success",
"FailureURL": "https://www.example.com/error",
"Payer": {
"Contact": {
"SalesforceFields": {
"FirstName": "Test",
"LastName": "Payment",
"Email": "testpayment@findock.com"
}
}
},
"OneTime" : {
"Amount" : "0.01"
},
"Recurring": {
"Amount": "25",
"Frequency": "Monthly",
"StartDate": "2020-12-05"
},
"PaymentMethod": {
"Name": "CreditCard",
"Processor": "PaymentHub-WorldPay",
"Target": "WorldPay2",
"Parameters":{
"Description":"test"
}
},
"Settings": {
"SourceConnector": "PaymentHub"
}
}If 0-authorization is used for your Worldpay target, you need to exclude the one-time payment block from the message since it is not needed to set up the new recurring payment.
{
    "SuccessURL": "https://www.example.com/success",
    "FailureURL": "https://www.example.com/error",
    "Payer": {
        "Contact": {
            "SalesforceFields": {
                "FirstName": "Test",
                "LastName": "Payment",
                "Email": "testpayment@findock.com"
            }
        }
    },
    "Recurring": {
        "Amount": "25",
        "Frequency": "Monthly",
        "StartDate": "2020-12-05"
    },
  "PaymentMethod": {
        "Name": "CreditCard",
        "Processor": "PaymentHub-WorldPay",
        "Target": "WorldPay2",
        "Parameters":{
              "Description":"test with 0-auth"
            }
    },
    "Settings": {
        "SourceConnector": "PaymentHub"
    }
}